Configure a mail server is one of top sysadmins nightmares, here i will try to make your painful journey a bit less unpleasant.
Starting from Centos 7 minimal install.
If in any moment something doesn’t work just leave a comment and i will try to give you some feedback
Before run this guide ensure that:
- Your server has an public ip
- Your ISP will configure a reverse dns for your public ip
- You can modify DNS records for all domains that you can attach to your new mailserver
Step 1: Enable extra repositories
yum install epel-release

yum -y install http://nginx.org/packages/centos/7/noarch/RPMS/nginx-release-centos-7-0.el7.ngx.noarch.rpm

yum -y update
Step 2: install packages
yum -y install perl-MailTools perl-MIME-EncWords perl-Email-Valid perl-Test-Pod roundcubemail dovecot dovecot-mysql dovecot-pigeonhole perl-Mail-Sender perl-Log-Log4perl imapsync offlineimap amavisd-new clamav perl-Razor-Agent mariadb-server opendkim vim wget crypto-utils mod_ssl.x86_64 nginx php php-mysql php-fpm clamav-update php-imap.x86_64 NetworkManager-tui mailx lrzip lzop lz4 arj unzoo cabextract p7zip fail2ban php-mcrypt.x86_64
yum install http://pkgs.repoforge.org/unrar/unrar-5.0.3-1.el7.rf.x86_64.rpm
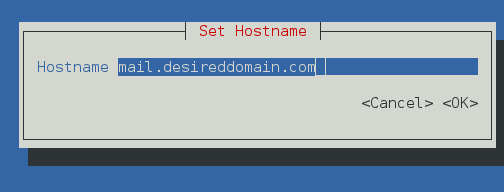
Step 3: Change your servers hostname
To avoid problems with hostname resolution the easy way is use NotworkManager-tui to set you hostname to a FQDN, when you configure your MX registers these point to a hostname, like mail.mydomain.com select your desired FQDN and execute
nmtui
this will show nmtui dialog
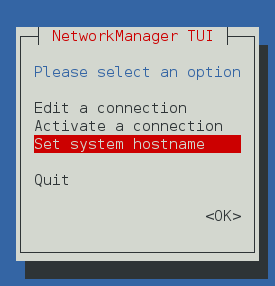 select Set system hosname
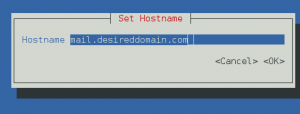 put your desired hostname and click OK
finaly exit nmtui
and apply changues
systemctl restart systemd-hostnamed
Step 4: Verify postifx local delivery
At this step we will ensure that postfix can send email to local users firstly we will add a two new users joe and alfred
useradd -d /home/joe -M -N -s /sbin/nologin joe
we will send a local mail
echo "Hello" | mail -s "test" joe@localhost
and verify if mail has been delivered
tail /var/log/maillog
May  6 18:57:34 localhost postfix/pickup[1705]: 3D20F1000ED: uid=0 from=<root>
May  6 18:57:34 localhost postfix/cleanup[2444]: 3D20F1000ED: message-id=<20150506165734.3D20F1000ED@mail.yourfqdn.com>
May  6 18:57:34 localhost postfix/qmgr[1706]: 3D20F1000ED: from=<root@mail.yourfqdn.com>, size=494, nrcpt=1 (queue active)
May  6 18:57:34 localhost postfix/local[2446]: 3D20F1000ED: to=<joe@localhost.yourfqdn.com>, orig_to=<joe@localhost>, relay=local, delay=0.11, delays=0.07/0.03/0/0.01, dsn=2.0.0, status=sent (delivered to mailbox)
May  6 18:57:34 localhost postfix/qmgr[1706]: 3D20F1000ED: removed
if it’s delivered next step is add a domain like centostestmail.com
vim /etc/postfix/main.cf
edit myhostname property near line 77
myhostname= yourfqdndomain
near line 164
mydestination = $myhostname, localhost.$mydomain, localhost, centostestmail.com
finaly execute
systemctl restart postfix.service
verify that postfix is running
systemctl status postfix.service
if postfix is running we will verify if postfix delivers mail to adress with domain centostestmail.com
echo "Hello" | mail -s "test" joe@centostestmail.com
verify if mail has been delivered
tail /var/log/maillog
ay  6 19:58:01 mail postfix/pickup[2818]: 9AC9D10025A: uid=0 from=<root>
May  6 19:58:01 mail postfix/cleanup[2829]: 9AC9D10025A: message-id=<20150506175801.9AC9D10025A@mail.yourfqdn.com>
May  6 19:58:01 mail postfix/qmgr[2819]: 9AC9D10025A: from=<root@mail.yourfqdn.com>, size=459, nrcpt=1 (queue active)
May  6 19:58:01 mail postfix/local[2831]: 9AC9D10025A: to=<joe@centostestmail.com>, relay=local, delay=0.14, delays=0.1/0.04/0/0.01, dsn=2.0.0, status=sent (delivered to mailbox)
May  6 19:58:01 mail postfix/qmgr[2819]: 9AC9D10025A: removed
if your log appears like example we can move to the next step
Step 5: Configure Clam Antivirus
If you want to run a mail server you will be a happy sysadmin if you put an antivirus inspecting incoming mail. Minimize viruses risk is a plus. In my case I will use clam.
setsebool -P antivirus_use_jit on
we need to configure how clam refreshes his database
vim /etc/sysconfig/freshclam
comment or remove last line
# FRESHCLAM_DELAY=disabled-warn # REMOVE ME
now we will make a edit clamav config file
vim /etc/freshclam.conf
remove the line that puts
example
finally update your viruses database
freshclam
after we get an updated antivirus we should check if it’s working as expected for these purposes there’s a string called EICAR that should be detected as a virus always.
download EICAR string
wget http://www.eicar.org/download/eicar.com
analyze EICAR string
clamscan --infected --remove eicar.com
output should be like these
eicar.com: Eicar-Test-Signature FOUND
eicar.com: Removed.

----------- SCAN SUMMARY -----------
Known viruses: 3802265
Engine version: 0.98.6
Scanned directories: 0
Scanned files: 1
Infected files: 1
Data scanned: 0.00 MB
Data read: 0.00 MB (ratio 0.00:1)
Time: 27.957 sec (0 m 27 s)
Step 6: Configure basic settings in spamassasin
At this point we have an antivirus in our server that is’s updated every 3 hours, viruses is a problem for our users but the BIG problem is spam, most of your users incoming mail will be spam, and our users will complaining about that they can work because lost his precious time removing spam in his incoming mail, another part will be losing her time buying magical blue pills, expensive watches and helping African kings moving her money outside Africa.
Anyway first step is configure selinux
setsebool -P spamassassin_can_network on
enable spamassasin service
systemctl start spamassassin.service
systemctl status spamassassin.service
systemctl enable spamassassin.service
update spamassasin definitions
sa-update
a cron task is added when you install spamassin that will update spamassasin definitions is located at /etc/cron.d/sa-update
Step 7: Integrate spamassasin and clamav with amavisd
At this point clamav and spamassasin are isolated services for integrate these elements we will use amavisd he will be responsive of deliver mails in order of get a virus and spam check.
Clamav is not a lightweight service instead launch a local copy for every mail, we load a service to be ready faster.
we need to provide some config files
cp /usr/share/doc/clamav-server*/clamd.sysconfig /etc/sysconfig/clamd.amavisd
we need to adapt config file to our actual configuration
vi /etc/sysconfig/clamd.amavisd
CLAMD_CONFIGFILE=/etc/clamd.d/amavisd.conf
CLAMD_SOCKET=/var/run/clamd.amavisd/clamd.sock
we will create a couple of new files
vi /etc/tmpfiles.d/clamd.amavisd.conf
add this content
d /var/run/clamd.amavisd 0755 amavis amavis -
vi /usr/lib/systemd/system/clamd@.service
with this content
[Unit]
Description = clamd scanner (%i) daemon
After = syslog.target nss-lookup.target network.target
[Service]
Type = simple
ExecStart = /usr/sbin/clamd -c /etc/clamd.d/%i.conf --nofork=yes
Restart = on-failure
PrivateTmp = true
[Install]
WantedBy=multi-user.target
now we can enable clamd@amavisd service
systemctl start clamd@amavisd

systemctl enable clamd@amavisd
now we need configure amavisd service
vim /etc/amavisd/amavisd.conf
at line 16 set number of amavisd childrens
more childres uses more ram but delivers more mail at once, one amavisd children consumes near 40% of cpu in a low end server, be careful if you receive a lot of mails at once can be a big punch in your cpu have too many childrens
$max_servers = <a number>
at line 20 set $mydomain we need to put step 3 domain name
$mydomain = ‘desireddomain.com’;
at line 152 aprox set your hostname
$myhostname= ‘mail.desireddomain.com’;
systemctl start amavisd.service
after this we must search in file /var/log/maillog strings like these
Mar 19 17:51:48 mail amavis[21284]: ANTI-SPAM-SA code loaded
Mar 19 17:51:48 mail amavis[21284]: Using primary internal av scanner code for ClamAV-clamd
to ensure that amavisd detects our antivirus and spamassasin
next step is enable service
systemctl enable amavisd.service
Step 8:Integrate postfix with amavisd
Amavisd will pass all incoming mail to our antivirus and antispam and verify that we are receiving a clean mail, but at this moment we have postfix and amavisd isolated, we need make a small integration.
vim /etc/postfix/main.cf
append this line at the end
content_filter=smtp-amavis:[127.0.0.1]:10024
vim /etc/postfix/master.cf
append these lines at the end
smtp-amavis unix -      -       n       -       6       smtp
        -o smtp_data_done_timeout=1200
        -o smtp_send_xforward_command=yes
        -o disable_dns_lookups=yes
127.0.0.1:10025 inet n  -       n      -        -       smtpd
        -o content_filter=
        -o local_recipient_maps=
        -o relay_recipient_maps=
        -o smtpd_restriction_classes=
        -o smtpd_client_restrictions=
        -o smtpd_helo_restrictions=
        -o smtpd_sender_restrictions=
        -o smtpd_recipient_restrictions=permit_mynetworks,reject
        -o mynetworks=127.0.0.0/8
        -o strict_rfc821_envelopes=yes
        -o smtpd_error_sleep_time=0
        -o smtpd_soft_error_limit=1001
        -o smtpd_hard_error_limit=1000
in line smtp-avavis unix – – n – <number> smtp
try that number value be the same that amavisd children
restart postfix service
systemctl stop postfix.service

systemctl start postfix.service
now we need to check that our postfix and amavisd service are integrated, the easy way is send an spam mail and a virus mail, one with gtube string another with eicar
we need to put EICAR and GTUBE strings in a mail.
EICAR String
Gtube String

after send this couple of test you need to check in /var/log/maillog and output like these
May 7 00:20:14 mail postfix/pickup[4434]: 578BA100322: uid=0 from=&lt;root&gt;
May 7 00:20:14 mail postfix/cleanup[4458]: 578BA100322: message-id=&lt;20150506222014.578BA100322@mail.yourfqdn.com&gt;
May 7 00:20:14 mail postfix/qmgr[4435]: 578BA100322: from=&lt;root@mail.yourfqdn.com&gt;, size=527, nrcpt=1 (queue active)
May 7 00:20:15 mail amavis[2388]: (02388-02) Blocked SPAM {DiscardedOpenRelay,Quarantined}, &lt;root@mail.yourfqdn.com&gt; -&gt; &lt;joe@centostestmail.com&gt;, Message-ID: &lt;20150506222014.578BA100322@mail.yourfqdn.com&gt;, mail_id: TcgB4ovK5t1h, Hits: 999.999, size: 527, 1596 ms
May 7 00:20:15 mail postfix/smtp[4460]: 578BA100322: to=&lt;joe@centostestmail.com&gt;, relay=127.0.0.1[127.0.0.1]:10024, delay=1.6, delays=0.03/0/0.01/1.6, dsn=2.7.0, status=sent (250 2.7.0 Ok, discarded, id=02388-02 - spam)
May 7 00:20:15 mail postfix/qmgr[4435]: 578BA100322: removed
May 7 00:20:22 mail postfix/pickup[4434]: 4D335100323: uid=0 from=&lt;root&gt;
May 7 00:20:22 mail postfix/cleanup[4458]: 4D335100323: message-id=&lt;20150506222022.4D335100323@mail.yourfqdn.com&gt;
May 7 00:20:22 mail postfix/qmgr[4435]: 4D335100323: from=&lt;root@mail.yourfqdn.com&gt;, size=527, nrcpt=1 (queue active)
May 7 00:20:22 mail clamd[1084]: /var/spool/amavisd/tmp/amavis-20150507T001929-02391-G5h5_dlo/parts/p002: Eicar-Test-Signature FOUND
May 7 00:20:22 mail clamd[1084]: /var/spool/amavisd/tmp/amavis-20150507T001929-02391-G5h5_dlo/parts/p001: Eicar-Test-Signature FOUND
May 7 00:20:22 mail amavis[2391]: (02391-02) Blocked INFECTED (Eicar-Test-Signature) {DiscardedOpenRelay,Quarantined}, &lt;root@mail.yourfqdn.com&gt; -&gt; &lt;joe@centostestmail.com&gt;, Message-ID: &lt;20150506222022.4D335100323@mail.yourfqdn.com&gt;, mail_id: yIy3drLObXjq, Hits: -, size: 527, 134 ms
May 7 00:20:22 mail postfix/smtp[4460]: 4D335100323: to=&lt;joe@centostestmail.com&gt;, relay=127.0.0.1[127.0.0.1]:10024, delay=0.16, delays=0.02/0/0.01/0.13, dsn=2.7.0, status=sent (250 2.7.0 Ok, discarded, id=02391-02 - INFECTED: Eicar-Test-Signature)
May 7 00:20:22 mail postfix/qmgr[4435]: 4D335100323: removed
Step 9: Configure mariadb
At this point we have a working postfix mail server with antivirus and antispam, at this point we can add local user accounts and they will get a mail account. But i prefer to have all users in a database and foget to have hundreds of accounts
vim /etc/my.cnf.d/server.cnf
#
# These groups are read by MariaDB server.
# Use it for options that only the server (but not clients) should see
#
# See the examples of server my.cnf files in /usr/share/mysql/
#

# this is read by the standalone daemon and embedded servers
[server]
innodb_file_per_table
innodb_file_format = Barracuda
# this is only for the mysqld standalone daemon
[mysqld]

# this is only for embedded server
[embedded]

# This group is only read by MariaDB-5.5 servers.
# If you use the same .cnf file for MariaDB of different versions,
# use this group for options that older servers don't understand
[mysqld-5.5]

# These two groups are only read by MariaDB servers, not by MySQL.
# If you use the same .cnf file for MySQL and MariaDB,
# you can put MariaDB-only options here
[mariadb]

[mariadb-5.5]
enable mariadb service
systemctl enable mariadb.service
Start mariadb database server
systemctl start mariadb.service
secure mariadb installation
mysql_secure_installation
follow screen instructions
Optional: if you will need access to database open port using this command
firewall-cmd --permanent --add-service=mysql
firewall-cmd --reload
Remember configure a backup script for your database
Step 10: Generate SSL Certificate
genkey --days 3650 mail.yourdamain.com
follow on screen instructions and this will generate two files.
private part of certificate at
/etc/pki/tls/certs/mail.yourdomain.com.0.csr
and public part of certificate at
/etc/pki/tls/private/mail.yourdomain.com.key
you should get your certificate signed by a certification autority search for one pay and follor certification authority instructions 🙁
Step 11: Create a user account and a folder were store mails
mkdir /var/vmail
chmod 770 /var/vmail/
useradd -r -u 101 -g mail -d /var/vmail/ -s /sbin/nologin -c &quot;Virtual Mailbox&quot; vmail
chown vmail:mail /var/vmail/
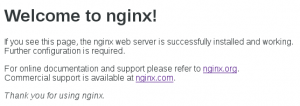
Step 12: Configure nginx
Fist step is verify that nginx server is installed and working
systemctl enable nginx.service
systemctl start nginx.service

firewall-cmd --permanent --zone=public --add-service=http
firewall-cmd --permanent --zone=public --add-service=https
firewall-cmd --reload
select your favorite webbrowser and navigate to your server ip
you should see something like this
Step 13: Configure php
vim /etc/php.ini
line 763 should be
cgi.fix_pathinfo=0
line 878 should be your timezone
search here http://php.net/manual/en/timezones.php
date.timezone = Continent/Country
Step 14: Configure PostfixAdmin
in my case i will create a domain like mailadmin.yourdomain.com
we have to download postfixadmin
wget http://downloads.sourceforge.net/project/postfixadmin/postfixadmin/postfixadmin-2.92/postfixadmin-2.92.tar.gz
and move to a valid ubication
mv postfixadmin-2.92.tar.gz /var/www

cd /var/www

tar xzvf postfixadmin-2.92.tar.gz

rm postfixadmin-2.92.tar.gz

mv postfixadmin-2.92/ postfixadmin.yourdomain.com

chown -R  nginx:nginx postfixadmin.yourdomain.com

mkdir /var/lib/php/postfixadmin.yourdomain.com
disable php-fpm default socket
mv /etc/php-fpm.d/www.conf /etc/php-fpm.d/www.conf.dis
create a php-fpm postfixadmin socket
vim /etc/php-fpm.d/postfixadmin.yourdomain.com.conf
[postfixadmin.yourdomain.com]
listen = /var/run/php-fpm/postfixadmin.yourdomain.com.socket
listen.allowed_clients = 127.0.0.1
user = nginx
group = nginx
pm = dynamic
pm.max_children = 50
pm.start_servers = 5
pm.min_spare_servers = 3
pm.max_spare_servers = 35
slowlog = /var/log/php-fpm/postfixadmin.log
rlimit_files = 1024
rlimit_core = 0
chdir = /var/www/postfixadmin.yourdomain.com
php_flag[display_errors] = off
php_admin_value[error_log] = /var/log/php-fpm/postfixadmin.yourdomain.com-error.log
php_admin_flag[log_errors] = on
php_admin_value[memory_limit] = 128M
php_value[session.save_handler] = files
php_value[session.save_path] = /var/lib/php/postfixadmin.yourdomain.com
start php-fpm service
systemctl start php-fpm.service
check if php-fpm has started
systemctl status php-fpm.service
output should appear like these
php-fpm.service - The PHP FastCGI Process Manager
   Loaded: loaded (/usr/lib/systemd/system/php-fpm.service; disabled)
   Active: active (running) since Thu 2015-05-07 00:52:05 CEST; 2s ago
 Main PID: 5499 (php-fpm)
   Status: ;Ready to handle connections;
   CGroup: /system.slice/php-fpm.service
           ├─5499 php-fpm: master process (/etc/php-fpm.conf)
           ├─5501 php-fpm: pool postfixadmin.yourdomain.com
           ├─5502 php-fpm: pool postfixadmin.yourdomain.com
           ├─5503 php-fpm: pool postfixadmin.yourdomain.com
           ├─5504 php-fpm: pool postfixadmin.yourdomain.com
           └─5505 php-fpm: pool postfixadmin.yourdomain.com

May 07 00:52:05 yourfqdn systemd[1]: Started The PHP FastCGI Process Manager.
enable php-fpm service to start at boot
systemctl enable php-fpm.service
Next we need to create postfix user database from a shell execute:
mysql -u root -p -e &quot;CREATE DATABASE postfix;&quot;
mysql -u root -p -e &quot;CREATE USER postfix@localhost IDENTIFIED BY 'put_here_your_password';&quot;
mysql -u root -p -e &quot;GRANT ALL PRIVILEGES ON postfix . * TO postfix@localhost;&quot;
at this point we need to create a host for postfixadmin in nginx
I will use a selfsigned certificate for https you can pay a certification authority to bypass bad certificate errors in your browser
genkey --days 3650 postfixadmin.yourdomain.com
follow screen instructions, if you put a password in your keys every time that you reboot your system you will need to put that
trick- collecting random data could take a lot of time, to acelerate this process you can dowload a linux distro iso to acelerate this process, it reads data from network card
vim /etc/nginx/conf.d/put_here_your_postfixadmin_domain.conf
server {
listen 80;
server_name postfixadmin.yourfqdn.com;
error_log /var/log/nginx/postfixadmin.yourfqdn.com.error.log warn;
access_log /var/log/nginx/postfixadmin.yourfqdn.com.access.log;
return 301 https://$server_name$request_uri; # enforce https
}
server {
listen 443 ssl;
server_name postfixadmin.yourfqdn.com;
error_log /var/log/nginx/postfixadmin.yourfqdn.com.secure.error.log warn;
access_log /var/log/nginx/postfixadmin.yourfqdn.com.secure.access.log;
root /var/www/postfixadmin.yourfqdn.com;
index index.php;
charset utf-8;
## SSL settings
ssl_certificate //etc/pki/tls/certs/postfixadmin.yourfqdn.com.crt;
ssl_certificate_key /etc/pki/tls/private/postfixadmin.yourfqdn.com.key;
ssl_protocols TLSv1.2;
ssl_ciphers &quot;EECDH+ECDSA+AESGCM:EECDH+aRSA+AESGCM:!aNULL:!eNULL:!LOW:!3DES:!MD5:!EXP:!PSK:!SRP:!DSS:!RC4&quot;;
ssl_prefer_server_ciphers on;
ssl_session_cache shared:SSL:10m;
ssl_session_timeout 10m;
ssl_ecdh_curve secp521r1;
add_header Strict-Transport-Security max-age=31536000;
# add_header X-Frame-Options DENY;
# auth_basic &quot;Restricted area&quot;;
# auth_basic_user_file /etc/nginx/passwd;
location / {
try_files $uri $uri/ index.php;
}
location ~* \.php$ {
try_files $uri =404;
fastcgi_split_path_info ^(.+\.php)(/.+)$;
include fastcgi_params;
fastcgi_pass unix:/var/run/php-fpm/postfixadmin.yourfqdn.com.socket;
fastcgi_index index.php;
fastcgi_param SCRIPT_FILENAME $document_root$fastcgi_script_name;
}
}
we need to allow in selinux communication between nginx and php-fpm
setsebool -P httpd_can_network_connect on
and allow selinux that permits nginx to write files in server
setsebool -P httpd_unified on
and allow php-fpm to write session files
chown nginx:nginx /var/lib/php/postfixadmin.yourdomain.com
now configure postfixadmin parameters
vim /var/www/postfixadmin.yourdomain.com/config.inc.php
it’s self explanatory but you will need to changue these parameters
$CONF['configured'] = true;
$CONF['setup_password'] = 'puthereastrongpassword';
$CONF['database_type'] = 'mysqli';
$CONF['database_host'] = 'localhost';
$CONF['database_user'] = 'postfix';
$CONF['database_password'] = 'yourpassword';
$CONF['database_name'] = 'postfix';
$CONF['emailcheck_resolve_domain']='NO';
$CONF['default_aliases'] = array (
'abuse' =&gt; 'abuse@amaindomainthatyouwilluse.com',
'hostmaster' =&gt; 'hostmaster@amaindomainthatyouwilluse.com',
'postmaster' =&gt; 'postmaster@amaindomainthatyouwilluse.com',
'webmaster' =&gt; 'webmaster@amaindomainthatyouwilluse.com'
);
we will need restart nginx again to enable postfixadmin site
systemctl restart nginx.service
now we can setup our postfixadmin instance
open in your browser
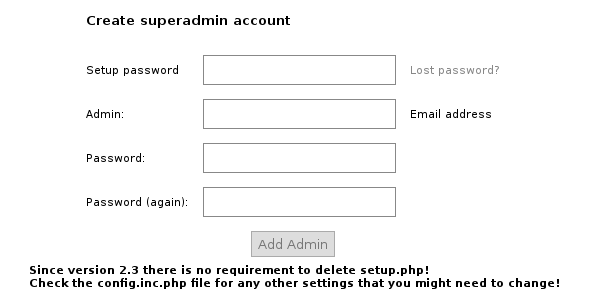
https://postfixadmin.yourdomain.com/setup.php
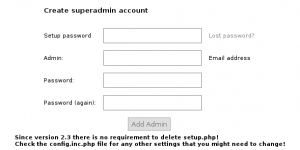 fill all data and follow instructions
finally access to https://postfixadmin.yourdomain.com and login in order to configure your domains
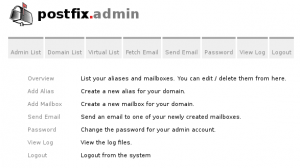
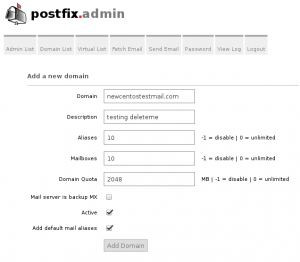
we will create one test domain like newcentostestmail.com
in tab Domain List we will select new domain
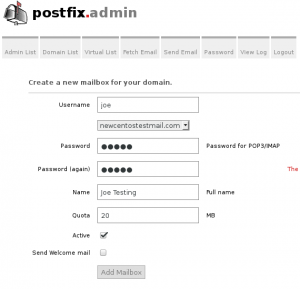
 after add new domain we will create a mailbox
go to Domain List -> Domain List
click on newcentostestmail.com
an Add Mailbox and create joe@newcentostestmail.com mailbox
 finally we have created a mailbox we need to link our database with postfix
step 15: Cleanup some test config
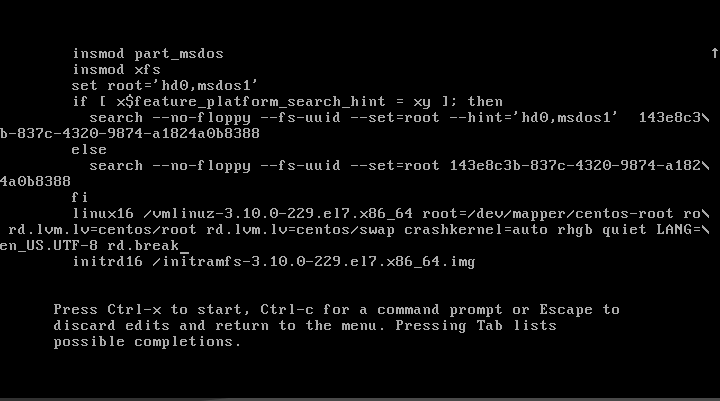
Do you want to have a user in your system called joe? you don’t
userdel joe
Do you want map mails from @centostestmail.com? neither
remove centostestmail.com from mydestination values
vim /etc/postfix/main.cf
at line 164 approx leave these values for mydestination
mydestination = $myhostname, localhost.$mydomain, localhost
restart postfix
systemctl restart postfix
step 16: Connect postfix with mariadb:
we have a database that contains a domain list and and a list of emails we need that postfix can access to database in order to read all data
because postfix and other components only will need read permisions we will create a only read user
mysql -u root -p -e &quot;CREATE USER postfixread@localhost IDENTIFIED BY 'put_here_your_password';&quot;
mysql -u root -p -e &quot;GRANT SELECT ON postfix . * TO postfixread@localhost ;&quot;
we will need to link three elements domains, mailboxes and aliases
we will start with domains
vim /etc/postfix/mysql-virtual_domains_maps.cf
using this content
hosts = localhost
user = postfixread
password = put_here_your_password
dbname = postfix
query = SELECT domain FROM domain WHERE domain='%s' AND backupmx = '0' AND active = '1'
vim /etc/postfix/mysql-relay_domains_maps.cf
using this content
hosts = localhost
user = postfixread
password = put_here_your_password
dbname = postfix
query = SELECT domain FROM domain WHERE domain='%s' and backupmx = '1'
next step are mailboxes
vim /etc/postfix/mysql-virtual_mailbox_maps.cf
with this content
hosts = localhost
user = postfixread
password = put_here_your_password
dbname = postfix
query = SELECT maildir FROM mailbox WHERE username='%s' AND active = '1'
vim /etc/postfix/mysql-virtual_mailbox_limit_maps.cf
hosts = localhost
user = postfixread
password = put_here_your_password
dbname = postfix
query = SELECT quota FROM mailbox WHERE username='%s' and active=1
and finally we need to configure aliases
vim /etc/postfix/mysql-virtual_alias_maps.cf
hosts = localhost
user = postfixread
password = put_here_your_password
dbname = postfix
query = SELECT goto FROM alias WHERE address='%s' AND active = '1'
now we need to link our sql queries with postfix config file
vim /etc/postfix/main.cf
at line 297 we need to paste this
relay_domains = proxy:mysql:/etc/postfix/mysql-relay_domains_maps.cf
at line 399 we need to paste this,
virtual_alias_maps = proxy:mysql:/etc/postfix/mysql-virtual_alias_maps.cf,
                     regexp:/etc/postfix/virtual_regexp
virtual_mailbox_base = /var/vmail
virtual_mailbox_domains = proxy:mysql:/etc/postfix/mysql-virtual_domains_maps.cf
virtual_mailbox_maps = proxy:mysql:/etc/postfix/mysql-virtual_mailbox_maps.cf
virtual_mailbox_limit_maps = proxy:mysql:/etc/postfix/mysql-virtual_mailbox_limit_maps.cf
virtual_minimum_uid = 101
virtual_uid_maps = static:101
virtual_gid_maps = static:12

proxy_read_maps = $local_recipient_maps $mydestination $virtual_alias_maps $virtual_alias_domains $virtual_mailbox_maps $virtual_mailbox_domains $relay_recipient_maps $relay_domains $canonical_maps $sender_canonical_maps $recipient_canonical_maps $relocated_maps $transport_maps $mynetworks $smtpd_sender_login_maps $sender_bcc_maps $recipient_bcc_maps $smtp_generic_maps $lmtp_generic_maps $alias_maps $virtual_mailbox_limit_maps
finally we need to create virtual_regexp file
touch /etc/postfix/virtual_regexp
if we restart postfix no problems should appear
systemctl restart postfix.service
if we check our maillog file
tail -f /var/log/maillog
we should see something like this
May  9 17:07:56 mail postfix/postfix-script[2967]: starting the Postfix mail system
May  9 17:07:56 mail postfix/master[2969]: daemon started -- version 2.10.1, configuration /etc/postfix
postfix has started and aparently it has been linked to our database but it’s better verify this
for this we will use postfixadmin but before we need to allow write in our virtual mail storage folder because our directory is not labeled
chcon -R -t mail_spool_t /var/vmail
now we will send a test email to a created mailbox in postfixadmin
echo &quot;Hello&quot; | mail -s &quot;test&quot; joe@newcentostestmail.com
in your maillog you should view something like these
tail /var/log/maillog
May 9 17:10:03 mail postfix/pickup[2970]: 1FD7C10041D: uid=0 from=&lt;root&gt;
May 9 17:10:03 mail postfix/cleanup[2992]: 1FD7C10041D: message-id=&lt;20150509151003.1FD7C10041D@mail.yourfqdn.com&gt;
May 9 17:10:03 mail postfix/qmgr[2971]: 1FD7C10041D: from=&lt;root@mail.yourfqdn.com&gt;, size=462, nrcpt=1 (queue active)
May 9 17:10:04 mail postfix/smtpd[3000]: connect from localhost[127.0.0.1]
May 9 17:10:04 mail postfix/smtpd[3000]: 295DD1004F0: client=localhost[127.0.0.1]
May 9 17:10:04 mail postfix/cleanup[2992]: 295DD1004F0: message-id=&lt;20150509151003.1FD7C10041D@mail.yourfqdn.com&gt;
May 9 17:10:04 mail postfix/qmgr[2971]: 295DD1004F0: from=&lt;root@mail.yourfqdn.com&gt;, size=943, nrcpt=1 (queue active)
May 9 17:10:04 mail amavis[2722]: (02722-01) Passed CLEAN {RelayedOpenRelay}, &lt;root@mail.yourfqdn.com&gt; -&gt; &lt;joe@newcentostestmail.com&gt;, Message-ID: &lt;20150509151003.1FD7C10041D@mail.yourfqdn.com&gt;, mail_id: Yppl42y970Wc, Hits: -0.001, size: 462, queued_as: 295DD1004F0, 975 ms
May 9 17:10:04 mail postfix/smtp[2997]: 1FD7C10041D: to=&lt;joe@newcentostestmail.com&gt;, relay=127.0.0.1[127.0.0.1]:10024, delay=1.2, delays=0.19/0.04/0.04/0.96, dsn=2.0.0, status=sent (250 2.0.0 from MTA(smtp:[127.0.0.1]:10025): 250 2.0.0 Ok: queued as 295DD1004F0)
May 9 17:10:04 mail postfix/qmgr[2971]: 1FD7C10041D: removed
May 9 17:10:04 mail postfix/virtual[3003]: 295DD1004F0: to=&lt;joe@newcentostestmail.com&gt;, relay=virtual, delay=0.09, delays=0.02/0.04/0/0.03, dsn=2.0.0, status=sent (delivered to maildir)
May 9 17:10:04 mail postfix/qmgr[2971]: 295DD1004F0: removed
Hurrah we have virtual mail
your sent mail should be at /var/vmail/newcentostestmail.com/joe/new
step 17: open smtp port, 25, and enable remote access in postfix
Our mailserver accepts connections from port 25 but only in localhost interface, that means that we can’t receive mail from a outside server and our users can’t send email from theirs applications.
firs of all we need to tell to postfix that listens from all interfaces
vim /etc/postfix/main.cf
at line 116 replace content with this
inet_interfaces = all
and restart postfix
systemctl restart postfix.service
postfix is listening at port 25 but firewalld is blocking any attemp from outside, we need to open port 25 in firewalld we just need to execute these commands
firewall-cmd --permanent --zone=public --add-service=smtp

firewall-cmd --reload
at this moment postfix should be contacted from any computer in the internet.
users, spammers, phishers and west Europe sexy women are ready to send tons of emails, we should check that this is correct.
from another computer execute this command
telnet &lt;mailserver ip&gt; 25
and you should get this output
Trying mailserver_ip...
Connected to mailserver_ip.
Escape character is '^]'.
220 mail.yourfqdn.com ESMTP Postfix
Eureka we can receive mails from a lot of people.
step 18: enable smtp security
At this moment if user try send an email using your new server, it only has support for smtp that is a plain protocol, that means that is really easy read communication contents and get his password. we don’t want this for us.
A long time ago, at the beginning of secure smtp times, that’s 1997. Some people decided that best way to secure smtp will be wrap it over a ssl or tls connection, that means that all connections should be realized starting a ssl/tls session since first data packet.
To differentiate secure and insecure smtp servers the best way it use a port for insecure smtp, 25, and another for secure connections 465. This strategy is a bit irritating because if another server want deliver a email in a secure mode it should verify if port 465 it’s opened.
Two years after some people decided that the best way should be implement STARTTLS this allows to secure our communication over a plain textcommunication at port 25.
using port 465 smtmps is deprecated and you shouldn’t give support.
if you remember at step 6 you generated a certificate located at
/etc/pki/tls/private/mail.yourdomain.com.key
/etc/pki/tls/certs/mail.yourdomain.com.0.csr
it’s recommendable have our certificate signed by and certification authority, sorry you must pay 🙁 . Otherwise you can generate a self-signed certificate which will you a lot of security warnings in mail clients.
openssl x509 -req -days 365 -in /etc/pki/tls/certs/mail.yourdomain.com.0.csr -signkey /etc/pki/tls/private/mail.yourdomain.com.key -out /etc/pki/tls/certs/mail.yourdomain.com.crt
we need to tell to postfix where are these certificates and enable smtps
vim /etc/postfix/main.cf

[text]
at the end of the file we need to append this content at the end of file
smtpd_tls_key_file = /etc/pki/tls/private/mail.yourfqdn.com.key
smtpd_tls_cert_file = /etc/pki/tls/certs/mail_yourfqdn_com.crt
smtpd_tls_CAfile = /etc/pki/tls/certs/intermediate.mail.yourfqdn.com.cer
postfix also needs to know that we want to use starttls appending this line
smtpd_tls_security_level = may
Once when we have our certificate variables setted we need restart our postfix service
systemctl restart postfix.service
and check /var/log/maillog output
tail /var/log/maillog
May  9 17:22:12 mail postfix/postfix-script[3614]: starting the Postfix mail system
May  9 17:22:12 mail postfix/master[3616]: daemon started -- version 2.10.1, configuration /etc/postfix
now we need to verify that our smtp port supports STARTTLS this can be done from another computer using telnet.
telnet mailserverip 25
Trying ...
Connected to .
Escape character is '^]'.
220 mail.yourfqdn.com ESMTP Postfix
ehlo testing
250-mail.mail.yourfqdn.com
250-PIPELINING
250-SIZE 10240000
250-VRFY
250-ETRN
250-STARTTLS
250-ENHANCEDSTATUSCODES
250-8BITMIME
250 DSN
You should have a line that puts 250-STARTTLS startttls is enabled
now we will check if ssl works
openssl s_client -starttls smtp -crlf -connect your_server_ip:25
this command should give info about your ssl certificate
step 19: Secure smtp ssl
Unfortunately during last months openssl and his protocols appears to be broken, this security problems should be resolved using two ways:
- maintain your Openssl packages updated.
- disable broken protocols and cyphers.
if you’re following this guide I assume that you know how to use yum update, next step is about cyphers and broken protocols.
openssl supports these protocols:
- SSLv2 broken
- SSLv3 broken https://poodle.io/
- TLS 1.0 Use for interoperability purposes where needed Has known issues that cannot be mitigated
- TLS 1.1 Use for interoperability purposes where needed Does not support modern cipher suites.
- TLS 1.2 Recommended version. Supports the modern AEAD cipher suites.
These protocols use different ciphers
- Minimal encryption should be 128bits.
- ADH Anonymous Diffie-Hellman doesn’t provide authentication
- NULL no encryption no party
- Export key exchange suites can be broken easily
- RC4 is prohibited RFC7465
- 3DES uses 112bits it’s strong but have performance problems avoid it
At this moment your STARTTLS configuration allow insecure protocols and insecure ciphers we need to fix this.
Simply append these content in your main.cf file
#Disable sslv2 ad SSLv3
smtpd_tls_protocols= !SSLv2, !SSLv3
smtpd_tls_mandatory_protocols= !SSLv2, !SSLv3

#set minimum TLS ciphers grade for tls
smtpd_tls_mandatory_ciphers = high

#use server ciphers instead client preference
tls_preempt_cipherlist = yes

#ciphers to exclude
smtpd_tls_mandatory_exclude_ciphers = aNULL, MD5 , DES, ADH, RC4, PSD, SRP, 3DES, eNULL
with this configuration you just avoided SSLv2, SSLv3 and remove insecure ciphers from TLS1.1
You should be tuned about security problems with openSSL.
step 20: enable Perfect forward secrecy in postfix
We have secured our SSL/TLS configuration? Yes
we can do more for our security? Yes
HOW? enabling Perfect forward secrecy.
perfect forward secrecy generates a public keys per session that means theoretically if our private key is compromised your information is secret.
There are two options
Prime-field groups (EDH) – Server uses a large prime number and a generator
Elliptic-curve groups (EECDH) – Instead a large prime serve uses a elliptic curve algorithm
To configure EDH we need to create some keys
openssl gendh -out /etc/postfix/dh_512.pem -2 512

openssl gendh -out /etc/postfix/dh_1024.pem -2 1024

openssl gendh -out /etc/postfix/dh_2048.pem -2 2048
append this lines in your /etc/postfix/main.cf
vim /etc/postfix/main.cf
#Perfect forwatd secrecy Prime Field Groups EDH
smtpd_tls_dh1024_param_file = ${config_directory}/dh_2048.pem
smtpd_tls_dh512_param_file = ${config_directory}/dh_512.pem
now we can restart postfix service
systemctl reload postfix.service
for security reasons we should generate a new group of prime numbers daily or hourly, we will create a bash script in order to generate these prime numbers every day
vim /etc/cron.daily/postfix_pfs_edh_regenerate
and copy this content
#!/bin/bash
cd /etc/postfix
umask 022
for legth in 512 1024 2048
do
openssl dhparam -out dh_$legth.tmp $legth &amp;&amp; mv dh_$legth.tmp dh_$legth.pem
chmod 644 dh_$legth.pem
done
and give correct permissions
chmod 700 /etc/cron.daily/postfix_pfs_edh_regenerate
To configure EECDH we should add these lines in main.cf
vim /etc/postfix/main.cf
#Perfect forward secrecy Elliptic-curve Groups EECDH
smtpd_tls_eecdh_grade = strong
tls_eecdh_strong_curve = prime256v1
tls_eecdh_ultra_curve = secp384r1
now we can restart postfix service
systemctl restart postfix.service
Step 21: enable POP and IMAP services
Our users need to read their incoming mail in laptops, mobile devices, fridges….
with smtp user can send mails but can’t read new emails and maintain philosophical conversations about last season most viewed soap opera.
Receiving emails from server can be done using POP, IMAP or both
In my case i preffer use only IMAP but i will both configurations
POP is older than IMAP if your users reads email from multiple devices IMAP should be better, check users email volume and number of devices to select what configuration fits better for each one, new soap operas are really intense.
For provide POP and IMAP connectivity we will use dovecot, Dovecot also includes SASL support for centralized logins, Tradicionally tutorials uses cyrus-sasl to implement authentication, but dovecot includes a SASL implementation, i will try to use it instead include cyrus-sasl package.
Dovecot configuration files are located at /etc/dovecot/conf.d
Step 22: create config files to Link dovecot with MariaDB user database
With postfixadmin we create a mariadb database, we should give access to dovecot in order to get these data
we need a file with needed queries to provide data about users
vim /etc/dovecot/conf.d/dovecot-mysql.conf.ext
driver = mysql
connect = host=localhost dbname=postfix user=postfixread password=yourpassword

password_query = SELECT username as user, password, concat('/var/vmail/', maildir) as userdb_home,  concat('maildir:/var/vmail/', maildir) as userdb_mail, 101 as userdb_uid, 12 as userdb_gid FROM mailbox  WHERE username = '%u' AND active = '1'

user_query = SELECT concat('/var/vmail/', maildir) as home, concat('maildir:/var/vmail/', maildir) as mail,  101 AS uid, 12 AS gid, CONCAT('*:bytes=', quota) as quota_rule FROM mailbox WHERE  username = '%u' AND active = '1'
also we need a file to provide information about accounts quota
vim /etc/dovecot/conf.d/dovecot-mysql-quota.conf.ext
connect = host=localhost dbname=postfix user=postfixread password=your_password
map {
  pattern = priv/quota/storage
  table = quota2
  username_field = username
  value_field = bytes
}
map {
  pattern = priv/quota/messages
  table = quota2
  username_field = username
  value_field = messages
}
with these files dovecot will query mariadb info about users and mailbox quotas.
step 23: configure dovecot ssl protocols
now we will configure some setting in dovecot main config file
vim /etc/dovecot/dovecot.conf
line 24 tells dovecot what protocols should serve it needs to be like
protocols = imap pop3
line 30 is what interfaces where dovecot will be listening
listen = *, ::
line 67 defines behavior when reboot dovecot service
shutdown_clients = yes
now we will restart dovecot service
systemctl restart dovecot.service
and verify if service has started correctly
tail /var/log/maillog
you should see a line like these
May 10 15:42:02 mail dovecot: master: Dovecot v2.2.10 starting up for imap (core dumps disabled)
step 24: Configure Dovecot users authentification
Now dovecot is listening in desired ports, but blocked by firewalld, before open these ports we need to do some modifications
When a user request their emails using pop3 or imap, he will need to pass his username and password, there are several ways to send login information:
plain: passed as clear text, secure if is send over a TLS/SSL conection
login: another clear text mechanism, used by outlook clients, secure if is send over a TLS/SSL conection
CRAM-MD5: not clear text, uses HMAC-MD5
these are main supported authentication protocols
by default dovecot only uses PLAIN mechanism, to add more mechanism we need to edit /etc/dovecot/conf.d/10-auth.conf file
vim /etc/dovecot/conf.d/10-auth.conf
at line 100 the content should be these:
auth_mechanisms = plain login cram-md5
now dovecot should support all these auth_mechanisms but we need to restart our dovecot service to check that
systemctl restart dovecot.service
and verify if service has restarted correctly
tail /var/log/maillog
you should see a line like these
May 10 15:44:57 mail dovecot: master: Warning: Killed with signal 15 (by pid=1 uid=0 code=kill)
May 10 15:44:57 mail dovecot: master: Dovecot v2.2.10 starting up for imap (core dumps disabled)
step 25: configure Dovecot SSL
like postfix dovecot needs to configure SSL. Dovecot supports these modes:
- POP3: insecure port 110
- POP3 with StartTLS: secure port 110
- POP3S: POP3 wraped over a TLS/SSL connection 995
- IMAP: insecure port 143
- IMAP with StartTLS: secure port 143
- IMAPS: IMAP wraped over a TLS/SSL connection 993
some people disable port 110 and port 143 because some email clients make a plain login even if communication over port 143 indicates that only use of StartTLS is avaliable.
What you should do with 110 and 143 is your decision, it depends of what kind of email clients you support. In mi case I will configure POP3 with StartTLS, POP3S, IMAP with StartTLS and IMAPS
We need to provide info about certificates to dovecot
vim /etc/dovecot/conf.d/10-ssl.conf
and replace certificates configuration chains
ssl_key = &lt;/etc/pki/tls/private/mail.yourdomain.com.key
ssl_cert = &lt;/etc/pki/tls/certs/mail_yourdomaiun_com.crt
ssl_ca = &lt;/etc/pki/tls/certs/intermediate.mail.yourdomain.com.cer
as you learn configuring postfix certificates providing only certificates allow using insecure protocols, we should hardening dovecot configuration near line 52
vim /etc/dovecot/conf.d/10-ssl.conf
# SSL protocols to use
ssl_protocols = !SSLv2 !SSLv3
# SSL ciphers to use
ssl_cipher_list = EECDH+ECDSA+AESGCM:EECDH+aRSA+AESGCM:EECDH+ECDSA+SHA384:EECDH+ECDSA+SHA256:EECDH+aRSA+SHA384:EECDH+aRSA+SHA256:EECDH+aRSA+RC4:EECDH:EDH+aRSA:!aNULL:!eNULL:!LOW:!3DES:!MD5:!EXP:!PSK:!SRP:!DSS:!RC4

# Prefer the server's order of ciphers over client's.
ssl_prefer_server_ciphers = yes
step 26: configure Dovecot mailbox location
Now dovecot uses secure ssl ciphers but need to know were are located accounts mailboxes, this configuration options are located in:
/etc/dovecot/conf.d/10-mail.conf
edit this file
vim /etc/dovecot/conf.d/10-mail.conf
and configure these parameters
mail_location = maildir:/var/vmail/%d/%n/:INDEX=/var/vmail/%d/%n/indexes
mail_uid =101
mail_gid =12
first_valid_uid = 101
last_valid_uid = 101
first_valid_gid = 12
last_valid_gid = 12
now dovecot knows where are located mailboxes
step 27: configure Dovecot pop3 pop3s imap and imaps
Now dovecot needs to know what protocols will serve and how
vim /etc/dovecot/conf.d/10-master.conf
service imap-login {
  inet_listener imap {
    port = 143
  }
  inet_listener imaps {
    port = 993
    ssl = yes
  }

service pop3-login {
  inet_listener pop3 {
    port = 110
  }
  inet_listener pop3s {
    port = 995
    ssl = yes
  }
}

service auth {

  unix_listener /var/spool/postfix/private/auth {
    mode = 0666
    user = vmail
    group = mail
  }
we need to advertise to dovecot that we will only accept login over encrypted connections
vim /etc/dovecot/conf.d/10-auth.conf
disable_plaintext_auth = yes
and new need to link dovecot with mariadb
vim /etc/dovecot/conf.d/auth-sql.conf.ext
# Authentication for SQL users. Included from 10-auth.conf.
#
# &lt;doc/wiki/AuthDatabase.SQL.txt&gt;
passdb {
driver = sql
# Path for SQL configuration file, see example-config/dovecot-sql.conf.ext
args = /etc/dovecot/conf.d/dovecot-mysql.conf.ext
}
# &quot;prefetch&quot; user database means that the passdb already provided the
# needed information and there's no need to do a separate userdb lookup.
# &lt;doc/wiki/UserDatabase.Prefetch.txt&gt;
#userdb {
# driver = prefetch
#}
userdb {
driver = sql
args = /etc/dovecot/conf.d/dovecot-mysql.conf.ext
}
# If you don't have any user-specific settings, you can avoid the user_query
# by using userdb static instead of userdb sql, for example:
# &lt;doc/wiki/UserDatabase.Static.txt&gt;
#userdb {
#driver = static
#args = uid=vmail gid=vmail home=/var/vmail/%u
#}
vim /etc/dovecot/conf.d/10-auth.conf
#!include auth-system.conf.ext
!include auth-sql.conf.ext
at this point we have a basical dovecot service running
systemctl restart dovecot.service
but we dont enable service if we restart our computer we don’t have dovecot enabled
systemctl enable dovecot.service
step 28: open Dovecot ports in firewall
dovecot is ready but we need to open ports in firewall
firewall-cmd –permanent –zone=public –add-service=pop3s
firewall-cmd –permanent –zone=public –add-port=110/tcp
firewall-cmd –permanent –zone=public –add-service=imaps
firewall-cmd –permanent –zone=public –add-port=143/tcp
firewall-cmd –reload
step 29: configure postfix smtp authentcation
when we configured dovecot we configure embebed sasl authentication, now we will integrate dovecot auth in postfix
we need to append these lines to our main.cf file
vim /etc/postfix/main.cf
smtpd_sasl_type = dovecot
smtpd_sasl_path = private/auth
smtpd_sasl_auth_enable = yes
smtpd_relay_restrictions = permit_mynetworks, permit_sasl_authenticated, reject_unauth_destination
step 30: avoid plain logins in smtp connections
Security parameters appear to be well configured, but if we leave configuration in hand of users, they will try to use plain login, this is easily to sniff we avoid these options
vim /etc/postfix/main.cf
and append these lines
#disallow plain login
smtpd_tls_auth_only = yes
step 31: enable smtp submission port
At this moment we know that our smtp service should run only in port 25, unfortunately some Internet Service Providers decided that the best way to stop spam is deny conections to smtp port. If you leave only port 25 opened some users can’t send email because their ISP deny connections. To solve this problem we can enable SMTP submission port, 587. and forget phone calls from users complaining about that they can’t send email from cafes, or their homes.
we need to modify file /etc/postfix/master.cf
vim /etc/postfix/master.cf
and remove comments in these lines
submission inet n       -       n       -       -       smtpd
  -o syslog_name=postfix/submission
  -o smtpd_tls_security_level=encrypt
  -o smtpd_sasl_auth_enable=yes
  -o smtpd_reject_unlisted_recipient=no
  -o smtpd_client_restrictions=$mua_client_restrictions
  -o smtpd_helo_restrictions=$mua_helo_restrictions
  -o smtpd_sender_restrictions=$mua_sender_restrictions
  -o smtpd_recipient_restrictions=permit_sasl_authenticated,reject
  -o milter_macro_daemon_name=ORIGINATING
we also need to define mua variables
vim /etc/postfix/main.cf
mua_client_restrictions = permit_sasl_authenticated,reject
mua_helo_restrictions = permit_sasl_authenticated,reject
mua_sender_restrictions = permit_sasl_authenticated,reject
now we will restart postifx service
systemctl restart postfix.service
and we should get one output like these is /var/log/maillog
tail -f /var/log/maillog
May 10 16:08:51 mail postfix/postfix-script[13671]: stopping the Postfix mail system
May 10 16:08:51 mail postfix/master[3802]: terminating on signal 15
May 10 16:08:52 mail postfix/postfix-script[13752]: starting the Postfix mail system
May 10 16:08:52 mail postfix/master[13754]: daemon started -- version 2.10.1, configuration /etc/postfix
we need to open smtp submission port too
firewall-cmd –permanent –zone=public –add-port=587/tcp
firewall-cmd –reload
Step 32: Test configuration against a mail client
In my case I will use Thunderbird, there are a lot of mail clients. If you use self signed certificates you should search in google, duck duck go or another web searcher how it’s the client behavior.
Configuring this data is easy.
- all your servers will be your fully qualified domain name,
- your username will be the email account
- and the password will be that you put in postfixadmin
check and send some emails between accounts, don’t send to hotmail or gmail probabily it will appear in spam.
it should work.
if doesn’t work check /var/log/maillog output or leave a comment
step 33:link amavisd-new with mariadb database
amavisd neew to know what domains is serving we need to link Mariadb database with amavisd-new.
In order to maintain a security lever we will create a view and a new user that only can access to this view.
we will append these lines in amavisd config file
vim /etc/amavisd/amavisd.conf
@lookup_sql_dsn = (
['DBI:mysql:database=postfix;host=127.0.0.1;port=3306', 'postfixread', 'yourpassword']
);
$sql_select_policy = 'SELECT &quot;Y&quot; AS local FROM domain WHERE CONCAT(&quot;@&quot;, domain) IN (%k)';
amavisd default config will discard spam mail we want to changue this behavior
vim /etc/amavisd/amavisd.conf
and edit final_spam_destiny variable
$final_spam_destiny = D_PASS; #!!! D_DISCARD / D_REJECT
now amavisd will deliver spam messages to inbox and knows what domains are hosted with postfixadmin.
Amavisd sends a copy of email to spamassasin and reads spamassasin results, this means that if spamassasin modifies email subject these will not appears in our detected email. we should modify several parameters in amavis config file to always write spamassasing analysis results.
vim /etc/amavisd/amavisd.conf
just modify these values
$sa_tag_level_deflt  = -9999;  # add spam info headers if at, or above that level
$sa_tag2_level_deflt = 6.2;  # add 'spam detected' headers at that level
$sa_kill_level_deflt = 6.9;  # triggers spam evasive actions (e.g. blocks mail)
$sa_dsn_cutoff_level = 10;   # spam level beyond which a DSN is not sent
$sa_crediblefrom_dsn_cutoff_level = 18; # likewise, but for a likely valid From
We will reconfigure some parameters in spamassasin
step 34: Configure spamassasin
vim /etc/mail/spamassassin/local.cf
should be like these
required_hits 5.0
report_safe 0
required_score 5
remove_header ham Status
remove_header ham Level
We can link spamassasing with a mariadb database that force us to create a database
mysql -u root -p
CREATE DATABASE mail_spamassassin;
CREATE USER 'spamassassin'@'localhost' IDENTIFIED BY 'new_password';
GRANT ALL PRIVILEGES ON `mail_spamassassin` . * TO 'spamassassin'@'localhost';
FLUSH PRIVILEGES;
quit;
we need to create several tables
mysql -u root -p mail_spamassassin
CREATE TABLE bayes_expire (
  id int(11) NOT NULL default '0',
  runtime int(11) NOT NULL default '0',
  KEY bayes_expire_idx1 (id)
) ENGINE=InnoDB;

CREATE TABLE bayes_global_vars (
  variable varchar(30) NOT NULL default '',
  value varchar(200) NOT NULL default '',
  PRIMARY KEY  (variable)
) ENGINE=InnoDB;

INSERT INTO bayes_global_vars VALUES ('VERSION','3');

CREATE TABLE bayes_seen (
  id int(11) NOT NULL default '0',
  msgid varchar(200) binary NOT NULL default '',
  flag char(1) NOT NULL default '',
  PRIMARY KEY  (id,msgid)
) ENGINE=InnoDB;

CREATE TABLE bayes_token (
  id int(11) NOT NULL default '0',
  token binary(5) NOT NULL default '',
  spam_count int(11) NOT NULL default '0',
  ham_count int(11) NOT NULL default '0',
  atime int(11) NOT NULL default '0',
  PRIMARY KEY  (id, token),
  INDEX bayes_token_idx1 (id, atime)
) ENGINE=InnoDB;

CREATE TABLE bayes_vars (
  id int(11) NOT NULL AUTO_INCREMENT,
  username varchar(200) NOT NULL default '',
  spam_count int(11) NOT NULL default '0',
  ham_count int(11) NOT NULL default '0',
  token_count int(11) NOT NULL default '0',
  last_expire int(11) NOT NULL default '0',
  last_atime_delta int(11) NOT NULL default '0',
  last_expire_reduce int(11) NOT NULL default '0',
  oldest_token_age int(11) NOT NULL default '2147483647',
  newest_token_age int(11) NOT NULL default '0',
  PRIMARY KEY  (id),
  UNIQUE bayes_vars_idx1 (username)
) ENGINE=InnoDB;

CREATE TABLE awl (
  username varchar(100) NOT NULL default '',
  email varbinary(255) NOT NULL default '',
  ip varchar(40) NOT NULL default '',
  count int(11) NOT NULL default '0',
  totscore float NOT NULL default '0',
  signedby varchar(255) NOT NULL default '',
  PRIMARY KEY (username,email,signedby,ip)
) ENGINE=InnoDB;

quit;
once when we have created these tables we need to link spamassasin with these tables
Auto-Whitelists linking
we need to enable autowhitelist check in spamassasin config
vim /etc/mail/spamassassin/v310.pre
edit line 45 removing comment
# AWL - do auto-whitelist checks
#
loadplugin Mail::SpamAssassin::Plugin::AWL
and configure database access
vim /etc/mail/spamassassin/auto-whitelist.cf
auto_whitelist_factory Mail::SpamAssassin::SQLBasedAddrList

user_awl_dsn                 DBI:mysql:mail_spamassassin:localhost
user_awl_sql_username        spamassassin
user_awl_sql_password        yourpassword

use_auto_whitelist 1
Bayesian Storage Module
vim /etc/mail/spamassassin/bayesian-storage.cf
bayes_store_module                 Mail::SpamAssassin::BayesStore::SQL

bayes_sql_dsn                 DBI:mysql:mail_spamassassin:localhost
bayes_sql_username            spamassassin
bayes_sql_password            yourpassword

use_bayes          1
bayes_auto_learn   1
bayes_auto_expire  1
at this point we will restart spamassassin service
systemctl restart spamassassin.service
we should see a log like this in /var/log/maillog
May 11 12:18:30 mail spamd[23346]: logger: removing stderr method
May 11 12:18:36 mail spamd[23348]: spamd: server started on IO::Socket::IP [127.0.0.1]:783, IO::Socket::IP [::1]:783 (running version 3.4.0)
May 11 12:18:36 mail spamd[23348]: spamd: server pid: 23348
May 11 12:18:36 mail spamd[23348]: spamd: server successfully spawned child process, pid 23354
May 11 12:18:36 mail spamd[23348]: spamd: server successfully spawned child process, pid 23355
May 11 12:18:36 mail spamd[23348]: prefork: child states: IS
May 11 12:18:36 mail spamd[23348]: prefork: child states: II
Now we will give a spam message to spamassassin to start learning
sa-learn –spam /usr/share/doc/spamassassin-3.4.0/sample-spam.txt
output should be like these
Learned tokens from 1 message(s) (1 message(s) examined)
this acction will add some data into database if we loged on mariadb
and execute a
select * from mail_spamassassin.bayes_vars;
we should see one record.
step 35: Sending spam to a dedicated folder in each account
When someone send spam it will appear in our inbox with text ***SPAM*** in the subject.
 if stats about 99% of received email are right, that means that we will get 99 ***Spam*** mails before get a valid one. Leaving a lot of Spam a inbox could be irritating for our users.
One smart solution used by providers like Google, Microsoft or Yahoo is deliver spam in a dedicated folder. Probably your users are familiarized with these behavior.
In our actual configuration deliver email to mailbox is managed by postfix virtual domain agent delivery VIRTUAL(8) , virtual agent can’t deliver email to spam folder. We need to use one alternative like Dovecot.
With dovecot acting as local delivery we can use sieve filters to manage messages location.
For local delivery Dovecot offers two options, LDA and LMTP
- LDA works like a binary command, each time that postfix sends a email lda deliver is called.
- LMTP is like a long-running process started by Dovecot.
obviously LMTP is better and is the option that we should use.
We need to change delivery agent in postfix. This requires some configuration changes in dovecot.
vim /etc/dovecot/conf.d/10-master.conf
and fill lmtp settings like these
service lmtp {
   unix_listener /var/spool/postfix/private/dovecot-lmtp {
     group = postfix
     mode = 0600
     user = postfix
    }
  unix_listener lmtp {
    #mode = 0666
   }

  # Create inet listener only if you can't use the above UNIX socket
  #inet_listener lmtp {
    # Avoid making LMTP visible for the entire internet
    #address =
    #port =
  #}
}
next step is configure lmtp protocol itself
vim /etc/dovecot/conf.d/20-lmtp.conf
here you will need to give a postmaster address
protocol lmtp {
postmaster_address = postmaster@yourdomain.com
}
finally we will enable lmtp protocol
vim /etc/dovecot/dovecot.conf
protocols = imap pop3 lmtp
our configuration is ready we should restart dovecot service to apply configuration modifications
systemctl restart dovecot.service
now postfix need to use dovecot lda instead virtual
append these lines in postfix main config file
vim /etc/postfix/main.cf
#use dovecot lmtp as virtual transport
virtual_transport = lmtp:unix:private/dovecot-lmtp
after these modifications we can restart postfix service
systemctl restart postfix.service
at this point send and email from one virtual account to another, it should work without problems.
in /var/log/maillog it should appear a line like this
dovecot: lmtp(3762, youruser@yourdomain.com): XXXXXXXXXXXXXXXXXX: msgid=XXXXXXXXXXX.YYYYYYYYY@yourdomain.com: saved mail to INBOX
Now dovecot is our local delivery agent
before enable sieve plugin we need to ensure that every IMAP user will have a spam folder
vim /etc/dovecot/conf.d/15-mailboxes.conf
We will create an typical set of folders
##
## Mailbox definitions
##
# NOTE: Assumes &amp;quot;namespace inbox&amp;quot; has been defined in 10-mail.conf.
namespace inbox {
#mailbox name {
# auto=create will automatically create this mailbox.
# auto=subscribe will both create and subscribe to the mailbox.
#auto = no
# Space separated list of IMAP SPECIAL-USE attributes as specified by
# RFC 6154: \All \Archive \Drafts \Flagged \Junk \Sent \Trash
#special_use =
#}
# These mailboxes are widely used and could perhaps be created automatically:
mailbox Drafts {
auto = subscribe
special_use = \Drafts
}
mailbox Junk {
auto = subscribe
special_use = \Junk
}
mailbox Trash {
auto = subscribe
special_use = \Trash
}
# For \Sent mailboxes there are two widely used names. We'll mark both of
# them as \Sent. User typically deletes one of them if duplicates are created.
mailbox Sent {
auto=subscribe
special_use = \Sent
}
# If you have a virtual &amp;quot;All messages&amp;quot; mailbox:
#mailbox virtual/All {
# special_use = \All
#}
# If you have a virtual &amp;quot;Flagged&amp;quot; mailbox:
#mailbox virtual/Flagged {
# special_use = \Flagged
#}
}
restart dovecot service
systemctl restart dovecot.service
now if we open our mail client, thunderbird, we should see a list of new folders

after all those steps we can enable sieve plugin
we will create a sieve global filter
cd /var/vmail
mkdir sieve
cd sieve
vim globalfilter.sieve
fill file with this content
require &quot;fileinto&quot;;
if exists &quot;X-Spam-Flag&quot; {
if header :contains &quot;X-Spam-Flag&quot; &quot;NO&quot; {
} else {
fileinto &quot;Junk&quot;;
stop;
}
}
if header :contains &quot;subject&quot; [&quot;***SPAM***&quot;] {
fileinto &quot;Junk&quot;;
stop;
}
chown -R vmail:mail /var/vmail/sieve
we need to enable sieve services in dovecot
vim /etc/dovecot/conf.d/20-managesieve.conf
##
## ManageSieve specific settings
##
# Uncomment to enable managesieve protocol:
#protocols = $protocols sieve
# Service definitions
service managesieve-login {
inet_listener sieve {
port = 4190
}
#inet_listener sieve_deprecated {
# port = 2000
#}
# Number of connections to handle before starting a new process. Typically
# the only useful values are 0 (unlimited) or 1. 1 is more secure, but 0
# is faster. &lt;doc/wiki/LoginProcess.txt&gt;
service_count = 1
# Number of processes to always keep waiting for more connections.
process_min_avail = 0
# If you set service_count=0, you probably need to grow this.
vsz_limit = 64M
}
service managesieve {
# Max. number of ManageSieve processes (connections)
#process_limit = 1024
}
# Service configuration
protocol sieve {
# Maximum ManageSieve command line length in bytes. ManageSieve usually does
# not involve overly long command lines, so this setting will not normally
# need adjustment
managesieve_max_line_length = 65536
# Maximum number of ManageSieve connections allowed for a user from each IP
# address.
# NOTE: The username is compared case-sensitively.
#mail_max_userip_connections = 10
# Space separated list of plugins to load (none known to be useful so far).
# Do NOT try to load IMAP plugins here.
#mail_plugins =
# MANAGESIEVE logout format string:
# %i - total number of bytes read from client
# %o - total number of bytes sent to client
#managesieve_logout_format = bytes=%i/%o
# To fool ManageSieve clients that are focused on CMU's timesieved you can
# specify the IMPLEMENTATION capability that Dovecot reports to clients.
# For example: 'Cyrus timsieved v2.2.13'
managesieve_implementation_string = Dovecot Pigeonhole
# Explicitly specify the SIEVE and NOTIFY capability reported by the server
# before login. If left unassigned these will be reported dynamically
# according to what the Sieve interpreter supports by default (after login
# this may differ depending on the user).
#managesieve_sieve_capability =
#managesieve_notify_capability =
# The maximum number of compile errors that are returned to the client upon
# script upload or script verification.
managesieve_max_compile_errors = 5
# Refer to 90-sieve.conf for script quota configuration and configuration of
# Sieve execution limits.
}
vim /etc/dovecot/conf.d/90-plugin.conf
plugin {
  #setting_name = value
  sieve_global_path = /var/vmail/sieve/globalfilter.sieve
  sieve_max_script_size = 1M
}
local delivery should use sieve
vim /etc/dovecot/conf.d/20-lmtp.conf
protocol lmtp {
  # Space separated list of plugins to load (default is global mail_plugins).
  postmaster_address =  postmaster@yourdomain.com
  mail_plugins = $mail_plugins sieve
}
at this point we should restart dovecot to apply these changues
systemctl restart dovecot.service
check service status if something is bad
systemctl status dovecot.service
now you can send a gtube string to yourself, it should appear in junk folder
May 12 12:01:07 mail postfix/submission/smtpd[12410]: connect from yourcomputer[yourip]
May 12 12:01:07 mail postfix/submission/smtpd[12410]: 8D6F310095C: client=XEON.cafeingles[yourip], sasl_method=PLAIN, sasl_username=destination@domain.com
May 12 12:01:07 mail postfix/cleanup[12420]: 8D6F310095C: message-id=&lt;5551CF63.8070307@yourfqdnsourcedomain.com&gt;
May 12 12:01:07 mail postfix/qmgr[1977]: 8D6F310095C: from=&lt;destination@domain.com&gt;, size=629, nrcpt=1 (queue active)
May 12 12:01:07 mail postfix/submission/smtpd[12410]: disconnect from XEON.cafeingles[yourip]
May 12 12:01:07 mail amavis[2763]: (02763-08) NOTICE: reconnecting in response to: err=2006, HY000, DBD::mysql::st execute failed: MySQL server has gone away at (eval 129) line 172.
May 12 12:01:08 mail postfix/smtpd[12427]: connect from localhost[127.0.0.1]
May 12 12:01:08 mail postfix/smtpd[12427]: 74AB1100960: client=localhost[127.0.0.1]
May 12 12:01:08 mail postfix/cleanup[12420]: 74AB1100960: message-id=&lt;5551CF63.8070307@yourfqdnsourcedomain.com&gt;
May 12 12:01:08 mail postfix/qmgr[1977]: 74AB1100960: from=&lt;destination@domain.com&gt;, size=1395, nrcpt=1 (queue active)
May 12 12:01:08 mail postfix/smtpd[12427]: disconnect from localhost[127.0.0.1]
May 12 12:01:08 mail amavis[2763]: (02763-08) Passed SPAM {RelayedTaggedInternal,Quarantined}, MYNETS LOCAL [yourip]:36125 &lt;destination@domain.com&gt; -&gt; &lt;destination@domain.com&gt;, Queue-ID: 8D6F310095C, Message-ID: &lt;5551CF63.8070307@yourfqdnsourcedomain.com&gt;, mail_id: PxRBJkjebYHJ, Hits: 999.001, size: 629, queued_as: 74AB1100960, 885 ms
May 12 12:01:08 mail postfix/smtp[12421]: 8D6F310095C: to=&lt;destination@domain.com&gt;, relay=127.0.0.1[127.0.0.1]:10024, delay=0.99, delays=0.04/0.03/0.02/0.89, dsn=2.0.0, status=sent (250 2.0.0 from MTA(smtp:[127.0.0.1]:10025): 250 2.0.0 Ok: queued as 74AB1100960)
May 12 12:01:08 mail postfix/qmgr[1977]: 8D6F310095C: removed
May 12 12:01:08 mail dovecot: lmtp(12429): Connect from local
May 12 12:01:08 mail dovecot: lmtp(12429, destination@domain.com): UOvhIGTPUVWNMAAAiaI7Ow: sieve: msgid=&lt;5551CF63.8070307@yourfqdnsourcedomain.com&gt;: stored mail into mailbox 'Junk'
May 12 12:01:08 mail postfix/lmtp[12428]: 74AB1100960: to=&lt;destination@domain.com&gt;, relay=mail.yourfqdn.com[private/dovecot-lmtp], delay=0.1, delays=0.01/0.03/0.03/0.02, dsn=2.0.0, status=sent (250 2.0.0 &lt;destination@domain.com&gt; UOvhIGTPUVWNMAAAiaI7Ow Saved)
May 12 12:01:08 mail postfix/qmgr[1977]: 74AB1100960: removed
May 12 12:01:08 mail dovecot: lmtp(12429): Disconnect from local: Successful quit
and your mail client should show a new mail in junk folder

Step 36: Training spamassasin
Our detected spam travels to junk folder, but if forget to train spamassasin we will get a lot of spam in our Inbox folder or false positives in our Junk folder.
To avoid this we can launch sa-learn command but do this by hand is a tedious work. Good sysadmins automatize these task, I make a small script in python, my first python script, to launch sa-learn automatically.
This script will scan each mailbox and check if user has created an extra imap folder, to ignore pop3 only users, adding all mail in junk folder as spam and rest of folders as ham mail.
I created a project in github if you want to colaborate I will accept all help
https://github.com/luzemail/spamAssasingTraining
to add this script to our server we will execute a set of commands
cd /var/vmail
wget https://raw.githubusercontent.com/luzemail/spamAssasingTraining/master/trainspamassasin.py
chmod +x trainspamassasin.py
now we will add a crontab line to execute this script all days
vim /etc/crontab
add this line
0 0 * * * vmail /var/vmail/trainspamassasin.py
adding a little of python magic helps to forget about what is learning spamassasin.
A small trick to start this is tell to our user that they should create a folder called nospam or whatever you prefer and recommend users to move false posivitives to this folder and undetected spam to junk folder.
This script scans all mail folders in account and ads all mail as ham except junk folder which is added as spam. You should need to change this behavior feel free to modify this script and colaborate.
Step 37:Enabling greylisting (optional)
One technique to avoid spam is use a greylisting, basically when we receive a mail for first time our mailserver will answer with an internal error forcing to sender, if senders server is well configures it will try in a few minutes to deliver message again and it will be acepted. Spamers doesn’t resend emails they simply forget our mailserver.
So using a greylisting adds delay receiving mails or they can be undelivered because another server isn’t well configured.
first we need to install postgrey
yum install postgrey
postgrey works as a daemon we need to activate it
systemctl start postgrey.service
and enable service
systemctl enable postgrey.service
we can check postgrey service status running
systemctl status postgrey.service
we should get an output like this
postgrey.service - Postfix Greylisting Service
Loaded: loaded (/usr/lib/systemd/system/postgrey.service; disabled)
Active: active (running) since Sat 2015-05-23 15:35:24 CEST; 13s ago
Docs: man:postgrey(8)
Process: 8176 ExecStart=/usr/sbin/postgrey --unix=/var/spool/postfix/postgrey/socket --pidfile=/var/run/postgrey.pid --group=postgrey --user=postgrey --greylist-text=Greylisted for %%s seconds --daemonize $POSTGREY_OPTS (code=exited, status=0/SUCCESS)
Process: 8173 ExecStartPre=/bin/rm -f /var/run/postgrey.pid (code=exited, status=0/SUCCESS)
Main PID: 8177 (/usr/sbin/postg)
CGroup: /system.slice/postgrey.service
└─8177 /usr/sbin/postgrey --unix=/var/spool/postfix/postgrey/socket --pidfile=/var/run/postgrey.pid --group=postgrey --user=postgrey --greylist-text=Greylisted for %s seconds --daemonize --delay=60...
now we need to link postgrey with postfix
just edit postfix config file
vim /etc/postfix/main.cf
and append these lines
smtpd_recipient_restrictions =
permit_mynetworks,
permit_sasl_authenticated,
check_policy_service unix:/var/spool/postfix/postgrey/socket
and restart postfix service
systemctl restart postfix.service
if you need to modify postgrey behavior you can use these files:
- /etc/postfix/postgrey_whitelist_clients
- /etc/postfix/postgrey_whitelist_recipients
- /etc/postfix/postgrey_whitelist_clients.local
Step 38: Configuring smtpd_recipient_restrictions
Like greylisting we can add some restrictions when receiving email to avoid receive unsolicited mail.
we can add these restriction to our smtpd_sender_restrictions line
- reject_unknown_address –> mails without from
- reject_unknown_sender_domain –> no know sender
- reject_invalid_hostname –> when a server make helo with a malformed hostname
- reject_unknown_recipient_domain –> If postfix is not final distination for recipient domain
- reject_unauth_pipelining –> stops mail from bulk mail software that doesn’t comply ESMTP command pipelining
finally we can use RBL’s, Real time Blackhole lists is a list of know spammers ips that will be rejected by postfix
command is basically
reject_rbl_client server1,

reject_rbl_client server2,

....,

reject_rbl_client servern,

permit
this will help you to stop a lot of spam and free system resources.
here you get a list of rbls http://en.wikipedia.org/wiki/Comparison_of_DNS_blacklists
here you have an example configuration
vim /etc/postfix/main.cf
smtpd_recipient_restrictions =
reject_invalid_hostname,
reject_unknown_recipient_domain,
reject_unauth_pipelining,
permit_mynetworks,
reject_unauth_destination,
permit_sasl_authenticated,
check_policy_service unix:/var/spool/postfix/postgrey/socket,
reject_rbl_client zen.spamhaus.org,
reject_rbl_client bl.spamcop.net,
reject_rbl_client dnsbl.sorbs.net,
reject_rbl_client cbl.abuseat.org,
reject_rbl_client b.barracudacentral.org,
reject_rbl_client dnsbl-1.uceprotect.net,
permit
and finally restart postfix
systemctl restart postfix.service
Step 39: Enabling spf
SPF (Sender Policy Framework) is basically a TXT dns record that indicates what ips and/or domains are authorized to send email.
A minimal spf record should be like this
spf=v1 mx -all
if your webserver send emails too
spf=v1 a mx -all
if you want to add an ip
spf=v1 a mx ip4:255.255.255.255 -all
in function of what servers will be generating email you should configure your spf records.
Maintain a spf record in your domains is important to avoid that spammers use your domain as as sender part of domain
Step 40: Enabling DKIM
DKIM, DomainKeys Identified Mail, helps to verify that a received email is sender from a valid mail server. Basically is a digital signature that can be verified using a public key published into senders domain dns record.
We need to generate a public and private key for each domain.
basically for each domain we need to execute a command like this
opendkim-genkey –bits=4096 –domain=example.com –selector=example.com –restrict
be careful with your dns provider 4096 bits could generate a long public key that couldn’t fit in your txt box, in this case you can reduce your key length to 2048 or changue dns provider
for generate these keys we should follow these steps:
go to opendkim keys dir
cd /etc/opendkim/keys
generate one keypair for each domain
opendkim-genkey –bits=4096 –domain=example.com –selector=example.com –restrict
this command will create two files
- domain.com.private your private key
- domain.com.txt contains public part in dns record format
Note: your should renew your keys every year.
we will to changue private keys ownership
chown opendkim:opendkim /etc/opendkim/keys/*.private
we need to configure opendkim edit config file
vim /etc/opendkim.conf
options should be like these
PidFile    /var/run/opendkim/opendkim.pid
Mode    sv
Syslog    yes
SyslogSuccess    yes
LogWhy    yes
UserID    opendkim:opendkim
Socket    inet:8891@localhost
Umask    002
Canonicalization    relaxed/relaxed
Selector    default
MinimumKeyBits 1024
KeyTable    refile:/etc/opendkim/KeyTable
SigningTable    refile:/etc/opendkim/SigningTable
ExternalIgnoreList    refile:/etc/opendkim/TrustedHosts
InternalHosts    refile:/etc/opendkim/TrustedHosts
OpenDKim needs a list of host whose mail should signed by Opendkim-
vim /etc/opendkim/TrustedHosts
content should be like these
127.0.0.1
::1
mail.yourdomain.com
mail.yourdomain.com should be your hostname
all mail originated from these host will be signed otherwise is ignored, if you have a relay server you should add these ip.
We will host several domains in our configuration, OpenDkim needs to know a list of domains and keys to sign.
vim /etc/opendkim/KeyTable
we need to link each domain with one key adding lines like this
default._domainkey.domain1.com domain1.com:default:/etc/opendkim/keys/domain1.com.private
default._domainkey.domain2.com domain2.com:default:/etc/opendkim/keys/domain2.com.private
using these list opendkim knows relations between domains and private keys.
now opendkim needs to know relation between mail adress and domains whe should configure SigningTable file
vim /etc/opendkim/SigningTable
if we want to sign all email address we shoild add a line like these
*@domain1.com default._domainkey.domain1.com

*@domain2.com default._domainkey.domain2.com
complete with all your domains and restart opendkim
systemctl restart opendkim.service
now you can check opendkim service status
systemctl status opendkim.service
output should be like these
opendkim.service - DomainKeys Identified Mail (DKIM) Milter
Loaded: loaded (/usr/lib/systemd/system/opendkim.service; enabled)
Active: active (running) since Wed 2015-05-27 16:26:39 CEST; 1s ago
Docs: man:opendkim(8)
man:opendkim.conf(5)
man:opendkim-genkey(8)
man:opendkim-genzone(8)
man:opendkim-testadsp(8)
man:opendkim-testkey
http://www.opendkim.org/docs.html
Process: 23824 ExecStart=/usr/sbin/opendkim $OPTIONS (code=exited, status=0/SUCCESS)
Main PID: 23825 (opendkim)
CGroup: /system.slice/opendkim.service
└─23825 /usr/sbin/opendkim -x /etc/opendkim.conf -P /var/run/opendkim/opendkim.pid

May 27 16:26:39 mail.yourdomain.com systemd[1]: Started DomainKeys Identified Mail (DKIM) Milter.
May 27 16:26:39 mail.yourdomain.com opendkim[23825]: OpenDKIM Filter v2.10.1 starting (args: -x /etc/opendkim.conf -P /var/run/opendkim/opendkim.pid)
At this point we have a opendkim daemon working we need to integrate opendkim with postfix
we need to open postfix main config file
vim /etc/postfix/main.cf
and finally append these lines
milter_default_action = accept
smtpd_milters = inet:127.0.0.1:8891
and restart postfix to see these changues applied
systemctl restart postfix.service
Finally the most important step is publish your public keys in each domain
for example for a file example.com.txt
whit these content
example.com._domainkey IN TXT ( &quot;v=DKIM1; k=rsa; s=email; &quot;
&quot;p=MIICIjANBgkqhkiG9w0BAQEFAAOCAg8AMIICCgKCAgEAzGqMtyZwjFzNsvFVSnsPvyHcsAGpqglHcKtRSIGKyzbAigp18LARojk5UlTAHmED46THNbo8q6IS/fysaGBBR97oZLK2/8Vl6FOc0hdU1alEaAr/MpI+0MquCqjaAFdVWKHtGRthCzJ0HuDqbQFBnc3eUOe8RxkYWwxyKs+Tze/FCQ/mso/Gm/Zp/z7v8jTRbaIZtKRB+1oBrc&quot;
&quot;L2WuFEOkZyxCEq0gYLNV2AYcfIdvBXqHsHLeeEZMEbxIHOQGg3fINd3bbP2hxWtlnCrIGFQxdkOH4hx75wfZ+QRWh0d7jmW4c0Jnwvw0HLIJSzfS1kOUCPSq+MR7h4bT17sfWMXSvwqWca1R0eVRZdkuuBBeK5897vvRCA/44WMhv2GeWM6uHrRLy8Z8CAoCVd4FrZ6UQ+eQ2SjJaObInWbXC0/VRNHLRHVqW3pZROH3tYWAD39EUKpAWO&quot;
&quot;vr6YfwD/7PeM/283LLDuQceqIVg4kYcNeZR9iL65sLXWkHPb8rJeGFqQhUC+Cvm1HkhLbm5m/OHl41EF+dfLDT+c8EpCT3khSebKvwHFbd2l6XQhy+zQSvQtPSgtWJ2mgq4FIHFBJFdQRUv/KQdhDDapYkcM80DyyRnzXv4erfNcC//LaI4LmJBd36KTNKWUbrBibxOWye3ZheiaPGYrdwrp/X0rPXnnju8CAwEAAQ==&quot; ) ; ----- DKIM key example.com for example.com
you need to add a _domainkey txt record whit this text
v=DKIM1; k=rsa; s=email; p=MIICIjANBgkqhkiG9w0BAQEFAAOCAg8AMIICCgKCAgEAzGqMtyZwjFzNsvFVSnsPvyHcsAGpqglHcKtRSIGKyzbAigp18LARojk5UlTAHmED46THNbo8q6IS/fysaGBBR97oZLK2/8Vl6FOc0hdU1alEaAr/MpI+0MquCqjaAFdVWKHtGRthCzJ0HuDqbQFBnc3eUOe8RxkYWwxyKs+Tze/FCQ/mso/Gm/Zp/z7v8jTRbaIZtKRB+1oBrcL2WuFEOkZyxCEq0gYLNV2AYcfIdvBXqHsHLeeEZMEbxIHOQGg3fINd3bbP2hxWtlnCrIGFQxdkOH4hx75wfZ+QRWh0d7jmW4c0Jnwvw0HLIJSzfS1kOUCPSq+MR7h4bT17sfWMXSvwqWca1R0eVRZdkuuBBeK5897vvRCA/44WMhv2GeWM6uHrRLy8Z8CAoCVd4FrZ6UQ+eQ2SjJaObInWbXC0/VRNHLRHVqW3pZROH3tYWAD39EUKpAWOr6YfwD/7PeM/283LLDuQceqIVg4kYcNeZR9iL65sLXWkHPb8rJeGFqQhUC+Cvm1HkhLbm5m/OHl41EF+dfLDT+c8EpCT3khSebKvwHFbd2l6XQhy+zQSvQtPSgtWJ2mgq4FIHFBJFdQRUv/KQdhDDapYkcM80DyyRnzXv4erfNcC//LaI4LmJBd36KTNKWUbrBibxOWye3ZheiaPGYrdwrp/X0rPXnnju8CAwEAAQ=
Step 41: Configuring DMARC records for each domain
Basically Dmarc is a method that joins SPF and DKIM defining what to do when a received mail doesn’t pass DKIM or SPF
we need to create a DNS TXT record like _dmarc.your_domain.com
with this text
v=DMARC1 p=pvalue optinalparameter1=value optinalparameter2=value …
Mandatory Parameters
Policy of domain
p= pvalues
Defines policy of domain.
pvalues are:
- none ->The Domain Owner requests no specific action be taken regarding delivery of messages
- quarantine -> if check dkim and/or spf fails, Depending on the capabilities of the Mail Receiver, this can mean “place into spam folder”, “scrutinize with additional intensity”, and/or “flag as suspicious”.
- reject -> check dkim and/or spf fails Mail Receiver will reject mail during smtp transaction
Optional Parameters
Policy of Subdomains
sp= spvalues
spvalues are:
- none ->The Domain Owner requests no specific action be taken regarding delivery of messages
- quarantine -> if check dkim and/or spf fails, Depending on the capabilities of the Mail Receiver, this can mean “place into spam folder”, “scrutinize with additional intensity”, and/or “flag as suspicious”.
- reject -> check dkim and/or spf fails Mail Receiver will reject mail during smtp transaction
DKIM identifier alignment
adkim= dkimvalues
dkimvalues are:
s -> strict, sender domain name must be the same that d=name in DKIM mail headers else fails
r-> relaxed, if sender domain is a subdomain will pass
if omitted adkim tag in domain txt default value is r (relaxed)
SPF-authenticated Identifiers
aspf= aspfvalues
aspfvalues are:
s -> strict, MAIL FROM command in SMTP and from:header in email must mach
r-> relaxed, if sender domain is a subdomain will pass
if omitted aspf tag in domain txt default value is r (relaxed)
Percentage of messages where DMARC mechanism is to be applied
pct=pctvalue
pctvalue= a number between 0 and 100
Interval between Aggregaye reports
ri = rivalue
rivalue= number of seconds between reports default 86400 (24 hours)
Reporting URL of aggregate reports
rua:mailto:address@domain.com
Each server will send an aggregate feedback to this adress
if domain lies outside sending zone you must validate, use a web searcher
Reporting URL of aggregate feedback
ruf:mailto:address@domain.com
Used for forensic reports about messagest that fail spf and/or dkim evaluation
if domain lies outside sending zone you must validate, use a web searcher
here you have a example of dmarc record
v=DMARC1; p=quarantine; pct=100 rua=mailto:dmarc.rua@customddomain.com
DMARC is not a point and shoot implementation you should follow a sequence like this in function of your mail volume:
- Monitor all.
- Quarantine 1%.
- Quarantine 5%.
- Quarantine 10%.
- Quarantine 25%.
- Quarantine 50%.
- Quarantine all.
- Reject 1%.
- Reject 5%.
- Reject 10%.
- Reject 25%.
- Reject 50%.
- Reject all.
Step 42: Enabling DMARC suport in postfix
Receive reports from DMARC helps to verify our configurations, configure a mailserver that send DMARC reports to another sysadmins makes you a good sysadmin and a better person :-P.
To make this we need to configure openDMARC
Actually in centos 7 openDMARC needs libspf2 that is avaliable in testing repo.
if you try to install opendmarc running this command
yum install opendmarc
and you get an output like these
---&gt; Package libopendmarc.x86_64 0:1.3.1-4.el7 will be updated
---&gt; Package libopendmarc.x86_64 0:1.3.1-13.el7 will be an update
--&gt; Processing Dependency: libspf2.so.2()(64bit) for package: libopendmarc-1.3.1-13.el7.x86_64
---&gt; Package opendmarc.x86_64 0:1.3.1-4.el7 will be updated
---&gt; Package opendmarc.x86_64 0:1.3.1-13.el7 will be an update
--&gt; Processing Dependency: libspf2.so.2()(64bit) for package: opendmarc-1.3.1-13.el7.x86_64
--&gt; Finished Dependency Resolution
Error: Package: libopendmarc-1.3.1-13.el7.x86_64 (epel)
Requires: libspf2.so.2()(64bit)
Error: Package: opendmarc-1.3.1-13.el7.x86_64 (epel)
Requires: libspf2.so.2()(64bit)
You could try using --skip-broken to work around the problem
You could try running: rpm -Va --nofiles --nodigest
run this command
yum install opendmarc –enablerepo=epel-testing
OpenDMARK will need a MariaDB database in order to store all info needed to generate reports.
We will create this database as first step
mysql -u root -p
CREATE DATABASE opendmarc;
CREATE USER 'dmarc'@'localhost' IDENTIFIED BY 'dmarcdatabaseuserpassword';
GRANT ALL PRIVILEGES ON `opendmarc` . * TO 'dmarc'@'localhost';
FLUSH PRIVILEGES;
quit;
once we’ve created database and user, next step is populate tables.
mysql -u dmarc -p opendmarc < /usr/share/doc/opendmarc-1.3.1/schema.mysql
should be easy now we can configure opendmarc
vim /etc/opendmarc.conf
replace line 15 to have these aspect
AuthservID HOSTNAME
now we will configure opendmarc service
systemctl enable opendmarc
systemctl start opendmarc
next step is integrate opendmarc service with postfix
vim /etc/postfix/main.cf
just modify smtpd_milters values
smtpd_milters = inet:127.0.0.1:8891 , inet:127.0.0.1:8893
non_smtpd_milters = $smtpd_milters
now you can restart postfix
systemctl restart postfix.service
some domains can use aname.domain.com instead top-level domain this can be a problem during dmarc verification, Mozilla maintais a database calle Public Suffix list that can be added to our opendmarc server to make it more effective
just execute these commands
/usr/bin/wget –no-check-certificate -q -N -P /etc/opendmarc https://publicsuffix.org/list/effective_tld_names.dat
chown opendmarc:opendmarc /etc/opendmarc/effective_tld_names.dat
we should maintain this database updated we can add a cron job to do this job
just edit crontab
vim /etc/crontab
and append these line
@weekly /usr/bin/wget --no-check-certificate -q -N -P /etc/opendmarc https://publicsuffix.org/list/effective_tld_names.dat #Get latest effective_tld_names for OpenDMARC
Opendmarc needs know where Pubblic Suffix List is located
vim /etc/opendmarc.conf
line 221 should be like this
PublicSuffixList /etc/opendmarc/effective_tld_names.dat
we will restart opendmarc service to apply configuration changes
systemctl restart opendmarc
now we will configure opendmarc to maintain a history file
vim /etc/opendmarc.conf
uncomment line 166
HistoryFile /var/spool/opendmarc/opendmarc.dat
and restart opendmarc again
systemctl restart opendmarc
now we will process this file with a script every hour
vim /etc/cron.hourly/processdmarc.cron
it should have this content.
Remenber put your dmarc password in dbpass variable
and correct domain settings in /usr/sbin/opendmarc-reports command
#!/bin/bash
# Imports data from OpenDMARC's opendmarc.dat file into a local MySQL DB
# and sends DMARC failure reports to domain owners.
# Based on a script from Hamzah Khan (http://blog.hamzahkhan.com/)
set -e
# Database and History File Info
DBHOST='localhost'
DBUSER='dmarc'
DBPASS='yourpassword'
DBNAME='opendmarc'
HISTDIR='/var/spool/opendmarc'
HISTFILE='opendmarc'
# Make sure history file exists
touch ${HISTDIR}/${HISTFILE}.dat
# Move history file temp dir for processing
mv ${HISTDIR}/${HISTFILE}.dat /tmp/${HISTFILE}.$$
# Import temp history file data and send reports
/usr/sbin/opendmarc-import -dbhost=${DBHOST} -dbuser=${DBUSER} -dbpasswd=${DBPASS} -dbname=${DBNAME} -verbose &lt; /tmp/${HISTFILE}.$$
/usr/sbin/opendmarc-reports -dbhost=${DBHOST} -dbuser=${DBUSER} -dbpasswd=${DBPASS} -dbname=${DBNAME} -verbose -interval=86400 -report-email 'postmaster@cheatcodes.com' -report-org 'CheatCodes.com'
/usr/sbin/opendmarc-expire -dbhost=${DBHOST} -dbuser=${DBUSER} -dbpasswd=${DBPASS} -dbname=${DBNAME} -verbose
# Delete temp history file
rm -rf /tmp/${HISTFILE}.$$
finaly we will make this file executable
chmod +x /etc/cron.hourly/processdmarc.cron
Now your postfix has dmarc support and every hour will send necesary reports
Step 43: Configuring Roundcube webmail
Smartphones are a inclredible good technology but sometimes we don’t have signal and we need to check our email, using roundcube we provide a webmail infrastructure to our users, where they can read and send emails using a web browser.
In order to configure roundcube we need to create a database, yes another one, using these commands
mysql -u root -p
CREATE DATABASE roundcubemail;
CREATE USER 'roundcube'@'localhost' IDENTIFIED BY 'a_secure_password';
GRANT ALL PRIVILEGES ON `roundcubemail` . * TO 'roundcube'@'localhost';
FLUSH PRIVILEGES;
quit;
next step is populate tables
mysql -uroundcube -p roundcube </usr/share/roundcubemail/SQL/mysql.initial.sql
we also need to enable some selinux options for our case
setsebool -P httpd_can_sendmail on
now we need to configure roundcubemail to access database and know were are located the mailservers
we will move example config file to use as template
mv /etc/roundcubemail/config.inc.php.sample /etc/roundcubemail/config.inc.ph
we need to modify some values
$config['db_dsnw'] = 'mysql://roundcube:your_password@localhost/roundcubemail';

$config['default_host'] = 'tls://yourfqdndomain.com';

$config['smtp_server'] = 'tls://yourfqdndomain.com';

$config['imap_auth_type'] = 'login';
$config['smtp_auth_type'] = 'login';
$config['smtp_port'] = 587;

$config['smtp_user'] = '%u';

$config['smtp_pass'] = '%p';

$config['des_key'] = 'PUTHEREA24CHARACTERRANDOMSTRING';
next we need to generate php-fpm pool to server roundcubemail config
we will create a dir for store sessions
mkdir /var/lib/php/yourfqdndomain.com
adjust group ownership
chown root:apache /var/lib/php/yourfqdndomain.com
adjust group permissions
chmod 770 /var/lib/php/yourfqdndomain.com
and set a valid selinux labeling
chcon -R -t httpd_var_run_t /var/lib/php/yourfqdndomain.com
now we can create a valid php-fpm pool
vim /etc/php-fpm.d/yourfqdndomain.com.conf
adapt this content
[yourfqdndomain]
listen = /var/run/php-fpm/yourfqdndomain.socket
listen.allowed_clients = 127.0.0.1
user = apache
group = apache
pm = dynamic
pm.max_children = 50
pm.start_servers = 5
pm.min_spare_servers = 3
pm.max_spare_servers = 35
slowlog = /var/log/php-fpm/yourfqdndomain.slow.log
rlimit_files = 1024
rlimit_core = 0
chdir = /usr/share/roundcubemail
php_flag[display_errors] = off
php_admin_value[error_log] = /var/log/php-fpm/yourfqdndomain-error.log
php_admin_flag[log_errors] = on
php_admin_value[memory_limit] = 128M
php_value[session.save_handler] = files
php_value[session.save_path] = /var/lib/php/yourfqdndomain.com
once edited we can restart php-fpm service to load new configuration
systemctl restart php-fpm.service
check if any error appears reading this command output
systemctl status php-fpm.service
next step is create a nginx record and certificate
nginx doesn’t have intermediate certificate config option we need to append pulic key with intermidiate certificate in one file executing a command like this.
cat publiccertificate.crt intermediatecertificate.crt > bundle_certificate.crt
Order of cat command is important public certificate will be at the beginning otherwise you will get ssl errors in nginx.
finally we can create our nginx config file
vim /etc/nginx/conf.d/yourfqdndomain.conf
and adapt these template
server {
listen 80;
server_name yourfqdndomain.com;
error_log /var/log/nginx/yourfqdndomain.error.log warn;
access_log /var/log/nginx/yourfqdndomain.access.log;
return 301 https://$server_name$request_uri; # enforce https
}
server {
listen 443 ssl;
server_name yourfqdndomain;
error_log /var/log/nginx/yourfqdndomain.secure.error.log warn;
access_log /var/log/nginx/yourfqdndomain.secure.access.log;
root /usr/share/roundcubemail;
index index.php;
charset utf-8;
## SSL settings
ssl_certificate /etc/pki/tls/certs/yourfqdndomain.bundle.crt;
ssl_certificate_key /etc/pki/tls/private/yourfqdndomain.key;
ssl_protocols TLSv1.2;
ssl_ciphers &quot;EECDH+ECDSA+AESGCM:EECDH+aRSA+AESGCM:!aNULL:!eNULL:!LOW:!3DES:!MD5:!EXP:!PSK:!SRP:!DSS:!RC4&quot;;
ssl_prefer_server_ciphers on;
ssl_session_cache shared:SSL:10m;
ssl_session_timeout 10m;
ssl_ecdh_curve secp521r1;
add_header Strict-Transport-Security max-age=31536000;
# add_header X-Frame-Options DENY;
# auth_basic &quot;Restricted area&quot;;
# auth_basic_user_file /etc/nginx/passwd;
location / {
try_files $uri $uri/ index.php;
}
location ~/(plugins/enigma/home|bin|installer) {
deny all;
return 403;
}
location ~* \.php$ {
try_files $uri =404;
fastcgi_split_path_info ^(.+\.php)(/.+)$;
include fastcgi_params;
fastcgi_pass unix:/var/run/php-fpm/yourfqdndomain.socket;
fastcgi_index index.php;
fastcgi_param SCRIPT_FILENAME $document_root$fastcgi_script_name;
}
}
now we should restart nginx
systemctl restart nginx.service
now we can open a web browser write our fqdn and check our roundcube webpage
 log with and account and check if everything is working, send an email respond create a folder …
Now you have a working webmail to your users 😛 .
Step 44: Protecting against brute force attacks using fail2ban
At this point we are filtering spam and using a huge number of antispam technologies. Unfortunately your mailserver will be exposed to internet and a lot of automatic tool will try get your passwords using bruteforce attacks.
To mitigate these actions we will use fail2ban, fail2ban reads system logs and block temporaly a ip making a bruteforce attacks, generally this means that we attackers avoid our server because temporally block makes bruteforce attack imposible
To make this fail2ban read logs and counts invalid logins when a number of invalid logins is detected fail2ban adds a rule to firewalld blocking source ip of invalid logins during a penalty time, typical brute force attacks abandom because they can’t test more
first we need to enable several triggers in fail2ban
modifiy needed lines to sections look like these
vim /etc/fail2ban/jail.conf
...

[roundcube-auth]
enabled = true
port     = http,https
logpath  = /var/log/roundcubemail/errors

....

[postfix]
enabled = true
port     = smtp,465,submission
logpath  = %(postfix_log)s

....

[dovecot]
enabled = true
port    = pop3,pop3s,imap,imaps,submission,465,sieve
logpath = %(dovecot_log)s

...

[sieve]
enabled = true
port   = smtp,465,submission
logpath = %(dovecot_log)s
now we need to enable fail2ban service
systemctl enable fail2ban.service
and start service
systemctl start fail2ban.service
Step 45: Enable imap quota
Some users will send a lot of attachments , and they need to know how many free space leave in their mailbox, we will enable imap_quota plugin to avoid support call about that they can’t receive or send mails with titanic attachments.
Responsive of inform about how many free space left in their mailbox is dovecot, we need to enable some plugins.
vim /etc/dovecot/conf.d/10-mail.conf
line 208 should be
mail_plugins = $mail_plugins quota
vim /etc/dovecot/conf.d/20-imap.conf
line 56 should be
mail_plugins = $mail_plugins imap_quota
finally
vim /etc/dovecot/conf.d/90-quota.conf
line 68 should look like these
quota = maildir:User quota
Now we need reboot dovecot service
systemctl restart dovecot.service
congrats now you should have a funcional mailserver running.
References:
http://www.campworld.net/thewiki/pmwiki.php/LinuxServersCentOS/Cent6VirtMailServer
http://dokuwiki.nausch.org/doku.php/centos:mail_c7:spam_7
https://qmail.jms1.net/test-auth.shtml
http://en.linuxreviews.org/HOWTO_Stop_spam_using_Postfix
https://hynek.me/articles/hardening-your-web-servers-ssl-ciphers/
https://www.ssllabs.com/downloads/SSL_TLS_Deployment_Best_Practices.pdf
https://access.redhat.com/documentation/en-US/Red_Hat_Enterprise_Linux/7/html/Security_Guide/sec-Hardening_TLS_Configuration.html
https://www.df.eu/de/service/df-faq/cloudserver/anleitungen/spam-und-virenschutz-mit-postfix-debian/
https://z0z0.me/2014/10/26/install-postfix-dovecot-auth-tls-mysql-postfixadmin-spamassassin-and-clamav-on-centos7/
https://www.2realities.com/blog/2014/02/13/secure-ssl-configuration-for-apache-postfix-dovecot/
https://bettercrypto.org/
https://wiki.gentoo.org/wiki/Complete_Virtual_Mail_Server
http://www.gentoo-wiki.info/Amavisd-new
http://www.iredmail.org/forum/topic3800-iredmail-support-localdomainsmaps-in-amavisdnew.html
http://gogs.info/books/debian-mail/chunked/antispam.amavis.html
http://www.nervous.it/2010/03/amavisd-and-per-user-spam-folder/#Howto
https://github.com/hardware/nginx-config/blob/master/virtual-hosts/https/postfixadmin
http://peketamin.hatenablog.jp/entry/2014/06/26/%28ubuntu_14_04%29_postfix_%E3%82%92%E5%A4%96%E9%83%A8%E3%81%8B%E3%82%89%E6%8E%A5%E7%B6%9A%E5%87%BA%E6%9D%A5%E3%82%8B%E3%82%88%E3%81%86%E3%81%AB%E3%81%99%E3%82%8B_%E2%86%92_dovecot_%E4%BD%BF%E3%81%A3
https://community.rackspace.com/products/f/43/t/51
https://bugzilla.redhat.com/show_bug.cgi?id=1225596
http://www.zytrax.com/books/dns/ch9/dmarc.html
http://dmarc.org/draft-dmarc-base-00-01.txt
http://www.stevejenkins.com/blog/2015/03/installing-opendmarc-rpm-via-yum-with-postfix-or-sendmail-for-rhel-centos-fedora/
 After First steps, we will need to get a terminal access.
 from a linux terminal or using putty we will login in the sinology