SAMBA group Permissions Centos 7

Mary, Eve, Peter and Julian are coworkers in a new startup.

their share all documents in a samba share because they’re using cutting edge technologies.

One shared folder is mapped to a network drive inside these unit there are 4 folders, billing, marketing, projects and contracts, permisions are defined by the next matrix

They are a little special and they need to have all folders inside the network unit, because they waste a lot of time searching for server folders.

So let’s go to configure this samba server under Centos 7.

1.- we will need to install several packages


yum -y update

yum install epel-release

yum install samba samba-client samba-common vim

2.- Open several ports and enable services


systemctl enable smb.service
systemctl enable nmb.service
systemctl start smb.service
systemctl start nmb.service
firewall-cmd --permanent --zone=public --add-service=samba
firewall-cmd --reload

3.- Create users

Each member of group needs an user


adduser   -s /sbin/nologin mary
adduser   -s /sbin/nologin eve
adduser   -s /sbin/nologin peter
adduser   -s /sbin/nologin julian

4.- Create Groups

each folder needs a group


groupadd billing
groupadd marketing
groupadd projects
groupadd contracts

5.- Join Groups and users

We will need to join users and groups


usermod -a -G billing mary
usermod -a -G marketing mary
usermod -a -G marketing eve
usermod -a -G projects eve
usermod -a -G projects peter
usermod -a -G contracts peter
usermod -a -G contracts julian
usermod -a -G billing julian

6.- Create samba config

we will edit our samba config, shared folder will be at /media/shared


vim /etc/samba/smb.conf

our config file should be like these


[global]
workgroup = SAMBA
security = user
name = THESERVER
passdb backend = tdbsam

[shared]
comment = shared folder
path = /media/shared
guest ok = no
guest only = no
write list = @billing, @marketing, @projects, @contracts
valid users = @billing, @marketing, @projects, @contracts
create mask = 660
directory mask = 2770

we need to inform selinux that /media/shared directory will be user by samba process


chcon -t samba_share_t /media/shared/

7 Create directory structure

we need to create our directory structure inside /media/shared and give correct permissions.


mkdir billing
mkdir marketing
mkdir projects
mkdir contracts

chgrp billing billing/

chgrp contracts contracts/

chgrp marketing marketing/

chgrp  projects projects/

and now here it’s the magic

all directories needs to have read and write permisions for group


chmod g+rw *

and we will enable Set Group ID for all directories


chmod g+s *

with Set Group ID SETGID all files created in each directory will have the same group that parent directory

8 Create password for users

each user needs to have a password to access to shared folder


smbpasswd -a mary

smbpasswd -a eve

smbpasswd -a peter

smbpasswd -a julian

Test if everything is working

Enjoy

Installing Zabbix Agent onto a Sinology DS216J

Nowadays small storage servers are a cheap solution for store backups and SME storage server.

Recently  Small business with various Sinology Servers in different locations asked me if there any way to control a few parameters like free storage space.

Quickly I remember that zabbix could be a good solution for this scenario, I get a Sinology DS216J and start checking if where posible to install a zabbix agent inside.

Like Qnap these devices are small ARM processors with a customized linux distribution installed.

The process was simply, Just attach a hard disk and update to latest firmware, remember newer is always better.

After First steps, we will need to get a terminal access.

This is easy

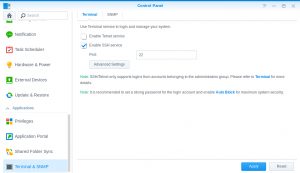
Login as admin in your sinology web interface an go to Control Panel -> Advanced Mode -> Terminal & SNMP and enable SSH service

from a linux terminal or  using putty we will login in the sinology


ssh admin@'sinology ip'

for example ssh admin@192.168.100.1

now we are inside the nas linux, first we will need to change to root user


sudo su -

now we can install Entware-ng that is a package repository only a few steps are needed

create a dir to store packages


mkdir -p /volume1/@entware-ng/opt

change /opt dir to the previous created


rm -rf /opt
ln -sf /volume1/@entware-ng/opt /opt

now we will execute the repo installer, in our case we are runing an armv7


wget -O - http://pkg.entware.net/binaries/armv7/installer/entware_install.sh | /bin/sh

next step is integrade entware with our profile

just edit /etc/profile and append these line at the end

. /opt/etc/profile

now we should reboot our nas and login again as admin

and start zabbix installation


opkg update

and we can install zabbix agent


opkg install zabbix-agentd

your zabbix configuration file will be at

/opt/etc/zabbix_agentd.conf

and you can start and stop zabbix agent launching this command


/opt/etc/init.d/S07zabbix_agentd start

/opt/etc/init.d/S07zabbix_agentd stop


references:

https://github.com/Entware-ng/Entware-ng/wiki/Install-on-Synology-NAS

Intalling PureFtpd in Centos6.x with virtual users

If you need to create virtual users in your ftp server and need some features like maps your users against a database table, automatic user folder creation and more vsftpd doesn’t fit very well. In one of my adventures as sysadmin i need to setup a ftp server with virtual users. Here the steps that I follo to get this.

Step 1: Enable epel repos

rpm -i http://ftp.cica.es/epel/6/x86_64/epel-release-6-8.noarch.rpm

Step 2: Intall required packages.

yum install pure-ftpd pure-ftpd-selinux mysql-server ftp

Step 3: Enable Services

chkconfig  mysqld on

chkconfig pure-ftpd on

service mysqld start

service pure-ftpd start

Step 4: Create system user where virtual users will be stored

groupadd ftpgroup

useradd ftpusers

usermod  -g ftpgroup ftpusers

usermod -s /sbin/nologin ftpusers

Step 5: Create Mysql user and database

mysql -u root -p

CREATE DATABASE pureftpd;

GRANT SELECT, INSERT, UPDATE, DELETE, CREATE, DROP ON pureftpd.* TO ‘pureftpd’@’localhost’ IDENTIFIED BY ‘ftpdpass’;

GRANT SELECT, INSERT, UPDATE, DELETE, CREATE, DROP ON pureftpd.* TO ‘pureftpd’@’localhost.localdomain’ IDENTIFIED BY ‘ftpdpass’;

FLUSH PRIVILEGES;

USE pureftpd;

CREATE TABLE ftpd ( User varchar(16) NOT NULL default ”, status enum(‘0′,’1’) NOT NULL default ‘0’, Password varchar(64) NOT NULL default ”, Uid varchar(11) NOT NULL default ‘-1’, Gid varchar(11) NOT NULL default ‘-1’, Dir varchar(128) NOT NULL default ”, ULBandwidth smallint(5) NOT NULL default ‘0’, DLBandwidth smallint(5) NOT NULL default ‘0’, comment tinytext NOT NULL, ipaccess varchar(15) NOT NULL default ‘*’, QuotaSize smallint(5) NOT NULL default ‘0’, QuotaFiles int(11) NOT NULL default 0, PRIMARY KEY (User), UNIQUE KEY User (User)) ENGINE=InnoDB;

quit;

Step 6: Configure PuteFTPD

vi /etc/pure-ftpd/pure-ftpd.conf

Should be similar to this content:

############################################################
#                                                          #
#         Configuration file for pure-ftpd wrappers        #
#                                                          #
############################################################

# If you want to run Pure-FTPd with this configuration
# instead of command-line options, please run the
# following command :
#
# /usr/sbin/pure-config.pl /etc/pure-ftpd/pure-ftpd.conf
#
# Please don’t forget to have a look at documentation at
# http://www.pureftpd.org/documentation.shtml for a complete list of
# options.

# Cage in every user in his home directory

ChrootEveryone              yes

# If the previous option is set to “no”, members of the following group
# won’t be caged. Others will be. If you don’t want chroot()ing anyone,
# just comment out ChrootEveryone and TrustedGID.

# TrustedGID                    100

# Turn on compatibility hacks for broken clients

BrokenClientsCompatibility  no

# Maximum number of simultaneous users

MaxClientsNumber            50

# Fork in background

Daemonize                   yes

# Maximum number of sim clients with the same IP address

MaxClientsPerIP             8

# If you want to log all client commands, set this to “yes”.
# This directive can be duplicated to also log server responses.

VerboseLog                  yes

# List dot-files even when the client doesn’t send “-a”.

DisplayDotFiles             yes

# Don’t allow authenticated users – have a public anonymous FTP only.

AnonymousOnly               no

# Disallow anonymous connections. Only allow authenticated users.

NoAnonymous                 yes

# Syslog facility (auth, authpriv, daemon, ftp, security, user, local*)
# The default facility is “ftp”. “none” disables logging.

SyslogFacility              ftp

# Display fortune cookies

# FortunesFile              /usr/share/fortune/zippy

# Don’t resolve host names in log files. Logs are less verbose, but
# it uses less bandwidth. Set this to “yes” on very busy servers or
# if you don’t have a working DNS.

DontResolve                 yes

# Maximum idle time in minutes (default = 15 minutes)

MaxIdleTime                 15

# LDAP configuration file (see README.LDAP)

# LDAPConfigFile                /etc/pure-ftpd/pureftpd-ldap.conf

# MySQL configuration file (see README.MySQL)

MySQLConfigFile               /etc/pure-ftpd/pureftpd-mysql.conf

# Postgres configuration file (see README.PGSQL)

# PGSQLConfigFile               /etc/pure-ftpd/pureftpd-pgsql.conf

# PureDB user database (see README.Virtual-Users)

# PureDB                        /etc/pure-ftpd/pureftpd.pdb

# Path to pure-authd socket (see README.Authentication-Modules)

# ExtAuth                       /var/run/ftpd.sock

# If you want to enable PAM authentication, uncomment the following line

PAMAuthentication             yes

# If you want simple Unix (/etc/passwd) authentication, uncomment this

# UnixAuthentication            yes

# Please note that LDAPConfigFile, MySQLConfigFile, PAMAuthentication and
# UnixAuthentication can be used only once, but they can be combined
# together. For instance, if you use MySQLConfigFile, then UnixAuthentication,
# the SQL server will be asked. If the SQL authentication fails because the
# user wasn’t found, another try # will be done with /etc/passwd and
# /etc/shadow. If the SQL authentication fails because the password was wrong,
# the authentication chain stops here. Authentication methods are chained in
# the order they are given.

# ‘ls’ recursion limits. The first argument is the maximum number of
# files to be displayed. The second one is the max subdirectories depth

LimitRecursion              10000 8

# Are anonymous users allowed to create new directories ?

AnonymousCanCreateDirs      no

# If the system is more loaded than the following value,
# anonymous users aren’t allowed to download.

MaxLoad                     4

# Port range for passive connections replies. – for firewalling.

# PassivePortRange          30000 50000

# Force an IP address in PASV/EPSV/SPSV replies. – for NAT.
# Symbolic host names are also accepted for gateways with dynamic IP
# addresses.

# ForcePassiveIP                192.168.0.1

# Upload/download ratio for anonymous users.

# AnonymousRatio                1 10

# Upload/download ratio for all users.
# This directive superscedes the previous one.

# UserRatio                 1 10

# Disallow downloading of files owned by “ftp”, ie.
# files that were uploaded but not validated by a local admin.

AntiWarez                   yes

# IP address/port to listen to (default=all IP and port 21).

# Bind                      127.0.0.1,21

# Maximum bandwidth for anonymous users in KB/s

# AnonymousBandwidth            8

# Maximum bandwidth for *all* users (including anonymous) in KB/s
# Use AnonymousBandwidth *or* UserBandwidth, both makes no sense.

# UserBandwidth             8

# File creation mask. <umask for files>:<umask for dirs> .
# 177:077 if you feel paranoid.

Umask                       133:022

# Minimum UID for an authenticated user to log in.

MinUID                      500

# Do not use the /etc/ftpusers file to disable accounts. We’re already
# using MinUID to block users with uid < 500

UseFtpUsers no

# Allow FXP transfers for authenticated users.

AllowUserFXP                no

# Allow anonymous FXP for anonymous and non-anonymous users.

AllowAnonymousFXP           no

# Users can’t delete/write files beginning with a dot (‘.’)
# even if they own them. If TrustedGID is enabled, this group
# will have access to dot-files, though.

ProhibitDotFilesWrite       no

# Prohibit *reading* of files beginning with a dot (.history, .ssh…)

ProhibitDotFilesRead        no

# Never overwrite files. When a file whoose name already exist is uploaded,
# it get automatically renamed to file.1, file.2, file.3, …

AutoRename                  no

# Disallow anonymous users to upload new files (no = upload is allowed)

AnonymousCantUpload         yes

# Only connections to this specific IP address are allowed to be
# non-anonymous. You can use this directive to open several public IPs for
# anonymous FTP, and keep a private firewalled IP for remote administration.
# You can also only allow a non-routable local IP (like 10.x.x.x) to
# authenticate, and keep a public anon-only FTP server on another IP.

#TrustedIP                  10.1.1.1

# If you want to add the PID to every logged line, uncomment the following
# line.

#LogPID                     yes

# Create an additional log file with transfers logged in a Apache-like format :
# fw.c9x.org – jedi [13/Dec/1975:19:36:39] “GET /ftp/linux.tar.bz2” 200 21809338
# This log file can then be processed by www traffic analyzers.

AltLog                     clf:/var/log/pureftpd.log

# Create an additional log file with transfers logged in a format optimized
# for statistic reports.

# AltLog                     stats:/var/log/pureftpd.log

# Create an additional log file with transfers logged in the standard W3C
# format (compatible with most commercial log analyzers)

# AltLog                     w3c:/var/log/pureftpd.log

# Disallow the CHMOD command. Users can’t change perms of their files.

#NoChmod                     yes

# Allow users to resume and upload files, but *NOT* to delete them.

#KeepAllFiles                yes

# Automatically create home directories if they are missing

CreateHomeDir               yes

# Enable virtual quotas. The first number is the max number of files.
# The second number is the max size of megabytes.
# So 1000:10 limits every user to 1000 files and 10 Mb.

#Quota                       1000:10

# If your pure-ftpd has been compiled with standalone support, you can change
# the location of the pid file. The default is /var/run/pure-ftpd.pid

#PIDFile                     /var/run/pure-ftpd.pid

# If your pure-ftpd has been compiled with pure-uploadscript support,
# this will make pure-ftpd write info about new uploads to
# /var/run/pure-ftpd.upload.pipe so pure-uploadscript can read it and
# spawn a script to handle the upload.
# Don’t enable this option if you don’t actually use pure-uploadscript.

#CallUploadScript yes

# This option is useful with servers where anonymous upload is
# allowed. As /var/ftp is in /var, it save some space and protect
# the log files. When the partition is more that X percent full,
# new uploads are disallowed.

MaxDiskUsage               99

# Set to ‘yes’ if you don’t want your users to rename files.

#NoRename                  yes

# Be ‘customer proof’ : workaround against common customer mistakes like
# ‘chmod 0 public_html’, that are valid, but that could cause ignorant
# customers to lock their files, and then keep your technical support busy
# with silly issues. If you’re sure all your users have some basic Unix
# knowledge, this feature is useless. If you’re a hosting service, enable it.

CustomerProof              yes

# Per-user concurrency limits. It will only work if the FTP server has
# been compiled with –with-peruserlimits (and this is the case on
# most binary distributions) .
# The format is : <max sessions per user>:<max anonymous sessions>
# For instance, 3:20 means that the same authenticated user can have 3 active
# sessions max. And there are 20 anonymous sessions max.

# PerUserLimits            3:20

# When a file is uploaded and there is already a previous version of the file
# with the same name, the old file will neither get removed nor truncated.
# Upload will take place in a temporary file and once the upload is complete,
# the switch to the new version will be atomic. For instance, when a large PHP
# script is being uploaded, the web server will still serve the old version and
# immediatly switch to the new one as soon as the full file will have been
# transfered. This option is incompatible with virtual quotas.

# NoTruncate               yes

# This option can accept three values :
# 0 : disable SSL/TLS encryption layer (default).
# 1 : accept both traditional and encrypted sessions.
# 2 : refuse connections that don’t use SSL/TLS security mechanisms,
#     including anonymous sessions.
# Do _not_ uncomment this blindly. Be sure that :
# 1) Your server has been compiled with SSL/TLS support (–with-tls),
# 2) A valid certificate is in place,
# 3) Only compatible clients will log in.

# TLS                      1

# Listen only to IPv4 addresses in standalone mode (ie. disable IPv6)
# By default, both IPv4 and IPv6 are enabled.

# IPV4Only                 yes

# Listen only to IPv6 addresses in standalone mode (ie. disable IPv4)
# By default, both IPv4 and IPv6 are enabled.

# IPV6Only                 yes

# UTF-8 support for file names (RFC 2640)
# Define charset of the server filesystem and optionnally the default charset
# for remote clients if they don’t use UTF-8.
# Works only if pure-ftpd has been compiled with –with-rfc2640

# FileSystemCharset    big5
# ClientCharset        big5
[/sourcecode]Step 7: Configure PureFTPD mysql link

vi /etc/pure-ftpd/pureftpd-mysql.conf

##############################################
#                                            #
# Sample Pure-FTPd Mysql configuration file. #
# See README.MySQL for explanations.         #
#                                            #
##############################################

# Optional : MySQL server name or IP. Don't define this for unix sockets.

#MYSQLServer     127.0.0.1

# Optional : MySQL port. Don't define this if a local unix socket is used.

#MYSQLPort       3306

# Optional : define the location of mysql.sock if the server runs on this host.

MYSQLSocket     /var/lib/mysql/mysql.sock

# Mandatory : user to bind the server as.

MYSQLUser       pureftpd

# Mandatory : user password. You must have a password.

MYSQLPassword   ftpdpass

# Mandatory : database to open.

MYSQLDatabase   pureftpd

# Mandatory : how passwords are stored
# Valid values are : "cleartext", "crypt", "md5" and "password"
# ("password" = MySQL password() function)
# You can also use "any" to try "crypt", "md5" *and* "password"

MYSQLCrypt      md5

# In the following directives, parts of the strings are replaced at
# run-time before performing queries :
#
# \L is replaced by the login of the user trying to authenticate.
# \I is replaced by the IP address the user connected to.
# \P is replaced by the port number the user connected to.
# \R is replaced by the IP address the user connected from.
# \D is replaced by the remote IP address, as a long decimal number.
#
# Very complex queries can be performed using these substitution strings,
# especially for virtual hosting.

# Query to execute in order to fetch the password

MYSQLGetPW      SELECT Password FROM ftpd WHERE User="\L" AND status="1" AND (ipaccess = "*" OR ipaccess LIKE "\R")

# Query to execute in order to fetch the system user name or uid

MYSQLGetUID     SELECT Uid FROM ftpd WHERE User="\L" AND status="1" AND (ipaccess = "*" OR ipaccess LIKE "\R")

# Optional : default UID - if set this overrides MYSQLGetUID

#MYSQLDefaultUID 1000

# Query to execute in order to fetch the system user group or gid

MYSQLGetGID     SELECT Gid FROM ftpd WHERE User="\L"AND status="1" AND (ipaccess = "*" OR ipaccess LIKE "\R")

# Optional : default GID - if set this overrides MYSQLGetGID

#MYSQLDefaultGID 1000

# Query to execute in order to fetch the home directory

MYSQLGetDir     SELECT Dir FROM ftpd WHERE User="\L"AND status="1" AND (ipaccess = "*" OR ipaccess LIKE "\R")

# Optional : query to get the maximal number of files
# Pure-FTPd must have been compiled with virtual quotas support.

MySQLGetQTAFS  SELECT QuotaFiles FROM ftpd WHERE User="\L"AND status="1" AND (ipaccess = "*" OR ipaccess LIKE "\R")

# Optional : query to get the maximal disk usage (virtual quotas)
# The number should be in Megabytes.
# Pure-FTPd must have been compiled with virtual quotas support.

MySQLGetQTASZ  SELECT QuotaSize FROM ftpd WHERE User="\L"AND status="1" AND (ipaccess = "*" OR ipaccess LIKE "\R")

# Optional : ratios. The server has to be compiled with ratio support.

# MySQLGetRatioUL SELECT ULRatio FROM users WHERE User='\L'
# MySQLGetRatioDL SELECT DLRatio FROM users WHERE User='\L'

# Optional : bandwidth throttling.
# The server has to be compiled with throttling support.
# Values are in KB/s .

MySQLGetBandwidthUL SELECT ULBandwidth FROM ftpd WHERE User="\L"AND status="1" AND (ipaccess = "*" OR ipaccess LIKE "\R")
MySQLGetBandwidthDL SELECT DLBandwidth FROM ftpd WHERE User="\L"AND status="1" AND (ipaccess = "*" OR ipaccess LIKE "\R")

# Enable ~ expansion. NEVER ENABLE THIS BLINDLY UNLESS :
# 1) You know what you are doing.
# 2) Real and virtual users match.

# MySQLForceTildeExpansion 1

# If you're using a transactionnal storage engine, you can enable SQL
# transactions to avoid races. Leave this commented if you are using the
# traditionnal MyIsam engine.

MySQLTransactions On

Step 8: Configure selinux

setsebool -P allow_ftpd_full_access=1
setsebool -P ftp_home_dir on
setsebool -P allow_ftpd_full_access on

Step 8: Test if configuration is working

service pure-ftpd restart

Acpi problems in Centos with D945GCLF

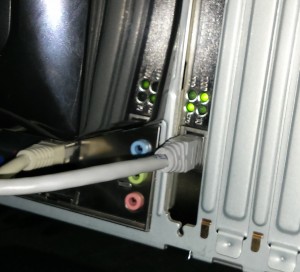
I decided upgrade my home fileserver computer a D945GCLF motherboard adding a new 10/100/1000 pci ethernet card. After configure the new ethernet controller in my centos 6 and start downloading isos and big files I saw that kacpid process uses one cpu at 100% all time. I check the syslog and hundreds of lines like these appears

ACPI Error (psparse-0537): Method parse/execution failed [\_SB_.PCI0.LPC_.SMBR] (Node ), AE_AML_INFINITE_LOOP
ACPI Error (psparse-0537): Method parse/execution failed [\_SB_.PCI0.LPC_.INIT] (Node ), AE_AML_INFINITE_LOOP
ACPI Error (psparse-0537): Method parse/execution failed [\_GPE._L00] (Node ), AE_AML_INFINITE_LOOP
ACPI Exception: AE_AML_INFINITE_LOOP, while evaluating GPE method [_L00] (20090903/evgpe-568)

If I disable the acpi in grub at next reboot the system lost one core and framebuffer etc etc.

What was the solution?

simply, Just Update the bios to the latest LF94510J.86A.0278.2010.0414.2000

Now I can enjoy 4x more speed that with integrated network card 🙂

new networkcard

Install BackupPC on Centos 6.3

BackupPC logo

Backups are important, every hard disk, every motherboard, every piece of hardware will fail.  Remember this if you don’t have a backup system.

Step 1. Install required software

enable epel repo

yum install wget

wget http://ftp.rediris.es/mirror/fedora-epel/6/i386/epel-release-6-7.noarch.rpm
rpm -i epel-release-6-7.noarch.rpm

yum install BackupPC

Step 2:enable Apache webserver

edit apache config file

vi /etc/httpd/conf/httpd.conf

and make apache run as backuppc user

User backuppc

edit BackupPC apache config

vi /etc/httpd/conf.d/BackupPC.conf

should be like these

<IfModule !mod_authz_core.c>
# Apache 2.2
order deny,allow
allow from all
allow from 127.0.0.1
allow from ::1
require valid-user
</IfModule>

chkconfig httpd on

/etc/init.d/httpd start

Step 3: Configure Backuppc password

htpasswd -c /etc/BackupPC/apache.users backuppc

Step 4: Enable BackupPC Service

chkconfig backuppc on

/etc/init.d/backuppc start

Step 5: Verify installation

open a browser and navigate to

http://<Backupchost>/backuppc

Clean backup pc install

sudo and /etc/sudoers.d directory

sudo logo

I needed to add a new user into sudoers file into several debian machines, i didn’t want open a terminal in each machine and add the line manually, the other option was append a new line into the file like echo “new line”>> /etc/sudoers .But I don’t like edit sudoers file without using visudo, I don’t feel safe.

Reading the debian documentation I found a magical directive for append external files #includedir /etc/sudoers.d, that’s mean if I add a new file  with 0440 permisions and the permissions are important will be appended into our sudo config.

Removing the hash character is a inherited custom ok don’t remove the hash character  is not a comment indicador withouth the hash character, includedir /etc/sudoers.d is a bad line and visudo show an error.

Migrating from M0n0wall to pfSense

During the last year,  talking with some colleages about firewalls and operative systems the mayor part of then said that they’re using, Pfsense instead M0n0wall. Recently I get a new job and my home networks are in the same range that the work network and some clients. To avoid this situation I decided migrate my router from M0n0wall to Pfsense and thats are the steps:

I decided maintain a copy of the actual M0n0wall config, bougth a new compact flash was the quick option.

Download pfSense

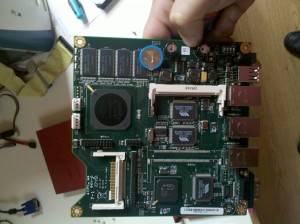
First I downloaded the version for my router, in this case it’s and ALIX Board without VGA,, that means that i need to choose the nanobsd version and my compactFlash size is 4Gb, if I had a bigger campactFlash I just only need to take the 4gb versión.

wget
wget

wget

Verify downloaded image:

md5sum pfSense-2.0.1-RELEASE-4g-i386-nanobsd.img.gz

and check if output it’s the same that content in /pfSense-2.0.1-RELEASE-4g-i386-nanobsd.img.gz.md5

sha256sum pfSense-2.0.1-RELEASE-4g-i386-nanobsd.img.gz

and check if output it’s the same that content in /pfSense-2.0.1-RELEASE-4g-i386-nanobsd.img.gz.sha256

Dump pfSense into the compact flash

In my case as fedora user i need to detect what device file is linked to my compactFlash i make this

open a root cosole and write

mount >mountedBefore

this generate a file with actual mounted files

i attach the compact flash and execute

mount >mountedAfter

now i write

diff mountedBefore mountedAfter

and the output will be like:

> /dev/sdd1 on /run/media/luzem/753C-3741 type vfat (rw,nosuid,nodev,relatime,uid=1000,gid=1000,fmask=0022,dmask=0077,codepage=cp437,iocharset=ascii,shortname=mixed,showexec,utf8,errors=remount-ro,uhelper=udisks2)

It said that my compact flash is on /dev/sdd file

first i need to umount it

umount /dev/sdd1

now i decompress and dump pfSense into compact flash writing

zcat pfSense-2.0.1-RELEASE-4g-i386-nanobsd.img.gz | dd of=/dev/sdd bs=16k

you should get and output like these

244138+1 records in
244138+1 records out
3999969792 bytes (4.0 GB) copied, 226.826 s, 17.6 MB/s

Putting pfSense into alix board

Now plug the compactFlash on your board

connect your board , power, ethernet ….

enjoy reconfiguring yout new router

alix 2d3

Setting up a Php Continuous integration environment in Centos 6

As part of my job I need to create a continuous integration environment for my develops in Php.

first I installed Gitlab and then I installed Jenkins using the web page tutorial ( http://jenkins-ci.org/ ).

you need to have enabled EPEL repos http://fedoraproject.org/wiki/EPEL and rpm Fusion repos http://rpmfusion.org/ .

when you have Jenkins installed you will need install the needed packages open a root terminal and write:

yum install ant php php-phpunit-phploc php-pdepend-PHP-Depend.noarch php-phpmd-PHP-PMD.noarch php-phpunit-phpcpd.noarch php-phpunit-phploc.noarch php-pear-PHP-CodeSniffer.noarch php-phpunit-PHP-CodeBrowser.noarch

The next step is add the php template into Jenkins CI

  • cd /var/lib/jenkins/jobs
  • mkdir php-template
  • cd php-template
  • wget https://raw.github.com/sebastianbergmann/php-jenkins-template/master/config.xml
  • cd ..
  • chown -R jenkins:jenkins php-template/
  • /etc/init.d/jenkins restart

now we can create a new php project based on the php-template 🙂

Jenkins git ssh auth in Centos 6

jenkins

After install Gitlab the next step  was install Jenkins and start to work with a continuous integration server. I installed Jenkins following doc and create a new project for one of my repos. and i get this output

Building in workspace /var/lib/jenkins/jobs/PFC/workspace
Checkout:workspace / /var/lib/jenkins/jobs/PFC/workspace – hudson.remoting.LocalChannel@1aba936a
Using strategy: Default
Cloning the remote Git repository
Cloning repository origin
ERROR: Error cloning remote repo ‘origin’ : Could not clone gitolite@git.luzem.com:pfc.git
hudson.plugins.git.GitException: Could not clone gitolite@git.luzem.com:pfc.git
at hudson.plugins.git.GitAPI.clone(GitAPI.java:245)
at hudson.plugins.git.GitSCM$2.invoke(GitSCM.java:1117)
at hudson.plugins.git.GitSCM$2.invoke(GitSCM.java:1059)
at hudson.FilePath.act(FilePath.java:832)
at hudson.FilePath.act(FilePath.java:814)
at hudson.plugins.git.GitSCM.checkout(GitSCM.java:1059)
at hudson.model.AbstractProject.checkout(AbstractProject.java:1218)
at hudson.model.AbstractBuild$AbstractRunner.checkout(AbstractBuild.java:581)
at hudson.model.AbstractBuild$AbstractRunner.run(AbstractBuild.java:470)
at hudson.model.Run.run(Run.java:1421)
at hudson.model.FreeStyleBuild.run(FreeStyleBuild.java:46)
at hudson.model.ResourceController.execute(ResourceController.java:88)
at hudson.model.Executor.run(Executor.java:238)
Caused by: hudson.plugins.git.GitException: Command “git clone –progress -o origin gitolite@git.luzem.com:pfc.git /var/lib/jenkins/jobs/PFC/workspace” returned status code 128:
stdout: Initialized empty Git repository in /var/lib/jenkins/jobs/PFC/workspace/.git/

stderr: Host key verification failed.
fatal: The remote end hung up unexpectedly

at hudson.plugins.git.GitAPI.launchCommandIn(GitAPI.java:779)
at hudson.plugins.git.GitAPI.access$000(GitAPI.java:38)
at hudson.plugins.git.GitAPI$1.invoke(GitAPI.java:241)
at hudson.plugins.git.GitAPI$1.invoke(GitAPI.java:221)
at hudson.FilePath.act(FilePath.java:832)
at hudson.FilePath.act(FilePath.java:814)
at hudson.plugins.git.GitAPI.clone(GitAPI.java:221)
… 12 more
Trying next repository
ERROR: Could not clone repository
FATAL: Could not clone
hudson.plugins.git.GitException: Could not clone
at hudson.plugins.git.GitSCM$2.invoke(GitSCM.java:1129)
at hudson.plugins.git.GitSCM$2.invoke(GitSCM.java:1059)
at hudson.FilePath.act(FilePath.java:832)
at hudson.FilePath.act(FilePath.java:814)
at hudson.plugins.git.GitSCM.checkout(GitSCM.java:1059)
at hudson.model.AbstractProject.checkout(AbstractProject.java:1218)
at hudson.model.AbstractBuild$AbstractRunner.checkout(AbstractBuild.java:581)
at hudson.model.AbstractBuild$AbstractRunner.run(AbstractBuild.java:470)
at hudson.model.Run.run(Run.java:1421)
at hudson.model.FreeStyleBuild.run(FreeStyleBuild.java:46)
at hudson.model.ResourceController.execute(ResourceController.java:88)
at hudson.model.Executor.run(Executor.java:238)

When you install Jenkins from the repos one problem is configure ssh keys for jenkins user, the first thing to configure ssh keys was su jenkins and run ssh keygen but it failed because i can’t log with Jenkins user.

i open a terminal as root on server machine as root and start writing:

vim /etc/passwd

changing jenkins line

jenkins:x:492:486:Jenkins Continuous Build server:/var/lib/jenkins:/bin/false

for

jenkins:x:492:486:Jenkins Continuous Build server:/var/lib/jenkins:/bin/bash

after changuing this line you can do

su jenkins

cd

ssh-keygen

cat .ssh/id_rsa.pub

now you have the key for your jenkins user and it can pull from your repos

for more security edit again /etc/passwd and pul false in jenkins shell

jenkins:x:492:486:Jenkins Continuous Build server:/var/lib/jenkins:/bin/false