Move wordpress blog to another domain

If you need to move wordpress from one domain to another you only need to make a simple search and replace.

http://interconnectit.com/products/search-and-replace-for-wordpress-databases/

First step

move your files to the new location, through ftp sftp ftps webdav ..

Second step

backup your database and move to the new server.

third step

upload a copy of Search and Replace Script and follow instructions

Clean all Mysql Data

/etc/init.d/mysql stop
/etc/init.d/mysql start
mysql -uroot
mysql -uroot   -e “show databases” | grep -v Database | grep -v mysql| grep -v information_schema| grep -v test | grep -v OLD |gawk ‘{print “drop database ” $1 “;select sleep(0.1);”}’ | mysql -uroot
/etc/init.d/mysql stop
rm ibdata1
rm ib_logfile*
rm -rf mysql
mysql_install_db
/usr/bin/mysqld_safe
/usr/bin/mysql_secure_installation


Enjoy

Acelerating openbravo Pos cash desk closing

After several years using Openbravo Pos in my family’s business,  My father  says that cash desk closing takes about 5 minutes and growing every day that was a bit annoying.

  • backup database
  • reconfigure my.conf enabling innodb_file_per_table,
  • restart mysql
  • drop database
  • restore
  • and pass a mysqlcheck with optimize option


didn’t show a big performance increase.

Finally the solution was adding indexes into tables.

ALTER TABLE TAXLINES ADD INDEX receipt (RECEIPT);
ALTER TABLE TAXLINES ADD INDEX taxid (TAXID);
ALTER TABLE TAXES ADD INDEX category (category);
ALTER TABLE RECEIPTS ADD INDEX money (money);

Point of sale

Setting up a Php Continuous integration environment in Centos 6

As part of my job I need to create a continuous integration environment for my develops in Php.

first I installed Gitlab and then I installed Jenkins using the web page tutorial ( http://jenkins-ci.org/ ).

you need to have enabled EPEL repos http://fedoraproject.org/wiki/EPEL and rpm Fusion repos http://rpmfusion.org/ .

when you have Jenkins installed you will need install the needed packages open a root terminal and write:

yum install ant php php-phpunit-phploc php-pdepend-PHP-Depend.noarch php-phpmd-PHP-PMD.noarch php-phpunit-phpcpd.noarch php-phpunit-phploc.noarch php-pear-PHP-CodeSniffer.noarch php-phpunit-PHP-CodeBrowser.noarch

The next step is add the php template into Jenkins CI

  • cd /var/lib/jenkins/jobs
  • mkdir php-template
  • cd php-template
  • wget https://raw.github.com/sebastianbergmann/php-jenkins-template/master/config.xml
  • cd ..
  • chown -R jenkins:jenkins php-template/
  • /etc/init.d/jenkins restart

now we can create a new php project based on the php-template 🙂

Jenkins Xvfb in Centos 6

During my last adventures with Jenkins y suffered into a new problem trying to running my gtester’s test battery.

 [exec] TEST: tests/stkmngtest... (pid=13754)
     [exec]
     [exec] Gtk-WARNING **: cannot open display:
     [exec] aborting...
     [exec] FAIL: tests/stkmngtest

that makes my test suite were aborted  and also makes Jenkins useless, and useless things are my competitors because the only useless thing allowed at home is me 😛 .

The basic problem is that there no are a XOrg session running, first I change runlevel to 5 and expect see test runing  a big FAIL was the result.

after reading a bit of literature I discover a thing called Xvfb

for install follow these steps

su

yum install Xvfb

yum install mesa-dri-drivers

the next step was try to install Xvfb plugin in jenkins but i doesn’t work it give these exception

FATAL: null
java.lang.NullPointerException
	at org.jenkinsci.plugins.xvfb.XvfbBuildWrapper.decorateLauncher(XvfbBuildWrapper.java:165)
	at hudson.model.AbstractBuild$AbstractRunner.createLauncher(AbstractBuild.java:525)
	at hudson.model.AbstractBuild$AbstractRunner.run(AbstractBuild.java:452)
	at hudson.model.Run.run(Run.java:1434)
	at hudson.model.FreeStyleBuild.run(FreeStyleBuild.java:46)
	at hudson.model.ResourceController.execute(ResourceController.java:88)
	at hudson.model.Executor.run(Executor.java:239)

I found a quick and dirty solution that is put a xvfb-run call in commands that need a xserver like this

<target name=”runtest” description=”run glib test”>
<exec executable=”xvfb-run”>
<arg value=”gtester”/>
<arg value=”tests/stkmngtest”/>
<arg value=”–keep-going”/>
<arg value=”-o=Tests.xml”/>
</exec>
</target>

the solution for solve these problem is configure Jenkins plugin BIG BIG BIG THANKS TO Tomasz Wysocki, he show me the missing configuration options.

Here for global settings

And here for project settings

Jenkins git ssh auth in Centos 6

jenkins

After install Gitlab the next step  was install Jenkins and start to work with a continuous integration server. I installed Jenkins following doc and create a new project for one of my repos. and i get this output

Building in workspace /var/lib/jenkins/jobs/PFC/workspace
Checkout:workspace / /var/lib/jenkins/jobs/PFC/workspace – hudson.remoting.LocalChannel@1aba936a
Using strategy: Default
Cloning the remote Git repository
Cloning repository origin
ERROR: Error cloning remote repo ‘origin’ : Could not clone gitolite@git.luzem.com:pfc.git
hudson.plugins.git.GitException: Could not clone gitolite@git.luzem.com:pfc.git
at hudson.plugins.git.GitAPI.clone(GitAPI.java:245)
at hudson.plugins.git.GitSCM$2.invoke(GitSCM.java:1117)
at hudson.plugins.git.GitSCM$2.invoke(GitSCM.java:1059)
at hudson.FilePath.act(FilePath.java:832)
at hudson.FilePath.act(FilePath.java:814)
at hudson.plugins.git.GitSCM.checkout(GitSCM.java:1059)
at hudson.model.AbstractProject.checkout(AbstractProject.java:1218)
at hudson.model.AbstractBuild$AbstractRunner.checkout(AbstractBuild.java:581)
at hudson.model.AbstractBuild$AbstractRunner.run(AbstractBuild.java:470)
at hudson.model.Run.run(Run.java:1421)
at hudson.model.FreeStyleBuild.run(FreeStyleBuild.java:46)
at hudson.model.ResourceController.execute(ResourceController.java:88)
at hudson.model.Executor.run(Executor.java:238)
Caused by: hudson.plugins.git.GitException: Command “git clone –progress -o origin gitolite@git.luzem.com:pfc.git /var/lib/jenkins/jobs/PFC/workspace” returned status code 128:
stdout: Initialized empty Git repository in /var/lib/jenkins/jobs/PFC/workspace/.git/

stderr: Host key verification failed.
fatal: The remote end hung up unexpectedly

at hudson.plugins.git.GitAPI.launchCommandIn(GitAPI.java:779)
at hudson.plugins.git.GitAPI.access$000(GitAPI.java:38)
at hudson.plugins.git.GitAPI$1.invoke(GitAPI.java:241)
at hudson.plugins.git.GitAPI$1.invoke(GitAPI.java:221)
at hudson.FilePath.act(FilePath.java:832)
at hudson.FilePath.act(FilePath.java:814)
at hudson.plugins.git.GitAPI.clone(GitAPI.java:221)
… 12 more
Trying next repository
ERROR: Could not clone repository
FATAL: Could not clone
hudson.plugins.git.GitException: Could not clone
at hudson.plugins.git.GitSCM$2.invoke(GitSCM.java:1129)
at hudson.plugins.git.GitSCM$2.invoke(GitSCM.java:1059)
at hudson.FilePath.act(FilePath.java:832)
at hudson.FilePath.act(FilePath.java:814)
at hudson.plugins.git.GitSCM.checkout(GitSCM.java:1059)
at hudson.model.AbstractProject.checkout(AbstractProject.java:1218)
at hudson.model.AbstractBuild$AbstractRunner.checkout(AbstractBuild.java:581)
at hudson.model.AbstractBuild$AbstractRunner.run(AbstractBuild.java:470)
at hudson.model.Run.run(Run.java:1421)
at hudson.model.FreeStyleBuild.run(FreeStyleBuild.java:46)
at hudson.model.ResourceController.execute(ResourceController.java:88)
at hudson.model.Executor.run(Executor.java:238)

When you install Jenkins from the repos one problem is configure ssh keys for jenkins user, the first thing to configure ssh keys was su jenkins and run ssh keygen but it failed because i can’t log with Jenkins user.

i open a terminal as root on server machine as root and start writing:

vim /etc/passwd

changing jenkins line

jenkins:x:492:486:Jenkins Continuous Build server:/var/lib/jenkins:/bin/false

for

jenkins:x:492:486:Jenkins Continuous Build server:/var/lib/jenkins:/bin/bash

after changuing this line you can do

su jenkins

cd

ssh-keygen

cat .ssh/id_rsa.pub

now you have the key for your jenkins user and it can pull from your repos

for more security edit again /etc/passwd and pul false in jenkins shell

jenkins:x:492:486:Jenkins Continuous Build server:/var/lib/jenkins:/bin/false

Installing GitLab 2.1 on Centos 6

gitlab logo

Step 1: Install needed packages

you will need remove installed ruby because repo version is 1.8.7 and we need 1.9 at least

yum remove ruby

yum install wget

enable epel repos

wget

rpm -Uvh epel-release-6-5.noarch.rpm

install required libraries

yum install readline-devel  libyaml-devel gdbm-devel  ncurses-devel  redis openssl-devel zlib-devel gcc gcc-c++ make autoconf readline-devel curl-devel expat-devel gettext-devel  tk-devel  libxml2-devel libffi-devel libxslt-devel libicu-devel httpd httpd-devel gitolite git-all python-devel python-pip sqlite-devel sendmail vim mysql-devel

Step 2: Install Ruby 1.9.3

wget http://ftp.ruby-lang.org/pub/ruby/1.9/ruby-1.9.3-p0.tar.gz

tar xzvf ruby-1.9.3-p0.tar.gz

cd ruby-1.9.3-p0

./configure

make

make install

Step 3: Install gitolite

Create gitolite-admin user

    useradd -d /home/gitolite-admin gitolite-admin

generate RSA key pair for gitolite-admin user

su gitolite-admin
ssh-keygen
exit

Move generate public key to gitolite home dir

cp /home/gitolite-admin/.ssh/id_rsa.pub /var/lib/gitolite/id_rsa_gitolite_admin.pub
chown gitolite:gitolite /var/lib/gitolite/id_rsa_gitolite_admin.pub

complete gitolite and gitolite-admin users pairing

su gitolite
gl-setup /var/lib/gitolite/id_rsa_gitolite_admin.pub

a editor will opened changue repo permissions to 0007

$REPO_UMASK to 0007
exit
su gitolite-admin
cd
git clone gitolite@localhost:gitolite-admin

in the last command you clone the gitolite-admin repo on gitolite-admin’s home. Gitolite-admin repo is gitolite config

before continue we need configure gitolite-admin git profile

git config –global user.email “gitolite-admin@localhost”
git config –global user.name “gitolite-admin”
exit

add gitolite-admin to gitolite group

usermod -a -G gitolite gitolite-admin

changue gitolite-admin password

passwd gitolite-admin

Step 6 Launch Redis

chkconfig redis on

/etc/init.d/redis start

Step 7 GitLab

Clone GitLab sourcecode

cd /var/www

git clone git://github.com/gitlabhq/gitlabhq.git

chown -R gitolite-admin:gitolite-admin gitlabhq/

cd gitlabhq/

Install phython dependencies

pip-python install pygments

Install required gems

gem install bundler

bundle install

su gitolite-admin

bundle install

Prepare config files

cp config/database.yml.example config/database.yml

cp config/gitlab.yml.example config/gitlab.yml

Prepare production enviroment

RAILS_ENV=production rake db:setup
RAILS_ENV=production rake db:seed_fu

you will get these login data

login………admin@local.host
password……5iveL!fe

Config gitolite gitlab link

vim config/gitlab.yml

your  git_host: section must be like this

# Git Hosting congiguration
git_host:
system: gitolite
admin_uri: gitolite@localhost:gitolite-admin
base_path: /var/lib/gitolite/repositories/
host: localhost
git_user: gitolite
# port: 22

fix gitolite permissions

chmod -R 770 /var/lib/gitolite/repositories/

try your installation launching webrick

bundle exec rails s -e production

open a web broser, write  yourhost:3000 and check if everything is working if you get an error send me a comment

Install passenger for Apache

gem install passenger
passenger-install-apache2-module

follow screen instructions

edit apache config file

vim /etc/httpd/conf/httpd.conf

and append these lines at the end

LoadModule passenger_module /usr/local/lib/ruby/gems/1.9.1/gems/passenger-3.0.11/ext/apache2/mod_passenger.so
PassengerRoot /usr/local/lib/ruby/gems/1.9.1/gems/passenger-3.0.11
PassengerRuby /usr/local/bin/ruby

enable apache service

/etc/init.d/httpd start

chkconfig httpd on

Sources

http://wasil.org/en/gitlab-installation-on-fedora-16-with-gitolite

http://rickfoosusa.blogspot.com/2011/08/gitolite-tutorial-senawario.html
Installing basic enviroment for start Developing Ruby on Rails apps under windows

If you plant to start developing under Ruby on Rails one good start point could be installing a basic developement enviroment.

If you are using windows I hope that this tutorial could be usefull for you.

1.- Download rubycompiler, interpreter

you can get it from http://rubyforge.org/frs/?group_id=167

2.- Download RubyGems, will be necesary for get libraries

you can get it from http://rubyforge.org/frs/?group_id=126

uncompres the zip file, and open a terminal

cd <directory where you decompress rubygems>

ruby setup.rb

3.- Download rubyInstaller developement kit

http://github.com/downloads/oneclick/rubyinstaller/DevKit-tdm-32-4.5.2-20110712-1620-sfx.exe

execute the downloaded file in a directory like: C:\\Devkit

when you have it extrated open a terminal and write

cd <Devkit installer dir>

ruby dk.rb init

ruby dk.rb review

ruby dk.rb install

4.- Install rails

Open a terminal and write

gem install rails

5.- Donload and install JDK (needed for netbeans)

http://www.oracle.com/technetwork/java/javase/downloads/index.html

6.- Download amd install  Netbeans

http://netbeans.org/

7.- Install Netbeans ruby plugin

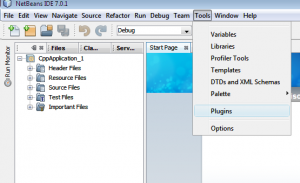
Open netbeans and select tools->plugins menu

netbeans plugins

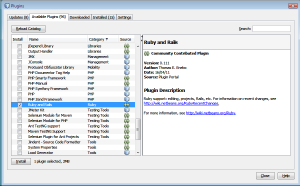
a new dialog appears, select avaliable plugins tab and mak ruby and rails plugin

ruby and rails plugin netbeansClick install

and follow the install wizard

Congratulations you have a ruby on rails basic enviroment installed

You can create a new ruby on rails project in the wizard File->New Project

Installing PhpUnderControl in Centos 6

PhpUnderControl is a way to use CI under

Step 1: Enable EPEL repo and Remi repo

yum install wget

rpm -Uvh http://download.fedora.redhat.com/pub/epel/6/i386/epel-release-6-5.noarch.rpm

rpm -Uvh http://rpms.famillecollet.com/enterprise/remi-release-6.rpm

enable remi repository editing file /etc/yum.repos.d/remi.repo

enabled=1

Step2: Install Java and other stuff

yum install unzip

yum install ant

yum install java-1.6.0-openjdk-devel

yum install php-phpunit-PHP-CodeCoverage.noarch

yum install phpdoc.noarch

yum install php-phpunit-phpcpd.noarch

yum install php-phpunit-phploc.noarch

yum install php-phpunit-PHPUnit.noarch

wget ftp://ftp.pbone.net/mirror/rpms.famillecollet.com/enterprise/5/remi/x86_64/php-pear-Console-CommandLine-1.1.3-3.el5.remi.noarch.rpm

rpm -i php-pear-Console-CommandLine-1.1.3-3.el5.remi.noarch.rpm

yum install php-phpunit-PHP-CodeBrowser

yum install php-phpmd-PHP-PMD.noarch

yum install php-ezc-Graph.noarch

yum install git

yum install subversion

Step3: Download CruiseControl

cd /opt

wget http://downloads.sourceforge.net/project/cruisecontrol/CruiseControl/2.8.4/cruisecontrol-bin-2.8.4.zip?r=http%3A%2F%2Fsourceforge.net%2Fprojects%2Fcruisecontrol%2Ffiles%2FCruiseControl%2F2.8.4%2F&ts=1314111366&use_mirror=heanet

unzip cruisecontrol-bin-2.8.4.zip

mv cruisecontrol-bin-2.8.4 cruisecontrol

rm cruisecontrol-bin-2.8.4.zip

cd cruisecontrol

step 4 fix problem with JAVA_HOME

open cruisecontrol.sh with your favorite editor (vim, emacs, nano, pico, gedit …) and set JAVA_HOME value, your file begin  must look like this:

<br />
&lt;br /&gt;#!/usr/bin/env bash&lt;br /&gt;<br />
JAVA_HOME=&quot;/usr/lib/jvm/java-1.6.0-openjdk&quot;&lt;br /&gt;<br />
 #################################################&lt;br /&gt;<br />
 # CruiseControl, a Continuous Integration Toolkit&lt;br /&gt;<br />
 # Copyright (c) 2001, ThoughtWorks, Inc.&lt;br /<br />
&gt; # 200 E. Randolph, 25th Floor&lt;br /&gt;<br />
 # Chicago, IL 60601 USA&lt;br /&gt;<br />
 # All rights reserved.&lt;br /&gt;<br />

step 5

open needed ports

step 6

Download PhpUnderControl

cd /opt

wget http://github.com/phpundercontrol/phpUnderControl/zipball/0.6.1beta1

mv 0.6.1beta1 0.6.1beta1.zip

unzip 0.6.1beta1.zip

mv phpundercontrol-phpUnderControl-04197bb/ phpundercontrol

step 7

Install PhpUnderControl over cruiseControl

cd phpundercontrol

cd bin

./phpuc.php install /opt/cruisecontrol/

Jeckins update under Fedora 15

If you have installed jenkins from their web page they add a new repository but not import the repository’s public key that generates problems in yum updates

No se ha instalado la llave pública de jenkins-1.421-1.1.noarch.rpm

if you want to fix these problem only run this command

sudo rpm –import http://pkg.jenkins-ci.org/redhat/jenkins-ci.org.key