During the last year, talking with some colleages about firewalls and operative systems the mayor part of then said that they’re using, Pfsense instead M0n0wall. Recently I get a new job and my home networks are in the same range that the work network and some clients. To avoid this situation I decided migrate my router from M0n0wall to Pfsense and thats are the steps:
I decided maintain a copy of the actual M0n0wall config, bougth a new compact flash was the quick option.
Download pfSense
First I downloaded the version for my router, in this case it’s and ALIX Board without VGA,, that means that i need to choose the nanobsd version and my compactFlash size is 4Gb, if I had a bigger campactFlash I just only need to take the 4gb versión.
and check if output it’s the same that content in /pfSense-2.0.1-RELEASE-4g-i386-nanobsd.img.gz.sha256
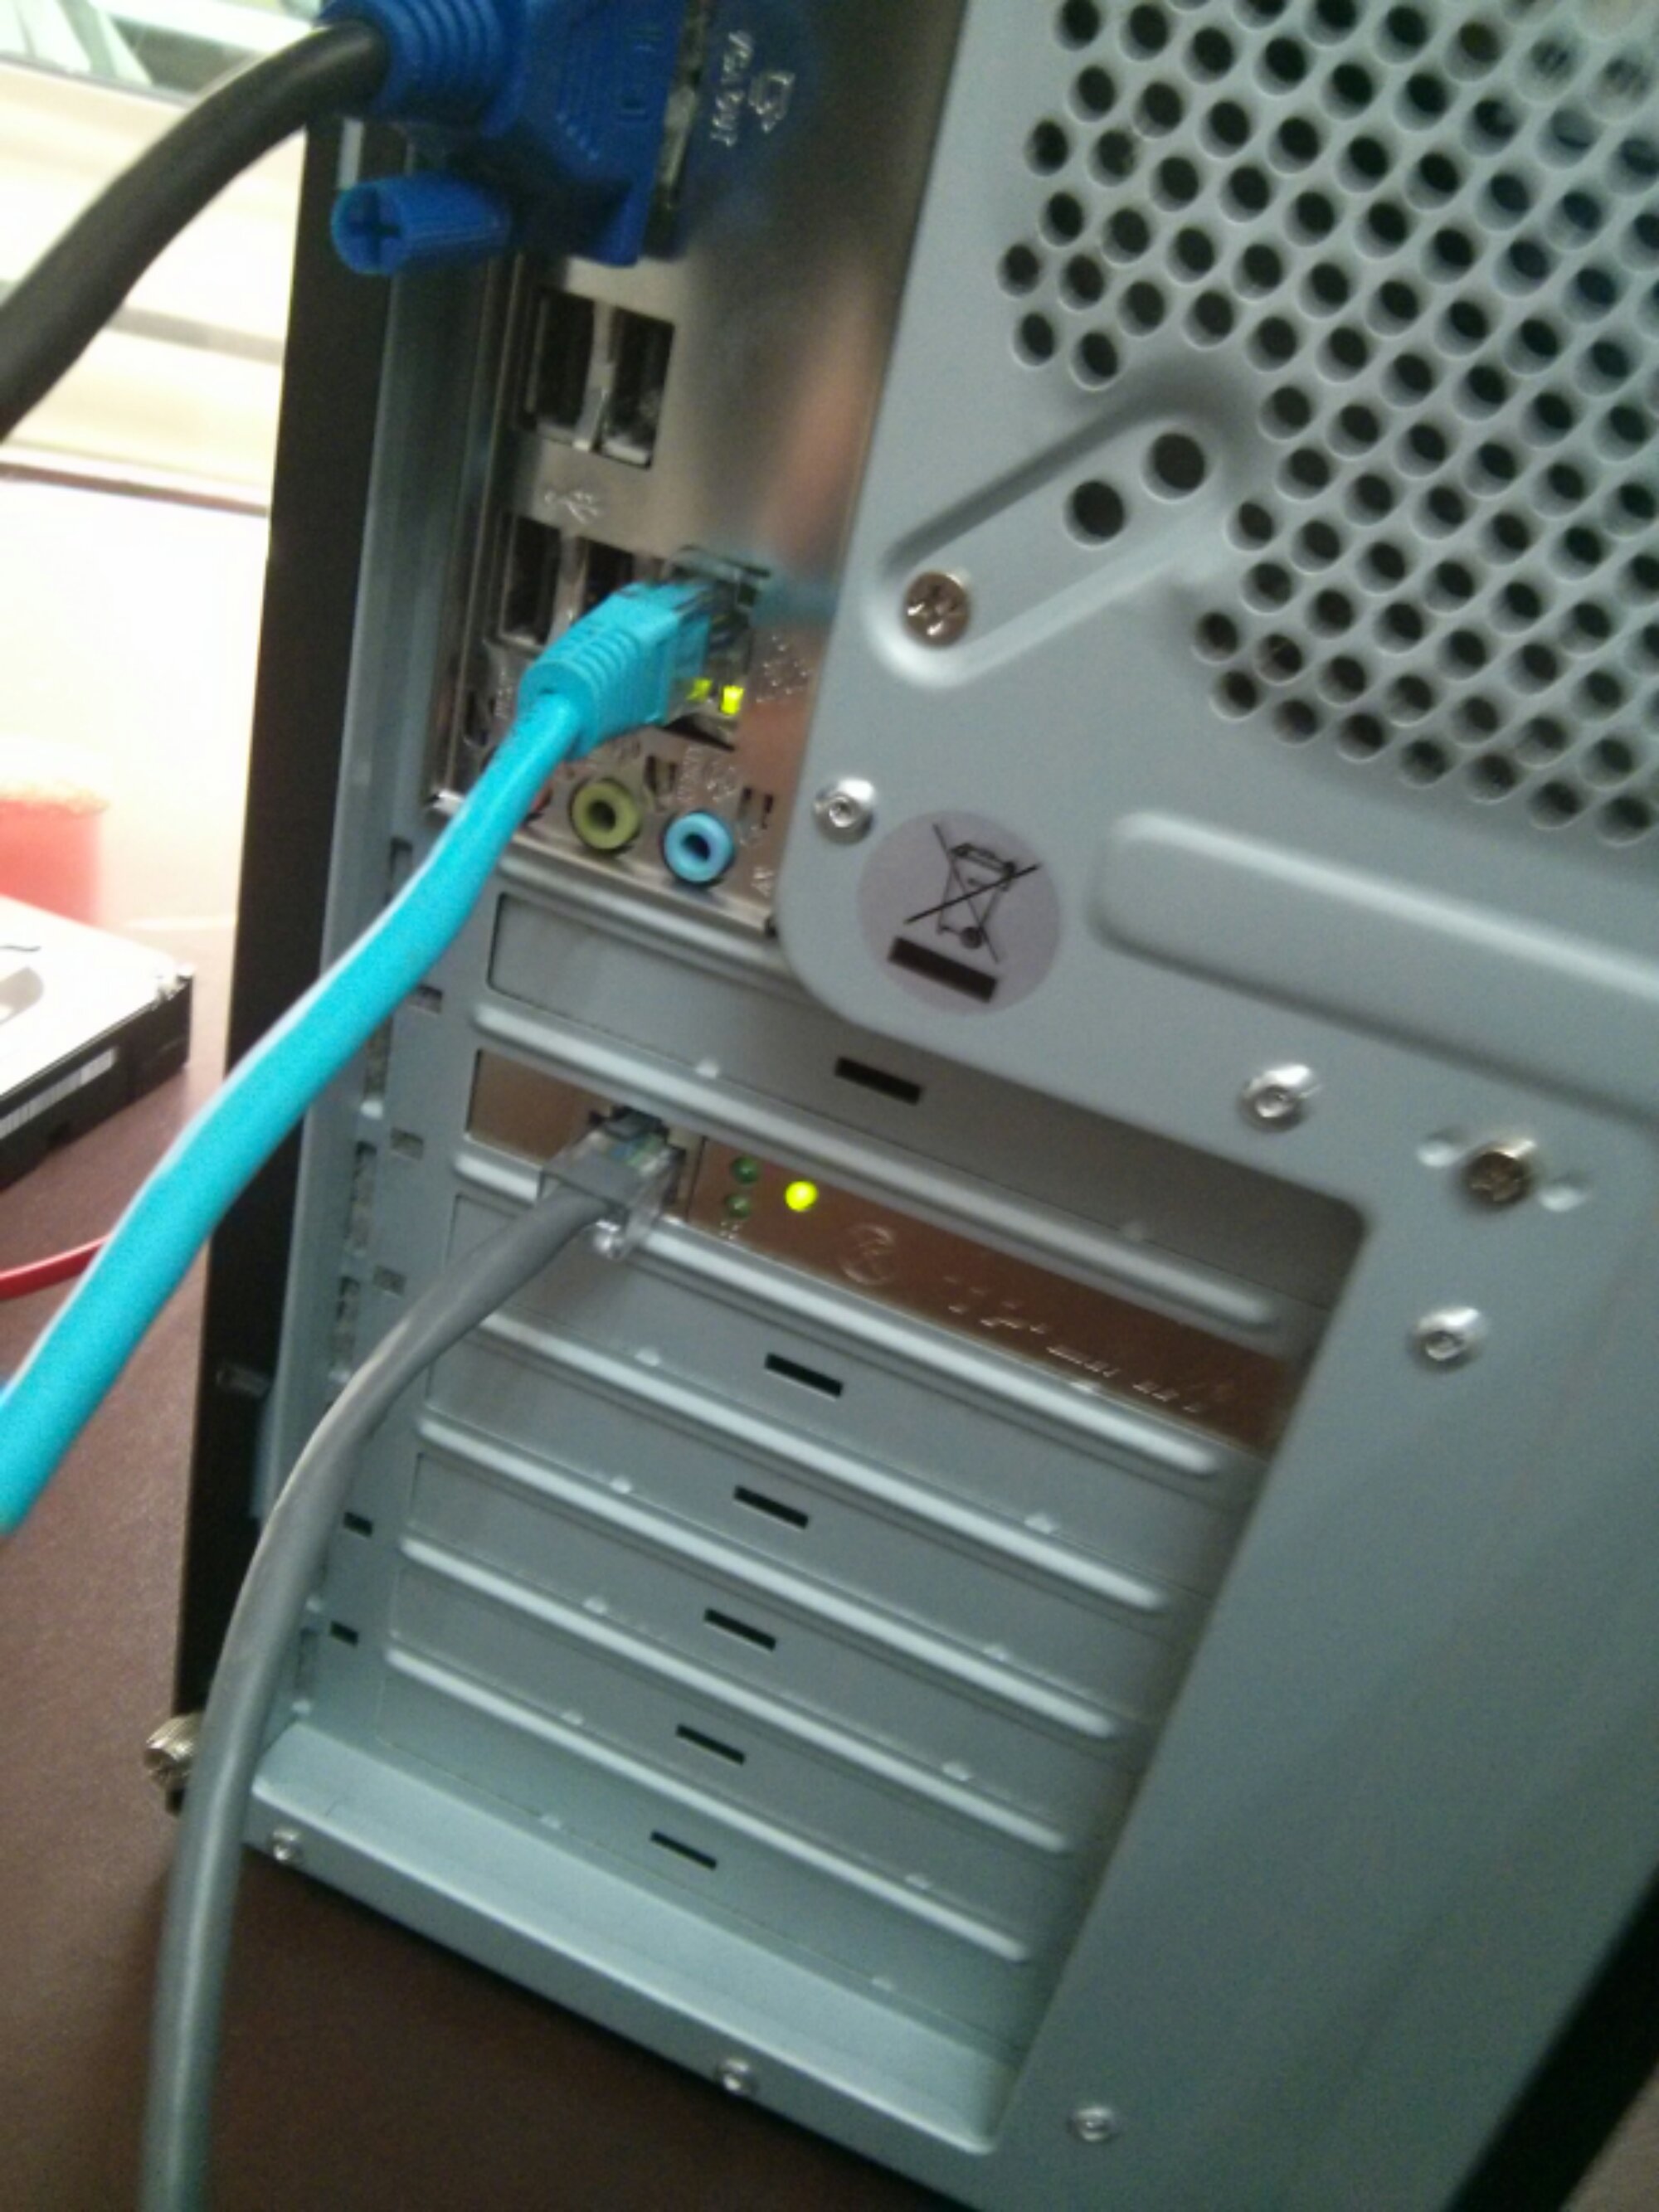
Dump pfSense into the compact flash
In my case as fedora user i need to detect what device file is linked to my compactFlash i make this
open a root cosole and write
mount >mountedBefore
this generate a file with actual mounted files
i attach the compact flash and execute
mount >mountedAfter
now i write
diff mountedBefore mountedAfter
and the output will be like:
> /dev/sdd1 on /run/media/luzem/753C-3741 type vfat (rw,nosuid,nodev,relatime,uid=1000,gid=1000,fmask=0022,dmask=0077,codepage=cp437,iocharset=ascii,shortname=mixed,showexec,utf8,errors=remount-ro,uhelper=udisks2)
It said that my compact flash is on /dev/sdd file
first i need to umount it
umount /dev/sdd1
now i decompress and dump pfSense into compact flash writing
¿ Qué comandos serían necesarios ejecutar para que un sistema Linux pudiese sustituir el encaminador R2 mostrado en el diagrama ? Asume todos aquellos datos que necesites para realizar el ejercicio (nombre de interfaces, gateway, etc)
Click for larger view
Previous Steps
Enable IP Forwarding
Temporal:
echo 1 > /proc/sys/net/ipv4/ip_forward
Permanent:
vim /etc/sysctl.conf
changue the value of net.ipv4.ip_forward = 1
sysctl -p /etc/sysctl.conf # enable changues
Configuring network intefaces
Temporal:
ifconfig eth0 down
ifconfig eth0 10.10.0.2 netmask 255.255.255.0 up
ifconfig eth1 down
ifconfig eth1 200.3.107.1 netmask 255.255.255.0 up
if you want to add more routes increment the numbers next to GATEWAY, for example: GATEWAY1=10.0.0.2 NETMASK1= 255.255.255.0 ADDRESS1=192.168.30.0
Pros
No extra processing and added resources as in the case of dynamic routing protocols
No extra bandwidth requirement caused by the transmission of excessive packets for the routing table update process
Extra security by manually admitting or rejecting routing to certain networks
Cons
Network Administrators need to know the complete network topology very well in order to configure routes correctly
Topology changes need manual adjustment to all routers something which is very time consuming
Option 2: Using NAT
Basically NAT works like static routing but changes the output ip maintaining a internal
temporal:
# delete old configuration, if any
#Flush all the rules in filter and nat tables
iptables –flush
iptables –table nat –flush
# delete all chains that are not in default filter and nat table, if any
iptables –delete-chain
iptables –table nat –delete-chain
# Set up IP FORWARDing and Masquerading (NAT)
iptables –table nat –append POSTROUTING –out-interface eth0 -j MASQUERADE
iptables –append FORWARD –in-interface eth1 -j ACCEPT
permanent:
store the rules into the ip tables into a rules set
Pros
same that static plus
It also benefits in a security sense as attackants can’t target a computer directly, they have to first get past the router.
Cons
Network Address Translation does not allow a true end-to-end connectivity that is required by some real time applications. A number of real-time applications require the creation of a logical tunnel to exchange the data packets quickly in real-time. It requires a fast and seamless connectivity devoid of any intermediaries such as a proxy server that tends to complicate and slow down the communications process.
NAT creates complications in the functioning of Tunneling protocols. Any communication that is routed through a Proxy server tends to be comparatively slow and prone to disruptions. Certain critical applications offer no room for such inadequacies. Examples include telemedicine and teleconferencing. Such applications find the process of network address translation as a bottleneck in the communication network creating avoidable distortions in the end-to-end connectivity.
NAT acts as a redundant channel in the online communication over the Internet. The twin reasons for the widespread popularity and subsequent adoption of the network address translation process were a shortage of IPv4 address space and the security concerns. Both these issues have been fully addressed in the IPv6 protocol. As the IPv6 slowly replaces the IPv4 protocol, the network address translation process will become redundant and useless while consuming the scarce network resources for providing services that will be no longer required over the IPv6 networks.
Option 3: Using RIP
Rip is a distance routing protocol, is more flexible that using static routers and necessary if the number of subnets grows. Do you want to fight against hundred of rules? or assume the risk of downtime’s created by a router malfunction?
Routing updates can require significant bandwidth because the entire routing table is sent
Prone to routing loops
Option 4: Using OSPF (Open Shortest Path First)
OSPF is a routing protocol that uses the Dijkstra algorithm for get the quickest way. into a set of subnets where the routers are connected at different speeds could work better than R.I.P.
ospfd(config-router)# network 200.3.107.0/24 area 0
ospfd(config-router)# passive-interface eth1
ospfd(config-router)# end
ospfd# write file
Configuration saved to /etc/zebra/ospfd.conf
pros
Scalability – OSPF is specifically designed to operate with larger networks.
Full subnetting support – OSPF can fully support subnetting
Hello packets – OSPF uses small hello packets to verify link operation with out transferring large tables
TOS routing – OSPF can route packets by different criterion based on their type of service field
Tagged routes – Routes can be tagged with arbitrary values, easing interoperation.
cons
very intensive processor
maintaining multiple copies of routing information, increasing the amount of memory needed
OSPF can be logically segmented by using areasnot as easy to learn as some other protocols
if an entire network is running OSPF, and one link within it is “bouncing” every few seconds, then OSPF updates would dominate the network by informing every other router every time the link changed state.
¿Quieres poner tu router linksys en modo cliente de un puto de acceso que emite una señal protegida con WEP?, seguro que la interfaz solo te permite insertar la clave a traves de la passphrase que no quieres cambiar o no puedes (interfaces web externas, muchas cosas configuradas….)
Pues esto es un bug de las ultimas versiones de DD-WRT si tienes un linksys con broadcom la solucion es conectarte por telnet o ssh (siempre mejor) e insertar estor comandos:
nvram set wl0_key1=”TU CLAVE WEP” (con las comillas)
¿Has decidido pasarte a OpenDNS y no puedes ver la lista de host en samba?, simplemente modifica tu archivo smb.conf introduciendo o editando la resolución de nombres
Estos dias a mis oidos de informatico llegan consultas sobre el TDT (si tiene enchufe todo informatico puedo arreglarlo desde un pc a una tostadora)
En España se implemento el estandar DVB-T para la emisión de la televisión digital, con la ventaja que no se ve el ruidillo blanco y aparte de los 8 o 9 canales que teníamos siempre fulmina las televisiones locales y aparecen 10 canales de teletienda.
Nada problemático hasta que llega la película de los descodificadores hace un par de días por la aprobación de la TDT de pago.
El españolito medio tiene en casa una colección de televisores que se ha comprado den los últimos años y no entiende la diferencia entre ver la televisión analógica y la tele del aparatito.
Punto 1 – La ventaja de la dichosa TDT es que se aprecia mejor calidad de imagen, cogen mas canales , tenemos una guía con la programación y no se pegan los canales entre si (famosas interferencias que solapaban la imagen de dos canales)
Modulo para la TDT de pago
Punto 2- El decodificador del Carrefour que te compraste por 4 duros sigue valiendo a menos que todos los canales pasen a emitir en 1080i25 encapsulado en MPEG4 AVC MP y HP L4.0 que lo dudo, así que para lo único que no te va a funcionar es para los canales de pago. (Si quieres ver el fútbol lo pagas y compras otro decodificador)
Punto 3 – El decodificador que te compraste (para ver la tele de pago como para ver los canales) dejara de funcionar entre el 2010 y 2012 (o un poco mas tarde dependerá de como se planifique la transición ) ¿por qué? pues porque el se implementara DVB-T2 que se le llamara TDT de 2ª generación o como se les ocurra a los de los telediarios. Aquí habrá que volver a cambiar el aparatito por uno nuevo o la tele (que 5 lustros son muchos para un aparatito).
Conclusiones
Si le preguntas a Prisa (esto es un engaño del gobierno y una falta de respeto porque nos obliga a cambiar el decodificador, también se llama competencia en la contenidos de pago allí se fue el monopolio de Canal Satélite Digital)
Si le preguntas a MediaPro (esto es la entrada a una televisión de mejor calidad en contenidos un paso hacia el futuro bla bla bla bla)
Si me preguntas a mi: Se acabaron las teles que duran 5 lustros y la televisión entra en el mundo del sector informático (Actualizar, actualizar, comprar otro vuelta al principio). Ver las bellezas de la Sexta en Full HD algún día merece la inversión, verle las arrugas a Gayoso y a Maria Teresa Campos en Full HD es perjudicial para la audiencia de esos canales (demasiado aburrimiento en alta definición ).
Así que compra el decodificador mas barato que te encuentres y que pienses que no es un producto DSST(Día Siguiente al Servicio Técnico) si quieres ver la TDT de pago compras uno con la tarjetita, si no quieres ver la tele de pago, comparte uno sin ranura para la tarjetita. Total en el 2012 te tienes que comprar otro así que en menos de 5 años le vas a dar puerta.
y bonus para los que se compraron una tele HD Ready que no es Full HD osea que no tiene 1080 lineas pero si 720 o menos, el día que los canales emitan a 1080 veras la imagen deformada (Pero las teles HD ready eran mas baratas y la película de dibujos se veía tan bien como la que costaba el doble).
Vamos que como todo lo tecnológico hay que leerse un poco como esta todo el tema antes de comprar y no ir como un loco al Carrefour comprar la chatarra mas barata que encuentres en modo no se lo que estoy comprando pero le escuche a Fulano, a Mengano y a Zutano algo y leí alguna cosa sin fijarme y esto me hace falta.
Y minipunto para el que me diga en los comentarios que es el MHP en los receptores de TDT (tecnología que era necesaria para la implantación de la televisión digital y con la cual no contaban todos los descodificadores y por eso algunos era un timo por que tendríamos que cambiarlos bla bla bla bla).
PD.- Corolario de la TDT por Luzem: La opinión del ciudadano sobre la TDT estará relacionada directamente con el canal de televisión donde vea las noticias
This website uses cookies to improve your experience. We'll assume you're ok with this, but you can opt-out if you wish.AcceptRejectRead More
Privacy & Cookies Policy
Privacy Overview
This website uses cookies to improve your experience while you navigate through the website. Out of these, the cookies that are categorized as necessary are stored on your browser as they are essential for the working of basic functionalities of the website. We also use third-party cookies that help us analyze and understand how you use this website. These cookies will be stored in your browser only with your consent. You also have the option to opt-out of these cookies. But opting out of some of these cookies may affect your browsing experience.
Necessary cookies are absolutely essential for the website to function properly. This category only includes cookies that ensures basic functionalities and security features of the website. These cookies do not store any personal information.
Any cookies that may not be particularly necessary for the website to function and is used specifically to collect user personal data via analytics, ads, other embedded contents are termed as non-necessary cookies. It is mandatory to procure user consent prior to running these cookies on your website.