More problems installing Fedora 17

After install fedora 17 into my friend computer, My desktop gets your turn.

I follow my classic fedora installation method.

  1. Download install DVD x86_64 version iso image.
  2. Burn a blank DVD
  3. Boot my computer from the DVD

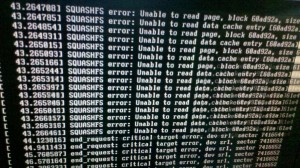
these are my normal steps but my boot DVD shoa lot of errors like:

SQUASHFS error: Unable to read page, block xxxxxxxF, size xxxF

I read some info from forums and they say that the problem was with the dvd, Because after install fedora in my desktop I was installed Hasefroch 7  and burned Fedora ISO in the same computer.

After Downloaded Sha256 for windows and check that I have the correct image, i go to bed and leave the computer checking a new recorder DVD.

When I get up I observer tat new DVD has errors too, so i decided to download a live cd iso and try with live CD, this method works and i could install fedora but i saw a small number of errors but it was thinking the live cd  too small for support everything. so i decide install my system from the live cd hopping that errors disappears at first boot.

After install a bad behavior appear in the screen and system appears to frozen in moments with unexpected X restarts. I decide to check running process using top et voila. My Phenom computer only has one processor working 🙁 . After that I remember that when change the hard disk some wires from the pow source stopped the CPU fan for a moment, 20 secs approx, a disaster has coming i burn my cpu and  need to buy a new processor, but when i reboot on haseforch  saw four cores working, that not was a CPU problem so I check the dmesg output.

[    0.006467] ACPI: Core revision 20120111
[    0.009031] ftrace: allocating 22596 entries in 89 pages
[    0.017650] ..TIMER: vector=0x30 apic1=0 pin1=2 apic2=-1 pin2=-1
[    0.028157] CPU0: AMD Phenom(tm) 9850 Quad-Core Processor stepping 03
[    0.028998] Performance Events: AMD PMU driver.
[    0.028998] ... version:                0
[    0.028998] ... bit width:              48
[    0.028998] ... generic registers:      4
[    0.028998] ... value mask:             0000ffffffffffff
[    0.028998] ... max period:             00007fffffffffff
[    0.028998] ... fixed-purpose events:   0
[    0.028998] ... event mask:             000000000000000f
[    0.028998] NMI watchdog enabled, takes one hw-pmu counter.
[    0.028998] Booting Node   0, Processors  #1
[    0.028998] smpboot cpu 1: start_ip = 93000
[    6.975648] CPU1: Not responding.
[    6.976466]  #2
[    6.976475] smpboot cpu 2: start_ip = 93000
[   14.279079] CPU2: Not responding.
[   14.281137]  #3
[   14.281146] smpboot cpu 3: start_ip = 93000
[   21.143977] CPU3: Not responding.
[   21.144993] Brought up 1 CPUs
[   21.145004] Total of 1 processors activated (5022.87 BogoMIPS).
[   21.147104] devtmpfs: initialized
[   21.147356] PM: Registering ACPI NVS region at cfcf0000 (12288 bytes)

I try changing kernel boot parameters without acpi with NOACPI and a lot of things and every time that my computer reboot my Linux only show one core.

Finally i found the guilty element it doesn’t was the CPU it was the motherboard

MA785GM-US2HI update the bios using the last version but it doesn’t work, finally I download a BIOS beta version , mb_bios_ga-ma785gm-us2h_f12a, from gigabyte web page and it works.

[    0.026770] CPU0: AMD Phenom(tm) 9850 Quad-Core Processor stepping 03
[    0.026998] Performance Events: AMD PMU driver.
[    0.026998] ... version:                0
[    0.026998] ... bit width:              48
[    0.026998] ... generic registers:      4
[    0.026998] ... value mask:             0000ffffffffffff
[    0.026998] ... max period:             00007fffffffffff
[    0.026998] ... fixed-purpose events:   0
[    0.026998] ... event mask:             000000000000000f
[    0.026998] NMI watchdog enabled, takes one hw-pmu counter.
[    0.026998] Booting Node   0, Processors  #1
[    0.026998] smpboot cpu 1: start_ip = 93000
[    0.038014] NMI watchdog enabled, takes one hw-pmu counter.
[    0.038094]  #2
[    0.038095] smpboot cpu 2: start_ip = 93000
[    0.050011] NMI watchdog enabled, takes one hw-pmu counter.
[    0.050083]  #3
[    0.050084] smpboot cpu 3: start_ip = 93000
[    0.062009] NMI watchdog enabled, takes one hw-pmu counter.
[    0.062032] Brought up 4 CPUs
[    0.062034] Total of 4 processors activated (20091.79 BogoMIPS).

Now all the cores are available. Screen doesn’t works yet and I’m downloading a new DVD copy because i don’t like liveCD install.

Enjoy
Nvidia Fx 5200 on Fedora 17

recently a friend lend me your desktop pc for reinstall the OS, I decided install Fedora 17 as a backup OS, if something happens with Windows XP linux will save his life.

After install and configure Windows XP, Fedora take his turn, but when the install process ended an out of range message appears into my screen. Fortunately network was working and ssh was runing :-P.

First I take my laptop and  discover the nvidia computer ip, you can check your router ip or use nmap.

ssh <nvidia_ip> -l root

vim /etc/default/grub

and append in your  GRUB_CMDLINE_LINUX  this text “rhgb quiet rdblacklist=nouveau nouveau.modeset=0″

GRUB_CMDLINE_LINUX=”rd.md=0 rd.lvm=0 rd.dm=0 SYSFONT=True rd.luks=0 LANG=es_ES.UTF-8  KEYTABLE=es rhgb quiet rdblacklist=nouveau nouveau.modeset=0”

and finally run

grub2-mkconfig -o /boot/grub2/grub.cfg

reboot your computer

reboot && exit

now your screen is working , not fluent  but working :-P.

Jenkins Xvfb in Centos 6

During my last adventures with Jenkins y suffered into a new problem trying to running my gtester’s test battery.

 [exec] TEST: tests/stkmngtest... (pid=13754)
     [exec]
     [exec] Gtk-WARNING **: cannot open display:
     [exec] aborting...
     [exec] FAIL: tests/stkmngtest

that makes my test suite were aborted  and also makes Jenkins useless, and useless things are my competitors because the only useless thing allowed at home is me 😛 .

The basic problem is that there no are a XOrg session running, first I change runlevel to 5 and expect see test runing  a big FAIL was the result.

after reading a bit of literature I discover a thing called Xvfb

for install follow these steps

su

yum install Xvfb

yum install mesa-dri-drivers

the next step was try to install Xvfb plugin in jenkins but i doesn’t work it give these exception

FATAL: null
java.lang.NullPointerException
	at org.jenkinsci.plugins.xvfb.XvfbBuildWrapper.decorateLauncher(XvfbBuildWrapper.java:165)
	at hudson.model.AbstractBuild$AbstractRunner.createLauncher(AbstractBuild.java:525)
	at hudson.model.AbstractBuild$AbstractRunner.run(AbstractBuild.java:452)
	at hudson.model.Run.run(Run.java:1434)
	at hudson.model.FreeStyleBuild.run(FreeStyleBuild.java:46)
	at hudson.model.ResourceController.execute(ResourceController.java:88)
	at hudson.model.Executor.run(Executor.java:239)

I found a quick and dirty solution that is put a xvfb-run call in commands that need a xserver like this

<target name=”runtest” description=”run glib test”>
<exec executable=”xvfb-run”>
<arg value=”gtester”/>
<arg value=”tests/stkmngtest”/>
<arg value=”–keep-going”/>
<arg value=”-o=Tests.xml”/>
</exec>
</target>

the solution for solve these problem is configure Jenkins plugin BIG BIG BIG THANKS TO Tomasz Wysocki, he show me the missing configuration options.

Here for global settings

And here for project settings

Jenkins git ssh auth in Centos 6

jenkins

After install Gitlab the next step  was install Jenkins and start to work with a continuous integration server. I installed Jenkins following doc and create a new project for one of my repos. and i get this output

Building in workspace /var/lib/jenkins/jobs/PFC/workspace
Checkout:workspace / /var/lib/jenkins/jobs/PFC/workspace – hudson.remoting.LocalChannel@1aba936a
Using strategy: Default
Cloning the remote Git repository
Cloning repository origin
ERROR: Error cloning remote repo ‘origin’ : Could not clone gitolite@git.luzem.com:pfc.git
hudson.plugins.git.GitException: Could not clone gitolite@git.luzem.com:pfc.git
at hudson.plugins.git.GitAPI.clone(GitAPI.java:245)
at hudson.plugins.git.GitSCM$2.invoke(GitSCM.java:1117)
at hudson.plugins.git.GitSCM$2.invoke(GitSCM.java:1059)
at hudson.FilePath.act(FilePath.java:832)
at hudson.FilePath.act(FilePath.java:814)
at hudson.plugins.git.GitSCM.checkout(GitSCM.java:1059)
at hudson.model.AbstractProject.checkout(AbstractProject.java:1218)
at hudson.model.AbstractBuild$AbstractRunner.checkout(AbstractBuild.java:581)
at hudson.model.AbstractBuild$AbstractRunner.run(AbstractBuild.java:470)
at hudson.model.Run.run(Run.java:1421)
at hudson.model.FreeStyleBuild.run(FreeStyleBuild.java:46)
at hudson.model.ResourceController.execute(ResourceController.java:88)
at hudson.model.Executor.run(Executor.java:238)
Caused by: hudson.plugins.git.GitException: Command “git clone –progress -o origin gitolite@git.luzem.com:pfc.git /var/lib/jenkins/jobs/PFC/workspace” returned status code 128:
stdout: Initialized empty Git repository in /var/lib/jenkins/jobs/PFC/workspace/.git/

stderr: Host key verification failed.
fatal: The remote end hung up unexpectedly

at hudson.plugins.git.GitAPI.launchCommandIn(GitAPI.java:779)
at hudson.plugins.git.GitAPI.access$000(GitAPI.java:38)
at hudson.plugins.git.GitAPI$1.invoke(GitAPI.java:241)
at hudson.plugins.git.GitAPI$1.invoke(GitAPI.java:221)
at hudson.FilePath.act(FilePath.java:832)
at hudson.FilePath.act(FilePath.java:814)
at hudson.plugins.git.GitAPI.clone(GitAPI.java:221)
… 12 more
Trying next repository
ERROR: Could not clone repository
FATAL: Could not clone
hudson.plugins.git.GitException: Could not clone
at hudson.plugins.git.GitSCM$2.invoke(GitSCM.java:1129)
at hudson.plugins.git.GitSCM$2.invoke(GitSCM.java:1059)
at hudson.FilePath.act(FilePath.java:832)
at hudson.FilePath.act(FilePath.java:814)
at hudson.plugins.git.GitSCM.checkout(GitSCM.java:1059)
at hudson.model.AbstractProject.checkout(AbstractProject.java:1218)
at hudson.model.AbstractBuild$AbstractRunner.checkout(AbstractBuild.java:581)
at hudson.model.AbstractBuild$AbstractRunner.run(AbstractBuild.java:470)
at hudson.model.Run.run(Run.java:1421)
at hudson.model.FreeStyleBuild.run(FreeStyleBuild.java:46)
at hudson.model.ResourceController.execute(ResourceController.java:88)
at hudson.model.Executor.run(Executor.java:238)

When you install Jenkins from the repos one problem is configure ssh keys for jenkins user, the first thing to configure ssh keys was su jenkins and run ssh keygen but it failed because i can’t log with Jenkins user.

i open a terminal as root on server machine as root and start writing:

vim /etc/passwd

changing jenkins line

jenkins:x:492:486:Jenkins Continuous Build server:/var/lib/jenkins:/bin/false

for

jenkins:x:492:486:Jenkins Continuous Build server:/var/lib/jenkins:/bin/bash

after changuing this line you can do

su jenkins

cd

ssh-keygen

cat .ssh/id_rsa.pub

now you have the key for your jenkins user and it can pull from your repos

for more security edit again /etc/passwd and pul false in jenkins shell

jenkins:x:492:486:Jenkins Continuous Build server:/var/lib/jenkins:/bin/false

Installing GitLab 2.1 on Centos 6

gitlab logo

Step 1: Install needed packages

you will need remove installed ruby because repo version is 1.8.7 and we need 1.9 at least

yum remove ruby

yum install wget

enable epel repos

wget

rpm -Uvh epel-release-6-5.noarch.rpm

install required libraries

yum install readline-devel  libyaml-devel gdbm-devel  ncurses-devel  redis openssl-devel zlib-devel gcc gcc-c++ make autoconf readline-devel curl-devel expat-devel gettext-devel  tk-devel  libxml2-devel libffi-devel libxslt-devel libicu-devel httpd httpd-devel gitolite git-all python-devel python-pip sqlite-devel sendmail vim mysql-devel

Step 2: Install Ruby 1.9.3

wget http://ftp.ruby-lang.org/pub/ruby/1.9/ruby-1.9.3-p0.tar.gz

tar xzvf ruby-1.9.3-p0.tar.gz

cd ruby-1.9.3-p0

./configure

make

make install

Step 3: Install gitolite

Create gitolite-admin user

    useradd -d /home/gitolite-admin gitolite-admin

generate RSA key pair for gitolite-admin user

su gitolite-admin
ssh-keygen
exit

Move generate public key to gitolite home dir

cp /home/gitolite-admin/.ssh/id_rsa.pub /var/lib/gitolite/id_rsa_gitolite_admin.pub
chown gitolite:gitolite /var/lib/gitolite/id_rsa_gitolite_admin.pub

complete gitolite and gitolite-admin users pairing

su gitolite
gl-setup /var/lib/gitolite/id_rsa_gitolite_admin.pub

a editor will opened changue repo permissions to 0007

$REPO_UMASK to 0007
exit
su gitolite-admin
cd
git clone gitolite@localhost:gitolite-admin

in the last command you clone the gitolite-admin repo on gitolite-admin’s home. Gitolite-admin repo is gitolite config

before continue we need configure gitolite-admin git profile

git config –global user.email “gitolite-admin@localhost”
git config –global user.name “gitolite-admin”
exit

add gitolite-admin to gitolite group

usermod -a -G gitolite gitolite-admin

changue gitolite-admin password

passwd gitolite-admin

Step 6 Launch Redis

chkconfig redis on

/etc/init.d/redis start

Step 7 GitLab

Clone GitLab sourcecode

cd /var/www

git clone git://github.com/gitlabhq/gitlabhq.git

chown -R gitolite-admin:gitolite-admin gitlabhq/

cd gitlabhq/

Install phython dependencies

pip-python install pygments

Install required gems

gem install bundler

bundle install

su gitolite-admin

bundle install

Prepare config files

cp config/database.yml.example config/database.yml

cp config/gitlab.yml.example config/gitlab.yml

Prepare production enviroment

RAILS_ENV=production rake db:setup
RAILS_ENV=production rake db:seed_fu

you will get these login data

login………admin@local.host
password……5iveL!fe

Config gitolite gitlab link

vim config/gitlab.yml

your  git_host: section must be like this

# Git Hosting congiguration
git_host:
system: gitolite
admin_uri: gitolite@localhost:gitolite-admin
base_path: /var/lib/gitolite/repositories/
host: localhost
git_user: gitolite
# port: 22

fix gitolite permissions

chmod -R 770 /var/lib/gitolite/repositories/

try your installation launching webrick

bundle exec rails s -e production

open a web broser, write  yourhost:3000 and check if everything is working if you get an error send me a comment

Install passenger for Apache

gem install passenger
passenger-install-apache2-module

follow screen instructions

edit apache config file

vim /etc/httpd/conf/httpd.conf

and append these lines at the end

LoadModule passenger_module /usr/local/lib/ruby/gems/1.9.1/gems/passenger-3.0.11/ext/apache2/mod_passenger.so
PassengerRoot /usr/local/lib/ruby/gems/1.9.1/gems/passenger-3.0.11
PassengerRuby /usr/local/bin/ruby

enable apache service

/etc/init.d/httpd start

chkconfig httpd on

Sources

http://wasil.org/en/gitlab-installation-on-fedora-16-with-gitolite

http://rickfoosusa.blogspot.com/2011/08/gitolite-tutorial-senawario.html

Installing OpenWRT Backfire in a fonera 2100

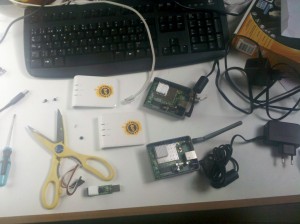
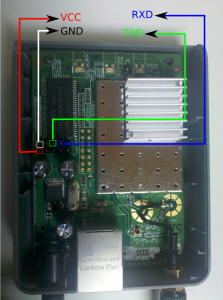
Sometimes pocket money isn’t enought for buy new network devices or we want to save some money changuing no existant money for personal time. In my case I needed to create a wireless bridge in my personal network, pass a ethernet wire between two builds wasn’t an option. Searching in my forgoten stuff boxes i found two foneras model 2100. Fon’s firmware isn’t powerfull enought to get wds and when these things happens Free Software is our solution. A couple of foneras Ready for flashing I’m a lucky man and I also found a usb to 3,3V serial adapter, one of my superpower is that i can brick everything. First of all we need to plug our serial adapter into fonera’s port, check the attached image for see jtag pinouts Fonera pinouts

when we have our jtag port connected we need a software for send data over jtag in my case i use GtkTerm.

in debian is simply I open a root terminal and I write

apt-get install GtkTerm

in the same term i write

gtkterm

I use a root terminal because I don’t want waste time configuring /dev/ttSy* permissions

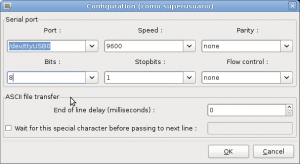
next step is configure port speed 9600,8N1

in GtkTerm menu select configuration/port and fill data boxes, in my case port is /dev/ttyUSB0 if you don’t know your port a dmesg output can be helpul.

GtkTerm 9600,8N1

now is time to plug powersounce on our fonera and see output.

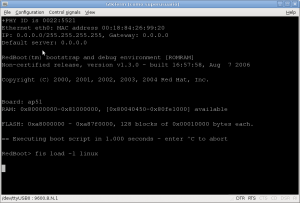
must be something like this in our gtkterm

Fonera booting

we need get access to redboot console  you only need un plug and plug powersource to fonera and press continously ctrl+c until you see

RedBoot>

we need download ou firmware go to

http://downloads.openwrt.org/backfire/10.03.1/atheros/

and download these files

  • openwrt-atheros-vmlinux.lzma
  • openwrt-atheros-root.squashfs
save the files and then we need install tftp server in our machine.

search ftpd config for your distro

Next step will be load files into fonera over tftpd config
in gtkterm we need write
ip_address -h <TFTP SERVER IP ADRESS> -l <ONE FREE IP IN YOUR NETWORK>/24
load -r -b %{FREEMEMLO} openwrt-atheros-vmlinux.lzma
fis init
fis create -e 0x80041000 -r 0x80041000 vmlinux.bin.l7
load -r -b %{FREEMEMLO} openwrt-atheros-root.squashfs
fis create rootfs
reset
if your system doesn’t boot because you have installed dd-wrt before or something similar write this in redboot console:
 fconfig boot_script_data
fis load -l vmlinux.bin.l7
exec
“press enter”
reset
enjoy
sources:

Installing basic enviroment for start Developing Ruby on Rails apps under windows

If you plant to start developing under Ruby on Rails one good start point could be installing a basic developement enviroment.

If you are using windows I hope that this tutorial could be usefull for you.

1.- Download rubycompiler, interpreter

you can get it from http://rubyforge.org/frs/?group_id=167

2.- Download RubyGems, will be necesary for get libraries

you can get it from http://rubyforge.org/frs/?group_id=126

uncompres the zip file, and open a terminal

cd <directory where you decompress rubygems>

ruby setup.rb

3.- Download rubyInstaller developement kit

http://github.com/downloads/oneclick/rubyinstaller/DevKit-tdm-32-4.5.2-20110712-1620-sfx.exe

execute the downloaded file in a directory like: C:\\Devkit

when you have it extrated open a terminal and write

cd <Devkit installer dir>

ruby dk.rb init

ruby dk.rb review

ruby dk.rb install

4.- Install rails

Open a terminal and write

gem install rails

5.- Donload and install JDK (needed for netbeans)

http://www.oracle.com/technetwork/java/javase/downloads/index.html

6.- Download amd install  Netbeans

http://netbeans.org/

7.- Install Netbeans ruby plugin

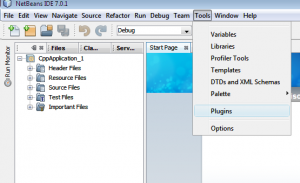
Open netbeans and select tools->plugins menu

netbeans plugins

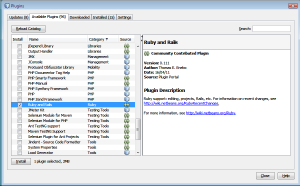
a new dialog appears, select avaliable plugins tab and mak ruby and rails plugin

ruby and rails plugin netbeansClick install

and follow the install wizard

Congratulations you have a ruby on rails basic enviroment installed

You can create a new ruby on rails project in the wizard File->New Project

Distribución en el Muestreo

Para ir practicando ejercicios resueltos y medianamente explicados, no tengo tiempo para pasarlos a libreOffice asi que van a manito (no tengo mejor letra)

PDF
Distribución en el muestreo