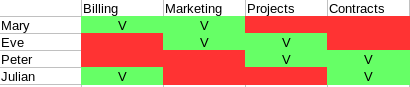
Mary, Eve, Peter and Julian are coworkers in a new startup.
their share all documents in a samba share because they’re using cutting edge technologies.
One shared folder is mapped to a network drive inside these unit there are 4 folders, billing, marketing, projects and contracts, permisions are defined by the next matrix
 They are a little special and they need to have all folders inside the network unit, because they waste a lot of time searching for server folders.
So let’s go to configure this samba server under Centos 7.
1.- we will need to install several packages
yum -y update

yum install epel-release

yum install samba samba-client samba-common vim
2.- Open several ports and enable services
systemctl enable smb.service
systemctl enable nmb.service
systemctl start smb.service
systemctl start nmb.service
firewall-cmd --permanent --zone=public --add-service=samba
firewall-cmd --reload
3.- Create users
Each member of group needs an user
adduser   -s /sbin/nologin mary
adduser   -s /sbin/nologin eve
adduser   -s /sbin/nologin peter
adduser   -s /sbin/nologin julian
4.- Create Groups
each folder needs a group
groupadd billing
groupadd marketing
groupadd projects
groupadd contracts
5.- Join Groups and users
We will need to join users and groups
usermod -a -G billing mary
usermod -a -G marketing mary
usermod -a -G marketing eve
usermod -a -G projects eve
usermod -a -G projects peter
usermod -a -G contracts peter
usermod -a -G contracts julian
usermod -a -G billing julian
6.- Create samba config
we will edit our samba config, shared folder will be at /media/shared
vim /etc/samba/smb.conf
our config file should be like these
[global]
workgroup = SAMBA
security = user
name = THESERVER
passdb backend = tdbsam

[shared]
comment = shared folder
path = /media/shared
guest ok = no
guest only = no
write list = @billing, @marketing, @projects, @contracts
valid users = @billing, @marketing, @projects, @contracts
create mask = 660
directory mask = 2770
we need to inform selinux that /media/shared directory will be user by samba process
chcon -t samba_share_t /media/shared/
7 Create directory structure
we need to create our directory structure inside /media/shared and give correct permissions.
mkdir billing
mkdir marketing
mkdir projects
mkdir contracts

chgrp billing billing/

chgrp contracts contracts/

chgrp marketing marketing/

chgrp  projects projects/
and now here it’s the magic
all directories needs to have read and write permisions for group
chmod g+rw *
and we will enable Set Group ID for all directories
chmod g+s *
with Set Group ID SETGID all files created in each directory will have the same group that parent directory
8 Create password for users
each user needs to have a password to access to shared folder
smbpasswd -a mary

smbpasswd -a eve

smbpasswd -a peter

smbpasswd -a julian
Test if everything is working
Enjoy