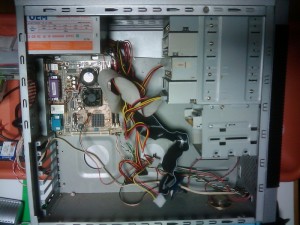
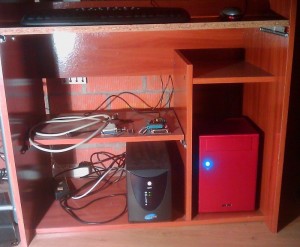
More problems installing Fedora 17

After install fedora 17 into my friend computer, My desktop gets your turn.

I follow my classic fedora installation method.

  1. Download install DVD x86_64 version iso image.
  2. Burn a blank DVD
  3. Boot my computer from the DVD

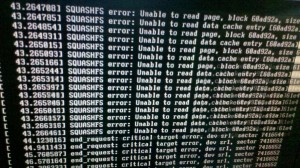
these are my normal steps but my boot DVD shoa lot of errors like:

SQUASHFS error: Unable to read page, block xxxxxxxF, size xxxF

I read some info from forums and they say that the problem was with the dvd, Because after install fedora in my desktop I was installed Hasefroch 7  and burned Fedora ISO in the same computer.

After Downloaded Sha256 for windows and check that I have the correct image, i go to bed and leave the computer checking a new recorder DVD.

When I get up I observer tat new DVD has errors too, so i decided to download a live cd iso and try with live CD, this method works and i could install fedora but i saw a small number of errors but it was thinking the live cd  too small for support everything. so i decide install my system from the live cd hopping that errors disappears at first boot.

After install a bad behavior appear in the screen and system appears to frozen in moments with unexpected X restarts. I decide to check running process using top et voila. My Phenom computer only has one processor working 🙁 . After that I remember that when change the hard disk some wires from the pow source stopped the CPU fan for a moment, 20 secs approx, a disaster has coming i burn my cpu and  need to buy a new processor, but when i reboot on haseforch  saw four cores working, that not was a CPU problem so I check the dmesg output.

[    0.006467] ACPI: Core revision 20120111
[    0.009031] ftrace: allocating 22596 entries in 89 pages
[    0.017650] ..TIMER: vector=0x30 apic1=0 pin1=2 apic2=-1 pin2=-1
[    0.028157] CPU0: AMD Phenom(tm) 9850 Quad-Core Processor stepping 03
[    0.028998] Performance Events: AMD PMU driver.
[    0.028998] ... version:                0
[    0.028998] ... bit width:              48
[    0.028998] ... generic registers:      4
[    0.028998] ... value mask:             0000ffffffffffff
[    0.028998] ... max period:             00007fffffffffff
[    0.028998] ... fixed-purpose events:   0
[    0.028998] ... event mask:             000000000000000f
[    0.028998] NMI watchdog enabled, takes one hw-pmu counter.
[    0.028998] Booting Node   0, Processors  #1
[    0.028998] smpboot cpu 1: start_ip = 93000
[    6.975648] CPU1: Not responding.
[    6.976466]  #2
[    6.976475] smpboot cpu 2: start_ip = 93000
[   14.279079] CPU2: Not responding.
[   14.281137]  #3
[   14.281146] smpboot cpu 3: start_ip = 93000
[   21.143977] CPU3: Not responding.
[   21.144993] Brought up 1 CPUs
[   21.145004] Total of 1 processors activated (5022.87 BogoMIPS).
[   21.147104] devtmpfs: initialized
[   21.147356] PM: Registering ACPI NVS region at cfcf0000 (12288 bytes)

I try changing kernel boot parameters without acpi with NOACPI and a lot of things and every time that my computer reboot my Linux only show one core.

Finally i found the guilty element it doesn’t was the CPU it was the motherboard

MA785GM-US2HI update the bios using the last version but it doesn’t work, finally I download a BIOS beta version , mb_bios_ga-ma785gm-us2h_f12a, from gigabyte web page and it works.

[    0.026770] CPU0: AMD Phenom(tm) 9850 Quad-Core Processor stepping 03
[    0.026998] Performance Events: AMD PMU driver.
[    0.026998] ... version:                0
[    0.026998] ... bit width:              48
[    0.026998] ... generic registers:      4
[    0.026998] ... value mask:             0000ffffffffffff
[    0.026998] ... max period:             00007fffffffffff
[    0.026998] ... fixed-purpose events:   0
[    0.026998] ... event mask:             000000000000000f
[    0.026998] NMI watchdog enabled, takes one hw-pmu counter.
[    0.026998] Booting Node   0, Processors  #1
[    0.026998] smpboot cpu 1: start_ip = 93000
[    0.038014] NMI watchdog enabled, takes one hw-pmu counter.
[    0.038094]  #2
[    0.038095] smpboot cpu 2: start_ip = 93000
[    0.050011] NMI watchdog enabled, takes one hw-pmu counter.
[    0.050083]  #3
[    0.050084] smpboot cpu 3: start_ip = 93000
[    0.062009] NMI watchdog enabled, takes one hw-pmu counter.
[    0.062032] Brought up 4 CPUs
[    0.062034] Total of 4 processors activated (20091.79 BogoMIPS).

Now all the cores are available. Screen doesn’t works yet and I’m downloading a new DVD copy because i don’t like liveCD install.

Enjoy
Nvidia Fx 5200 on Fedora 17

recently a friend lend me your desktop pc for reinstall the OS, I decided install Fedora 17 as a backup OS, if something happens with Windows XP linux will save his life.

After install and configure Windows XP, Fedora take his turn, but when the install process ended an out of range message appears into my screen. Fortunately network was working and ssh was runing :-P.

First I take my laptop and  discover the nvidia computer ip, you can check your router ip or use nmap.

ssh <nvidia_ip> -l root

vim /etc/default/grub

and append in your  GRUB_CMDLINE_LINUX  this text “rhgb quiet rdblacklist=nouveau nouveau.modeset=0″

GRUB_CMDLINE_LINUX=”rd.md=0 rd.lvm=0 rd.dm=0 SYSFONT=True rd.luks=0 LANG=es_ES.UTF-8  KEYTABLE=es rhgb quiet rdblacklist=nouveau nouveau.modeset=0”

and finally run

grub2-mkconfig -o /boot/grub2/grub.cfg

reboot your computer

reboot && exit

now your screen is working , not fluent  but working :-P.

Installing GitLab 2.1 on Centos 6

gitlab logo

Step 1: Install needed packages

you will need remove installed ruby because repo version is 1.8.7 and we need 1.9 at least

yum remove ruby

yum install wget

enable epel repos

wget

rpm -Uvh epel-release-6-5.noarch.rpm

install required libraries

yum install readline-devel  libyaml-devel gdbm-devel  ncurses-devel  redis openssl-devel zlib-devel gcc gcc-c++ make autoconf readline-devel curl-devel expat-devel gettext-devel  tk-devel  libxml2-devel libffi-devel libxslt-devel libicu-devel httpd httpd-devel gitolite git-all python-devel python-pip sqlite-devel sendmail vim mysql-devel

Step 2: Install Ruby 1.9.3

wget http://ftp.ruby-lang.org/pub/ruby/1.9/ruby-1.9.3-p0.tar.gz

tar xzvf ruby-1.9.3-p0.tar.gz

cd ruby-1.9.3-p0

./configure

make

make install

Step 3: Install gitolite

Create gitolite-admin user

    useradd -d /home/gitolite-admin gitolite-admin

generate RSA key pair for gitolite-admin user

su gitolite-admin
ssh-keygen
exit

Move generate public key to gitolite home dir

cp /home/gitolite-admin/.ssh/id_rsa.pub /var/lib/gitolite/id_rsa_gitolite_admin.pub
chown gitolite:gitolite /var/lib/gitolite/id_rsa_gitolite_admin.pub

complete gitolite and gitolite-admin users pairing

su gitolite
gl-setup /var/lib/gitolite/id_rsa_gitolite_admin.pub

a editor will opened changue repo permissions to 0007

$REPO_UMASK to 0007
exit
su gitolite-admin
cd
git clone gitolite@localhost:gitolite-admin

in the last command you clone the gitolite-admin repo on gitolite-admin’s home. Gitolite-admin repo is gitolite config

before continue we need configure gitolite-admin git profile

git config –global user.email “gitolite-admin@localhost”
git config –global user.name “gitolite-admin”
exit

add gitolite-admin to gitolite group

usermod -a -G gitolite gitolite-admin

changue gitolite-admin password

passwd gitolite-admin

Step 6 Launch Redis

chkconfig redis on

/etc/init.d/redis start

Step 7 GitLab

Clone GitLab sourcecode

cd /var/www

git clone git://github.com/gitlabhq/gitlabhq.git

chown -R gitolite-admin:gitolite-admin gitlabhq/

cd gitlabhq/

Install phython dependencies

pip-python install pygments

Install required gems

gem install bundler

bundle install

su gitolite-admin

bundle install

Prepare config files

cp config/database.yml.example config/database.yml

cp config/gitlab.yml.example config/gitlab.yml

Prepare production enviroment

RAILS_ENV=production rake db:setup
RAILS_ENV=production rake db:seed_fu

you will get these login data

login………admin@local.host
password……5iveL!fe

Config gitolite gitlab link

vim config/gitlab.yml

your  git_host: section must be like this

# Git Hosting congiguration
git_host:
system: gitolite
admin_uri: gitolite@localhost:gitolite-admin
base_path: /var/lib/gitolite/repositories/
host: localhost
git_user: gitolite
# port: 22

fix gitolite permissions

chmod -R 770 /var/lib/gitolite/repositories/

try your installation launching webrick

bundle exec rails s -e production

open a web broser, write  yourhost:3000 and check if everything is working if you get an error send me a comment

Install passenger for Apache

gem install passenger
passenger-install-apache2-module

follow screen instructions

edit apache config file

vim /etc/httpd/conf/httpd.conf

and append these lines at the end

LoadModule passenger_module /usr/local/lib/ruby/gems/1.9.1/gems/passenger-3.0.11/ext/apache2/mod_passenger.so
PassengerRoot /usr/local/lib/ruby/gems/1.9.1/gems/passenger-3.0.11
PassengerRuby /usr/local/bin/ruby

enable apache service

/etc/init.d/httpd start

chkconfig httpd on

Sources

http://wasil.org/en/gitlab-installation-on-fedora-16-with-gitolite

http://rickfoosusa.blogspot.com/2011/08/gitolite-tutorial-senawario.html

Installing OpenWRT Backfire in a fonera 2100

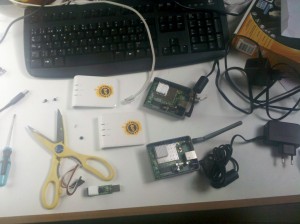
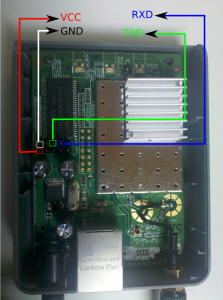
Sometimes pocket money isn’t enought for buy new network devices or we want to save some money changuing no existant money for personal time. In my case I needed to create a wireless bridge in my personal network, pass a ethernet wire between two builds wasn’t an option. Searching in my forgoten stuff boxes i found two foneras model 2100. Fon’s firmware isn’t powerfull enought to get wds and when these things happens Free Software is our solution. A couple of foneras Ready for flashing I’m a lucky man and I also found a usb to 3,3V serial adapter, one of my superpower is that i can brick everything. First of all we need to plug our serial adapter into fonera’s port, check the attached image for see jtag pinouts Fonera pinouts

when we have our jtag port connected we need a software for send data over jtag in my case i use GtkTerm.

in debian is simply I open a root terminal and I write

apt-get install GtkTerm

in the same term i write

gtkterm

I use a root terminal because I don’t want waste time configuring /dev/ttSy* permissions

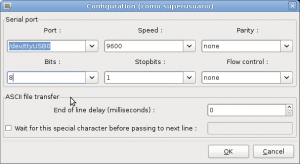
next step is configure port speed 9600,8N1

in GtkTerm menu select configuration/port and fill data boxes, in my case port is /dev/ttyUSB0 if you don’t know your port a dmesg output can be helpul.

GtkTerm 9600,8N1

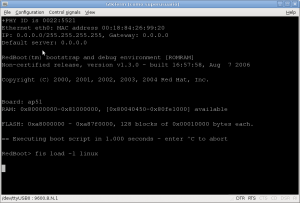
now is time to plug powersounce on our fonera and see output.

must be something like this in our gtkterm

Fonera booting

we need get access to redboot console  you only need un plug and plug powersource to fonera and press continously ctrl+c until you see

RedBoot>

we need download ou firmware go to

http://downloads.openwrt.org/backfire/10.03.1/atheros/

and download these files

  • openwrt-atheros-vmlinux.lzma
  • openwrt-atheros-root.squashfs
save the files and then we need install tftp server in our machine.

search ftpd config for your distro

Next step will be load files into fonera over tftpd config
in gtkterm we need write
ip_address -h <TFTP SERVER IP ADRESS> -l <ONE FREE IP IN YOUR NETWORK>/24
load -r -b %{FREEMEMLO} openwrt-atheros-vmlinux.lzma
fis init
fis create -e 0x80041000 -r 0x80041000 vmlinux.bin.l7
load -r -b %{FREEMEMLO} openwrt-atheros-root.squashfs
fis create rootfs
reset
if your system doesn’t boot because you have installed dd-wrt before or something similar write this in redboot console:
 fconfig boot_script_data
fis load -l vmlinux.bin.l7
exec
“press enter”
reset
enjoy
sources:

Installing PhpUnderControl in Centos 6

PhpUnderControl is a way to use CI under

Step 1: Enable EPEL repo and Remi repo

yum install wget

rpm -Uvh http://download.fedora.redhat.com/pub/epel/6/i386/epel-release-6-5.noarch.rpm

rpm -Uvh http://rpms.famillecollet.com/enterprise/remi-release-6.rpm

enable remi repository editing file /etc/yum.repos.d/remi.repo

enabled=1

Step2: Install Java and other stuff

yum install unzip

yum install ant

yum install java-1.6.0-openjdk-devel

yum install php-phpunit-PHP-CodeCoverage.noarch

yum install phpdoc.noarch

yum install php-phpunit-phpcpd.noarch

yum install php-phpunit-phploc.noarch

yum install php-phpunit-PHPUnit.noarch

wget ftp://ftp.pbone.net/mirror/rpms.famillecollet.com/enterprise/5/remi/x86_64/php-pear-Console-CommandLine-1.1.3-3.el5.remi.noarch.rpm

rpm -i php-pear-Console-CommandLine-1.1.3-3.el5.remi.noarch.rpm

yum install php-phpunit-PHP-CodeBrowser

yum install php-phpmd-PHP-PMD.noarch

yum install php-ezc-Graph.noarch

yum install git

yum install subversion

Step3: Download CruiseControl

cd /opt

wget http://downloads.sourceforge.net/project/cruisecontrol/CruiseControl/2.8.4/cruisecontrol-bin-2.8.4.zip?r=http%3A%2F%2Fsourceforge.net%2Fprojects%2Fcruisecontrol%2Ffiles%2FCruiseControl%2F2.8.4%2F&ts=1314111366&use_mirror=heanet

unzip cruisecontrol-bin-2.8.4.zip

mv cruisecontrol-bin-2.8.4 cruisecontrol

rm cruisecontrol-bin-2.8.4.zip

cd cruisecontrol

step 4 fix problem with JAVA_HOME

open cruisecontrol.sh with your favorite editor (vim, emacs, nano, pico, gedit …) and set JAVA_HOME value, your file begin  must look like this:

<br />
&lt;br /&gt;#!/usr/bin/env bash&lt;br /&gt;<br />
JAVA_HOME=&quot;/usr/lib/jvm/java-1.6.0-openjdk&quot;&lt;br /&gt;<br />
 #################################################&lt;br /&gt;<br />
 # CruiseControl, a Continuous Integration Toolkit&lt;br /&gt;<br />
 # Copyright (c) 2001, ThoughtWorks, Inc.&lt;br /<br />
&gt; # 200 E. Randolph, 25th Floor&lt;br /&gt;<br />
 # Chicago, IL 60601 USA&lt;br /&gt;<br />
 # All rights reserved.&lt;br /&gt;<br />

step 5

open needed ports

step 6

Download PhpUnderControl

cd /opt

wget http://github.com/phpundercontrol/phpUnderControl/zipball/0.6.1beta1

mv 0.6.1beta1 0.6.1beta1.zip

unzip 0.6.1beta1.zip

mv phpundercontrol-phpUnderControl-04197bb/ phpundercontrol

step 7

Install PhpUnderControl over cruiseControl

cd phpundercontrol

cd bin

./phpuc.php install /opt/cruisecontrol/

Install redmine in RHEL6 and RH based distributions

Redmine

Step 1: Install packages needed
su
yum install mysql-server ruby rubygems httpd ruby-devel mysql-devel gcc-c++ curl-devel httpd-devel apr-devel apr-util-devel

Step 2: Enable services at boot-time
apache server
chkconfig httpd on

mysql server
chkconfig mysqld on

Step 3: Open needed ports

open /etc/sysconfig/iptables in your config file and add these rules

-A INPUT -m state –state NEW -m tcp -p tcp –dport 80 -j ACCEPT

-A INPUT -m state –state NEW -m tcp -p tcp –dport 3000 -j ACCEPT

Step 4: Install ruby libs
gem install rails -v=2.3.5
gem install rack -v=1.0.1
gem install mysql
gem install -v=0.4.2 i18n
gem install passenger

Step 5: Download redmine
wget http://rubyforge.org/frs/download.php/74419/redmine-1.1.2.tar.gz

step 6: add redmine user

groupadd redmine
useradd -g redmine redmine
passwd redmine

step 7: decompress redmine
tar -xzvf redmine-1.1.2.tar.gz

step 8: move to destination dir
cd <dest_dir>

step 9: copy redmine
cp -R <redmine_uncompress_dir>/* ./

Step 10: create a new database and a new username in mysql

step 11: configure redmine
cd config/
mv database.yml.example database.yml
open database.yml #complete the data needed
cd ..

step 12: generate session store secret
rake generate_session_store

step 13: generate database structure
RAILS_ENV=production rake db:migrate

step 14: generate default configuration
RAILS_ENV=production rake redmine:load_default_data

step 15 Setting up permissions
mkdir tmp public/plugin_assets #in case of the dirs doesn’t exists
sudo chown -R redmine:redmine files log tmp public/plugin_assets # change redmine:redmine if you create a diferent user
sudo chmod -R 755 files log tmp public/plugin_assets

step 16 check redmine installation
ruby script/server webrick -e production
open in your browser :3000
login is admin pass is admin too

step 17 enable mod_cgi in apache
check in /etc/httpd/conf/httpd.conf if exist the line
LoadModule cgi_module modules/mod_cgi.so

step 18 create public/dispatch.cgi file
mv public/dispatch.cgi.example public/dispatch.cgi
edit the first line
from
#!/usr/bin/env ruby
to
#!/usr/bin/ruby

step 19 grant execution rights
chmod 755 public/dispatch.cgi

step 20 grant apache permissions
chown -R apache:apache files log tmp vendor

step 21 set production state in file config/environment.rb
uncoment the line ENV[‘RAILS_ENV’] ||= ‘production’

step 22 configure passenger
passenger-install-apache2-module and follow instructions

if you get an error check this http://stackoverflow.com/questions/5585583/problem-in-installing-passenger
In fact, just need to edit the ” /usr/lib/ruby/gems/1.8/gems/passenger-3.0.6/lib/phusion_passenger/platform_info/apache.rb” file, and replace “test_exe_outdir” with “tmpexedir”.

step 23 Enable cgi in SeLinux
setsebool -P httpd_enable_cgi 1

step 24 add virtual host in apache config file
ServerName redmine..com
ServerAdmin webmaster@.com
DocumentRoot /live/redmine/public/
ErrorLog logs/redmine_error_log
Options Indexes ExecCGI FollowSymLinks
Order allow,deny
Allow from all
AllowOverride all

Step 25: close 3000 port editing /etc/sysconfig/iptables file

-A INPUT -m state –state NEW -m tcp -p tcp –dport 3000 -j ACCEPT

Step 26: reboot or restart services

Redmine Working

Laboratory III

¿ Qué comandos serían necesarios ejecutar para que un sistema Linux pudiese sustituir el encaminador R2 mostrado en el diagrama ? Asume todos aquellos datos que necesites para realizar el ejercicio (nombre de interfaces, gateway, etc)

Network Diagram
Click for larger view

Previous Steps

Enable IP Forwarding

Temporal:

echo 1 > /proc/sys/net/ipv4/ip_forward

Permanent:

vim /etc/sysctl.conf

changue the value of  net.ipv4.ip_forward = 1

sysctl -p /etc/sysctl.conf # enable  changues

Configuring network intefaces

Temporal:

ifconfig eth0 down

ifconfig eth0 10.10.0.2 netmask 255.255.255.0 up
ifconfig eth1 down

ifconfig eth1 200.3.107.1 netmask 255.255.255.0 up

Persistent:

on debian: edit /etc/network/interfaces like this

auto lo

iface lo inet loopback

iface eth0 inet static
address 10.10.0.2
netmask 255.255.255.0

iface eth1 inet static
address 200.3.107.1
netmask 255.255.255.0

red hat and derivates: edit /etc/sysconfig/network-scripts/ifcfg-<interface name>

Device eth0 file /etc/sysconfig/network-scripts/ifcfg-eth0

DEVICE=”eth0″
IPADDR=10.10.0.2
METMASK=255.255.255.0
NETWORK=10.10.0.0
BROADCAST=10.0.0.255
ONBOOT=yes
BOOTPROTO=none
USERCTL=no

Device eth1 file /etc/sysconfig/network-scripts/ifcfg-eth1

DEVICE=”eth1″

IPADDR=200.3.107.1
METMASK=255.255.255.0
NETWORK=200.3.107.0
BROADCAST=200.3.107.255
ONBOOT=yes
BOOTPROTO=none
USERCTL=no

Option 1: Using Static Routing

temporal:

#from network 2 to network 3 assumed not necessary

#from network 3 to network 2 assumed not necessary

#from network 3 to network 1

ip route add 192.168.0.0/24 via 10.0.0.1 dev eth0

persistent:

on Debian

edit /etc/network/interfaces

write this at after the interfaces setup

up route add 192.168.0.0/24 via 10.0.0.1 dev eth0

on Fedora

edit /etc/sysconfig/network-scripts/route-<device>

GATEWAY0=10.0.0.1
NETMASK0= 255.255.255.0
ADDRESS0=192.168.0.0

if you want to add more routes increment the numbers next to GATEWAY, for example: GATEWAY1=10.0.0.2 NETMASK1= 255.255.255.0 ADDRESS1=192.168.30.0

Pros

  • No extra processing and added resources as in the case of dynamic routing protocols
  • No extra bandwidth requirement caused by the transmission of excessive packets for the routing table update process
  • Extra security by manually admitting or rejecting routing to certain networks

Cons

  • Network Administrators need to know the complete network topology very well in order to configure routes correctly
  • Topology changes need manual adjustment to all routers something which is very time consuming

Option 2: Using NAT

Basically NAT works like static routing but changes the output ip maintaining a internal

temporal:

# delete old configuration, if any
#Flush all the rules in filter and nat tables
iptables –flush
iptables –table nat –flush

# delete all chains that are not in default filter and nat table, if any
iptables –delete-chain
iptables –table nat –delete-chain

# Set up IP FORWARDing and Masquerading (NAT)
iptables –table nat –append POSTROUTING –out-interface eth0 -j MASQUERADE
iptables –append FORWARD –in-interface eth1 -j ACCEPT

permanent:

store the rules into the ip tables into a rules set

Pros

same that static plus

It also benefits in a security sense as attackants can’t target a computer directly, they have to first get past the router.

Cons

  • Network Address Translation does not allow a true end-to-end connectivity that is required by some real time applications. A number of real-time applications require the creation of a logical tunnel to exchange the data packets quickly in real-time. It requires a fast and seamless connectivity devoid of any intermediaries such as a proxy server that tends to complicate and slow down the communications process.
  • NAT creates complications in the functioning of Tunneling protocols. Any communication that is routed through a Proxy server tends to be comparatively slow and prone to disruptions. Certain critical applications offer no room for such inadequacies. Examples include telemedicine and teleconferencing. Such applications find the process of network address translation as a bottleneck in the communication network creating avoidable distortions in the end-to-end connectivity.
  • NAT acts as a redundant channel in the online communication over the Internet. The twin reasons for the widespread popularity and subsequent adoption of the network address translation process were a shortage of IPv4 address space and the security concerns. Both these issues have been fully addressed in the IPv6 protocol. As the IPv6 slowly replaces the IPv4 protocol, the network address translation process will become redundant and useless while consuming the scarce network resources for providing services that will be no longer required over the IPv6 networks.

Option 3: Using RIP

Rip is a distance routing protocol, is more flexible that using static routers and necessary if the number of subnets grows. Do you want to fight against hundred of rules? or assume the risk of downtime’s created by a router malfunction?

install zebra

permanent:

edit the /etc/zebra/ripd.conf file

redistribute connected

version 2

ip rip authentication string “max 16 characters”

router rip
network 10.10.0.0/24
network 200.3.107.200/24

pros

  • Easy to configure and use
  • V2 supports VLSM and CIDR

cons

  • Converges slowly on large networks
  • Doesn’t recognize bandwidth of links
  • Doesn’t support multiple paths for the same route
  • Routing updates can require significant bandwidth because the entire routing table is sent
  • Prone to routing loops

Option 4: Using OSPF (Open Shortest Path First)

OSPF is a routing protocol that uses the Dijkstra algorithm for get the quickest way. into a set of subnets where the routers are connected at different speeds could work better than R.I.P.

install zebra

add the necessary VTY in  /etc/services

zebrasrv        2600/tcp             # zebra service
zebra           2601/tcp              # zebra vty
ospfd           2604/tcp              # OSPFd vty
ospf6d          2606/tcp              # OSPF6d vty

edit zebra.conf file

hostname R2
password zebra
enable password z3bRa
log file /var/log/zebra/zebra.log
!
interface eth0
description Network 2
ip address 10.10.0.2/24
!
interface eth1
description Network 3
ip address 200.3.107.1/24

start zebra service

/usr/sbin/zebra –dk
/usr/sbin/ospfd –d

Telnet to port 2604 on the local machine to begin the OSPF configuration and type enable in order to get privileged mode

the next step will be announce the networks that we want  to publicity  in out networks

R2:~# telnet 0 2604
Trying 0.0.0.0…
Connected to 0.
Escape character is ‘^]’.

Hello, this is zebra (version 0.84b)
Copyright 1996-2000 Kunihiro Ishiguro

User Access Verification

ospfd> enable
Password:
ospfd# configure terminal
ospfd(config)# router ospf
ospfd(config-router)# network 10.10.0.0/24 area 0
ospfd(config-router)# passive-interface eth0

ospfd(config-router)# network 200.3.107.0/24 area 0
ospfd(config-router)# passive-interface eth1
ospfd(config-router)# end
ospfd# write file
Configuration saved to /etc/zebra/ospfd.conf

pros

  • Scalability – OSPF is specifically designed to operate with larger networks.
  • Full subnetting support – OSPF can fully support subnetting
  • Hello packets – OSPF uses small hello packets to verify link operation with out transferring large tables
  • TOS routing – OSPF can route packets by different criterion based on their type of service field
  • Tagged routes – Routes can be tagged with arbitrary values, easing interoperation.

cons

  • very intensive processor
  • maintaining multiple copies of routing information, increasing the amount of memory needed
  • OSPF can be logically segmented by using areasnot as easy to learn as some other protocols
  • if an entire network is running OSPF, and one link within it is “bouncing” every few seconds, then OSPF updates would dominate the network by informing every other router every time the link changed state.

sources:

http://www.techrepublic.com/article/use-zebra-to-set-up-a-linux-bgpospf-router/1047843

http://www.trainsignaltraining.com/ip-addressing-routing-default-static-routing

http://ipv6.com/articles/nat/NAT-Pros-and-Cons.htm

www.techrepublic.com/i/tr/one_offs/t063_preview.pdf

http://gotechsf.wordpress.com/2009/09/05/the-pros-and-cons-of-ospf-and-eigrp/

http://ipsit.bu.edu/sc546/sc441Spring2003/ospf/proscons.html

Keysigning Fosdem quick howto

step 1: Install gnugp

debian: apt-get install gnupg

fedora: yum install gnupg

step2: create your key

gpg --gen-key

you’ll have to answer several questions:

kind and key size that do you want: defaults appears to be good enough.

how long the key will be valid : your decision mine never expires.

your name and surname (Use your real name Do you trust in a person called Bart Simpson or Zero Trust?)

your email address

comment: optional

A passphrase: Don’t forget, if you lost your passphrase your encripted data will useless .

Trick: Open a flash video or run a virtual machine for create entropy .

gpg generated key

step 3: Generate a revoke key

changue mykey for your key fingerprint last characters

gpg –output revoke.asc –gen-revoke mykeyfingerprint

step 4: Export public and private keys

exporting private key

gpg –output private.gpg –export-secret-key mykeyfingerprint

exporting public key

gpg –output public.gpg –export mykeyfingerprint

step 5: Backup tour keys

Store your keys into a Floppy disk, usb memory, CD, or wherever, you can print your keys for security.

step 6: Send your public key to fosdem server

the instructions appear in the fosdem site http://fosdem.org and check the public key uploaded

step 7: Print the keys list

a few days before the fosdem start will appear a document to print. (https://ksp.fosdem.org/files/ksp-fosdem2011.txt)

trick try to print the document in the minor number of pages.

step 8: Keysinging Event

Stay at time.

Wear warm clothing.

if you come later  try to find your position asking the key numbers to the participants try to Maintain the order easy for you easy for everyone

keysinging positions

fosdem 2011 keysigning

step 9; Import keys

After the Fosdem you’ll receive several emails signing your public key,  you must import the public keys.

Download the key hashes from https://ksp.fosdem.org/files/ksp-fosdem2011-keyring.asc.bz2

how?

wget –no-check-certificate https://ksp.fosdem.org/files/ksp-fosdem2011-keyring.asc.bz2

bunzip  ksp-fosdem2011-keyring.asc.bz2

gpg –import ksp-fosdem2011-keyring.asc

now your have all the public keys in your ring

step 10: parse fosdem keys

pass your paper maks to a new copy of  the txt keys file

I create this perl script in order to get the key hashes to sing

fosdemparse.pl

unzip and execute

./fosdemparse.pl <path to your file>

this script show the key hashes to

step 11: configure your sSMTP

CAFF sends the sing keys using your system mail transfer agent (MTA), nowadays using your ISP ip address is a warranty  of appears in the receiver  spam box

install sSMTP

on debian: apt-get install ssmtp

on fedora:

yum install ssmtp

(select ssmtp)

alternatives –config mta

configure sSMTP : https://wiki.archlinux.org/index.php/SSMTP

step 12: configure CAFF

install caff

on debian: apt-get install signing-party

on fedora: yum install pgp-tools

now we’ll configure caff

first we’ll execute caff

caff

this creates a config file named .caffrc in your home folder.

edit .caffrc file

gedit $HOME/.caffrc

complete the config file reading the instructions.

final step: send the keys

simply execute caff and paste your fosdemparse.pl output.

enjoy writing your password several times.

Instalando Adobe Flash Player en Fedora 13 64bits

  • Abrir la terminal
  • Descargar Adobe Flash Player
    wget
  • Descomprimir el Reproductor
    tar -xzvf libflashplayer-10.0.45.2.linux-x86_64.so.tar.gz
  • Mover la librería a la carpeta de plugins de Firefox
    mv libflashplayer.so ~/.mozilla/plugins/
  • Reiniciar el Firefox y entrar en youtube para ver un video
  • Eliminar el archivo descargado
    rm libflashplayer-10.0.45.2.linux-x86_64.so.tar.gz

De Nuevo Online

Pues al final no era un ataque lo que tiro mi blog el lunes, simplemente fue que el antiguo servidor dijo Basta y  se murió

no esta mal para una placa base con 10 añitos de vida y una vida ejerciendo de servidor intermitentemente

para los amantes de la potencia el servidor estaba compuesto por:

  • Una placa base Via Epia (descripción técnica ) con un procesador C3 a 800mhz
  • 192MB de Sdram a PC133
  • Un disco duro Maxtor DiamondMax Plus 9 160GB ATA/133
  • y una instalación de Gentoo linux porque el Via C3 cuenta con todas las instrucciones de un i686 menos la Cmov por lo que me vi obligado a bajar los fuentes de todo y compilar

La defunción del Via C3 estaba programada para veranito pero desgraciadamente opto por el suicidio antes de una jubilación, hace unas horas he llegado a casa,reiniciado el pc, reseteado la bios peroel servidor no arrancaba.  -Hombre precavido vale por dos y había adelantado la compra de un nuevo servidor asi que solo a sido recuperar los datos y poner todo en marcha.

Para los interesados no tenia copia de seguridad de la base de datos y me vi obligado a recuperar los datos del disco duro.

El proceso es fácil,

  1. trasladar el disco duro a un adaptador USB, el kernel de la Gentoo estaba demasiado tuneado para que arrancara en otro sitio que no fuera una Via EPIA,
  2. Conectar el disco duro a otro ordenador (Ordenador B) y copiar las carpetas del directorio data de mysql al escritorio el directorio lo podéis obtener pasandole una mirada al  archivo “/etc/my.cnf“.
  3. Cada base de datos que teníamos en el antiguo servidor debería tener un directorio con tres archivos para cada tabla el .frm (estructura de la tabla), .MYD (datos de la tabla) y MYI (indices de la tabla).
  4. Obtener una copia de seguridad antigua de la base de datos y restaurarla en el servidor del ordenador (si no tenéis copia de seguridad crear tablas con 1 campo para generar los archivos frm,MYD,MYI de cada tabla).
  5. Detener el servidor MySQL.
  6. Sobreescribir el directorio de la base de datos nuestro servidor MySQL con los archivos  de la base de datos  del viejo servidor.
  7. Arranca el servidor MySQL.
  8. Cruzar los dedos.
  9. Comprobar que la restauración ha sido correcta.
  10. Ejecutar el comando mysqlcheck y esperar que repare y optimice todo (manual mysqlcheck).

yo tuve suerte y recupere la base de datos.

Asi que larga vida al nuevo servidor

New Web serverPara los mismos amantes de la potencia es un Intel Atom D510 de doble núcleo con 4GB de RAM ejecutando Centos 5.5 X86_64 (no me da el money para una Red Hat Enterprise superserver chachi guai).

Espero que  aguante unos cuanto añitos 🙂